2020.11.20
First Digital Painting: What You Need to Know! What’s possible because of digital coloring and finishing)
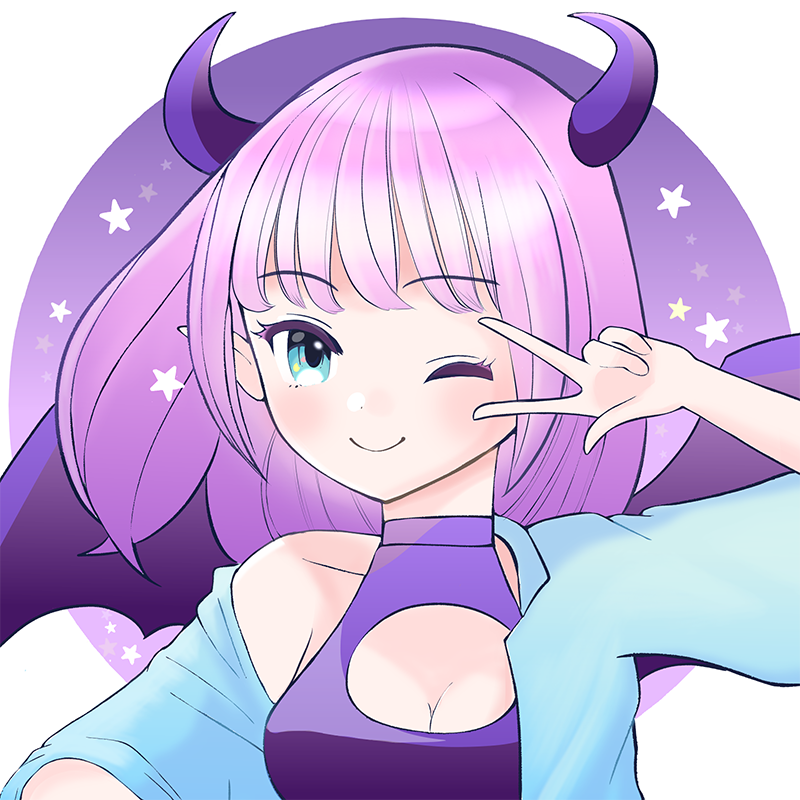
I want to start drawing digital illustrations now! If this is the case, it’s a good idea to know what the differences are between digital and analog first.
Both digital and analog have their own strengths and weaknesses.
What digital is good at is being able to draw illustrations more easily and smoothly with convenient features.
You can draw the parts that take longer in analog in a faster time.
However, no matter how useful a function is, if you don’t know it or how to use it, it’s a waste of time.
So, in the last article, we introduced the making of this illustration as well as the useful functions of digital “What you can do because of digital”.
In this article, we’d like to look at the making of the illustration and what you can do with digital technology.

What I’m going to show you here are very basic features, so I recommend it to both those who have been drawing analog illustrations and those who are new to drawing!
If you’re thinking of using Mediban Paint in the future, please check it out.
※The previous article can be found here.
▶︎First Digital Painting: What You Need to Know! What’s possible because of digital (rough and line drawings)
1. Paint the color
Last time I was able to draw even the line drawing here.

So now we will start painting the colors.
The procedure for coloring is different for each person, so I hope you can see this as an example.
(1) Put down the basic color.
The first step is to roughly put down the basic colors and look at the balance of colors.

【What you can do digitally: 1.You can paint it all at once】
If you want to apply a large area at once, you can use the bucket tool to apply it all at once.
You can work even faster if you adjust the brush settings, such as “Extended” and “Gap Binding” to make it easier to apply.
▶︎Let’s master the bucket tool! How to avoid gaps and bleeding
2. Adjust the color
It doesn’t feel right somehow, so I’ll change the color of the area that I’m interested in.
【What you can do digitally: 2.You can easily change the color of any area you want】
In digital illustrations, you can easily change the color after you’ve finished painting.
There are two ways to change the color: change it on each layer, or change it by selecting it in a selection.
<Changing Per Layer>
If you paint colors on separate layers for each part of your hair, clothing, skin, etc., you can change the color at once when you want to change the color later.
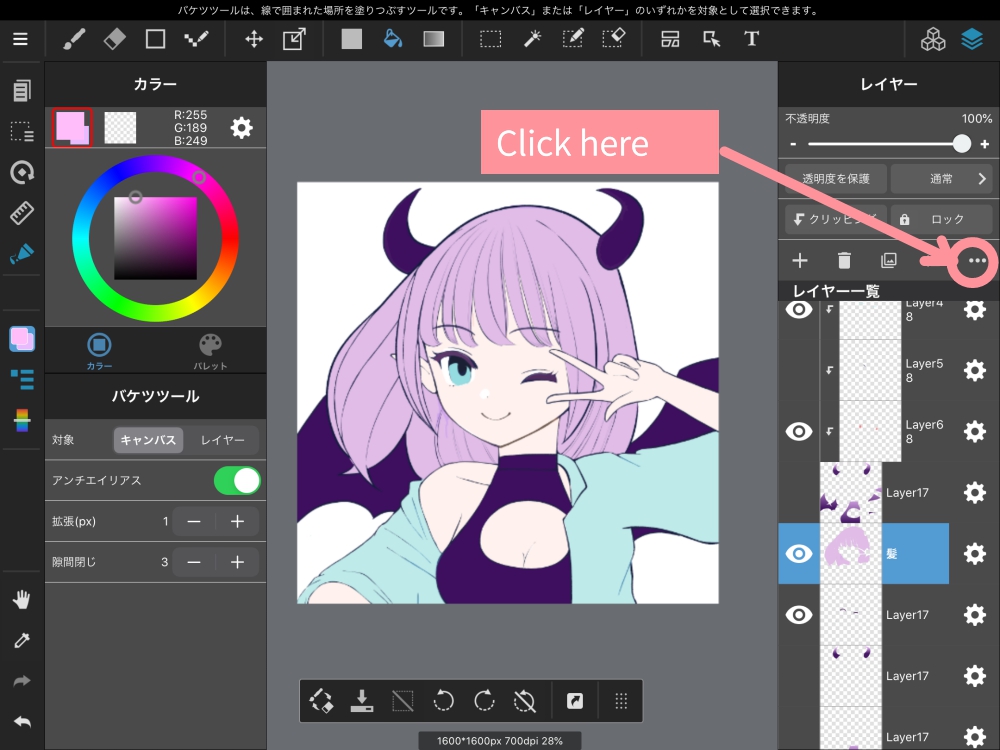
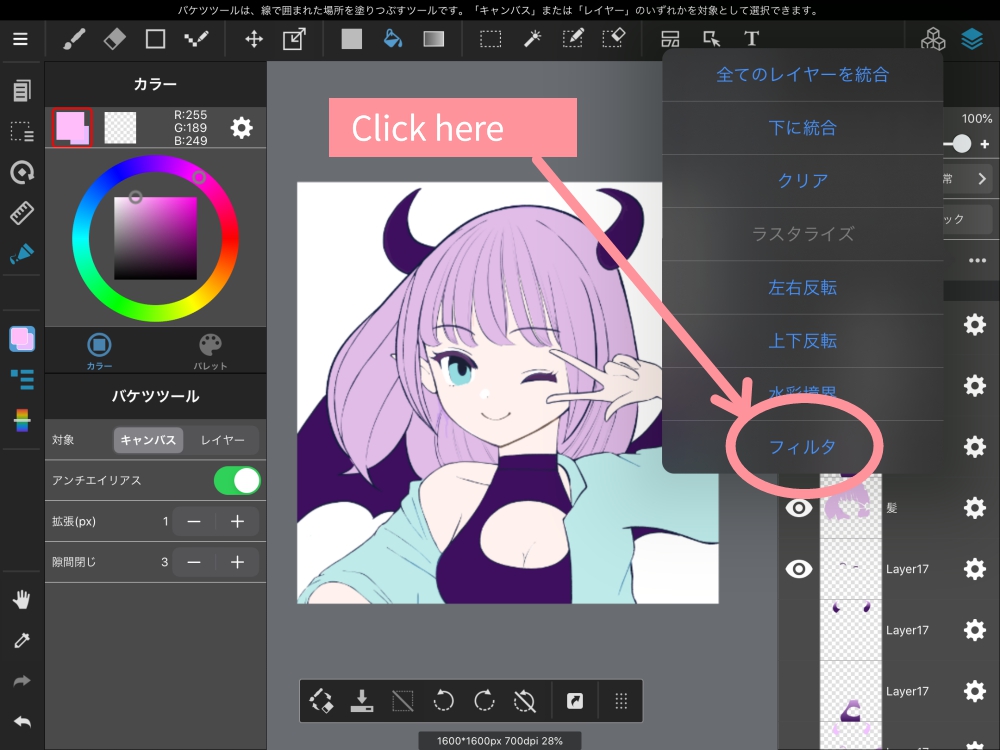
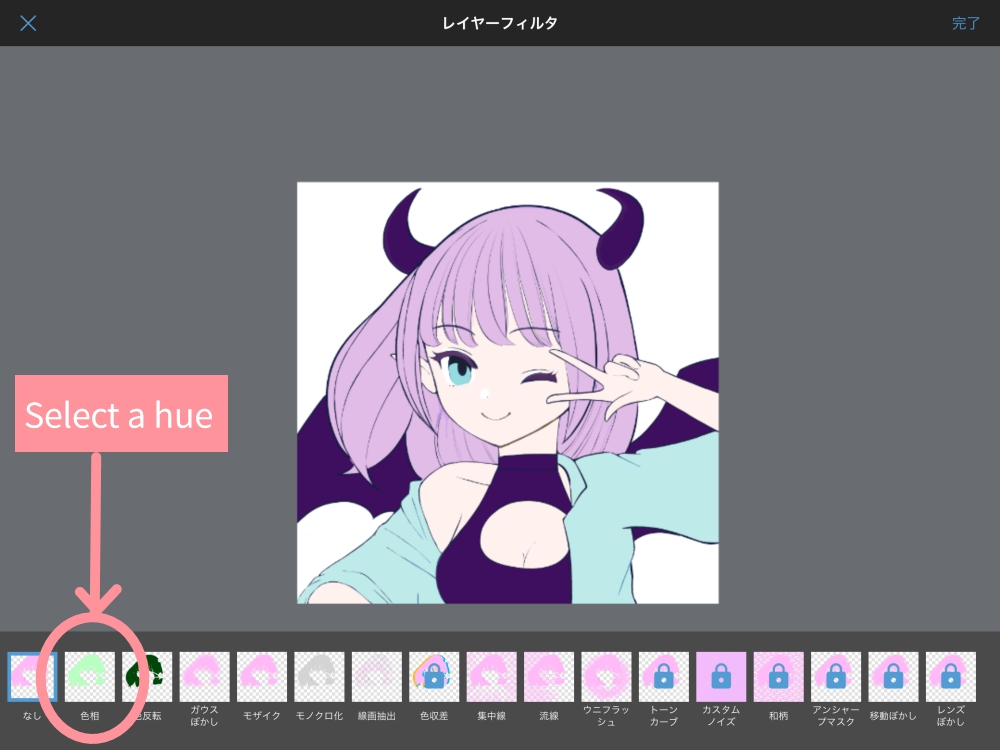
For example, if you want to change the color of this hair, you can easily change the color by choosing Filter > Hue.
Select the layer you want to change the color of and choose a hue from the filter.
【PC】Select “Hue” from “Filter” in the toolbar
【ipad】Press the “….” button in the upper right corner of the Layers palette and select Filter > Hue.
Another way to change the color of a layer that uses only one color is to change it to an 8-bit layer.
An 8-bit layer is a layer that represents the layer with only a certain color and opacity.
With this layer, you can easily change colors.
This color change method is also useful when you want to change the color of a line drawing.
Please refer to this article for detailed instructions on how to change the color of the line art using an 8-bit layer.
▶︎Easily change the color of your line art with 8bit layers
<Pick a selection and change it>
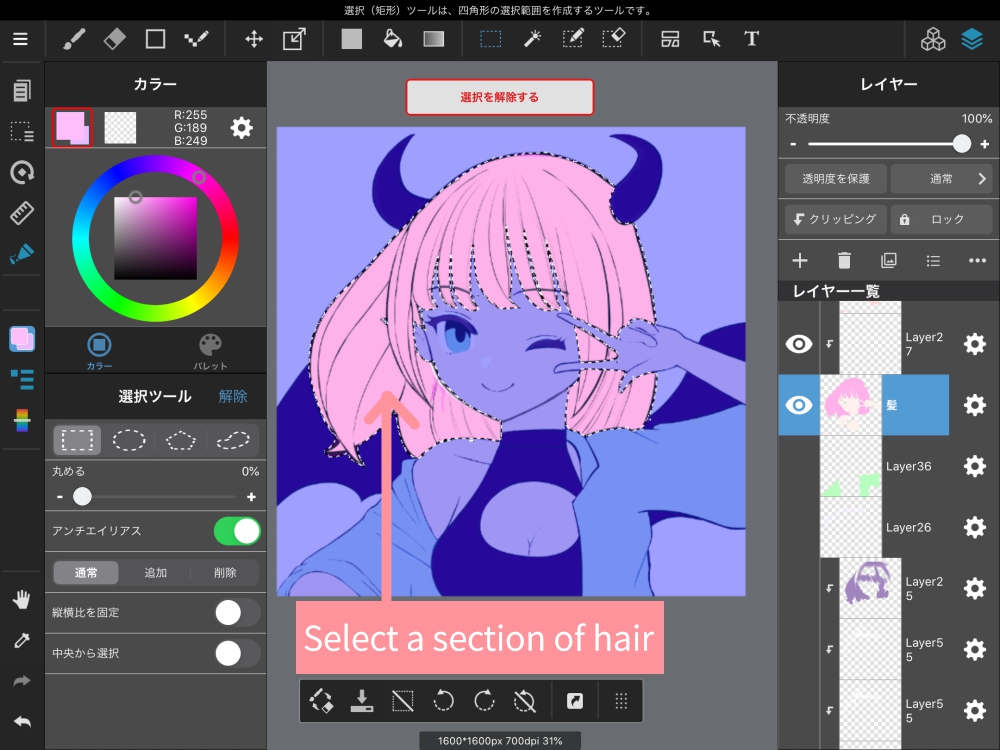
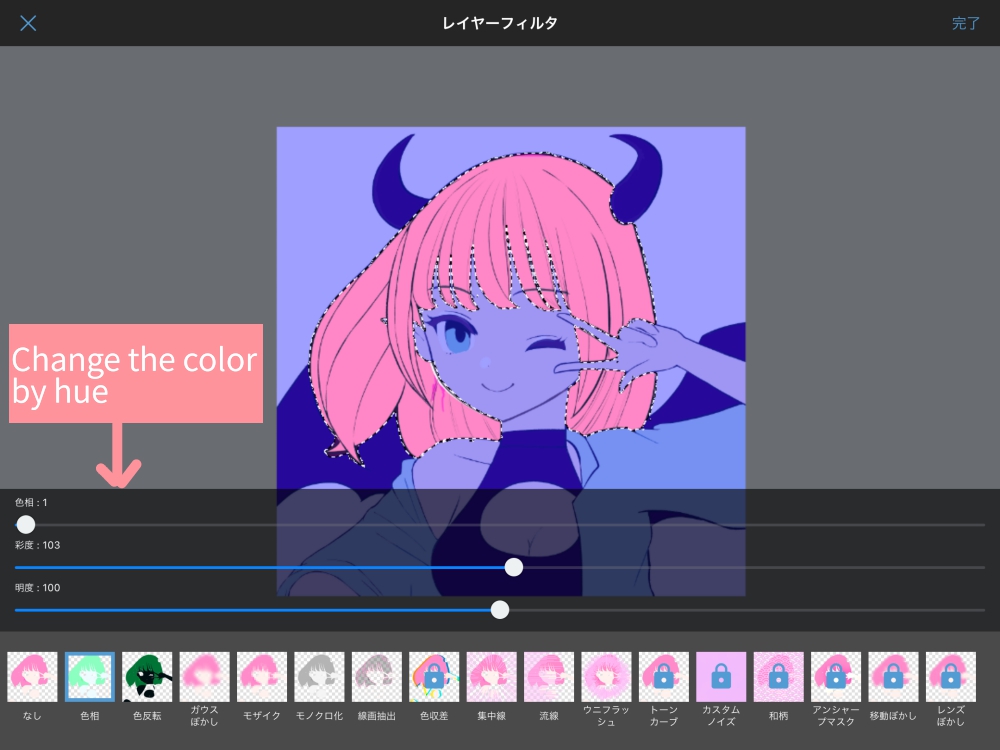
If you want to change the color of only one part of a layer, use a selection to specify the area you want to change.
①Selecting the area to be changed in the selection
②Change the color by Filter > Hue

3. Add shadows and highlights
Once you’ve decided on a general color, you can create a new layer and add shadows and highlights.
【What you can do digitally: 3.You can apply it without it sticking out easily】
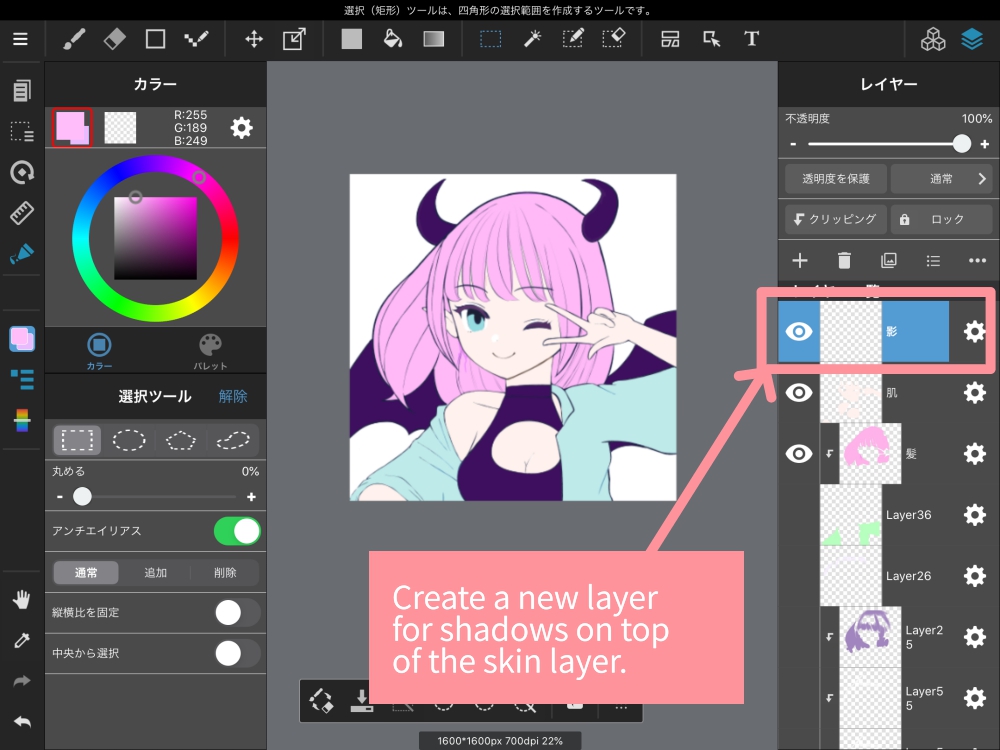
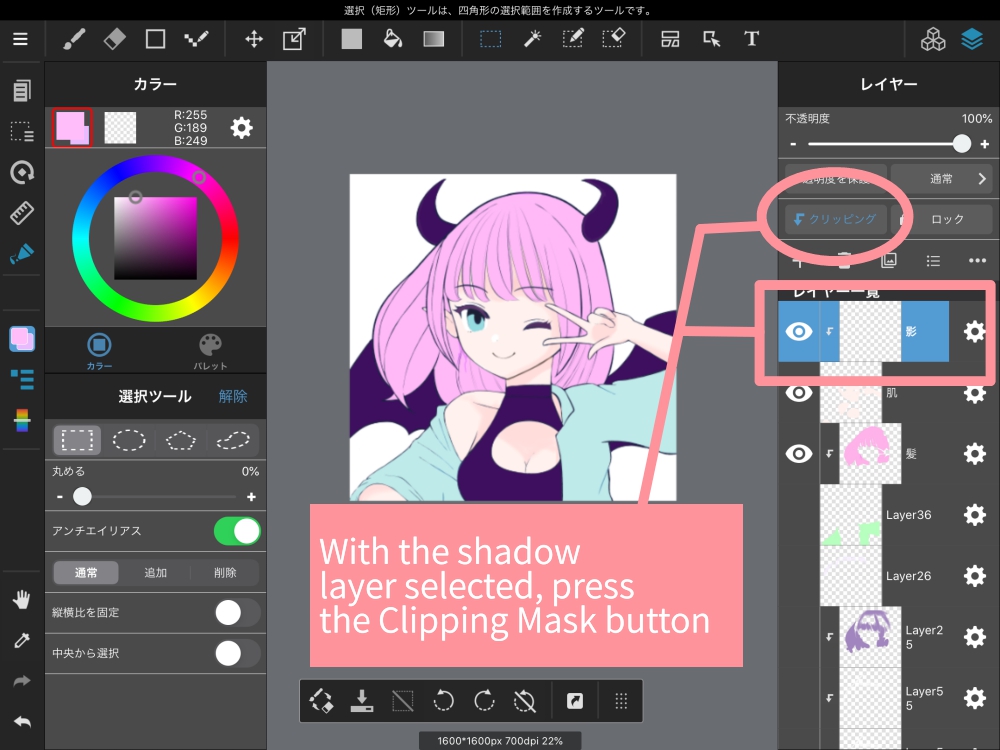
When you want to fill in shadows and highlights without having them run over the underlying color, we recommend the “Clipping Mask” feature.
Clipping mask is perfect for when you want to paint on an area other than the selected area (the area where you have painted the color) on the bottom layer without having the color run out of the selected area.
①Create a new layer over the area you want to paint
②With a new layer selected, press “Clipping Mask”
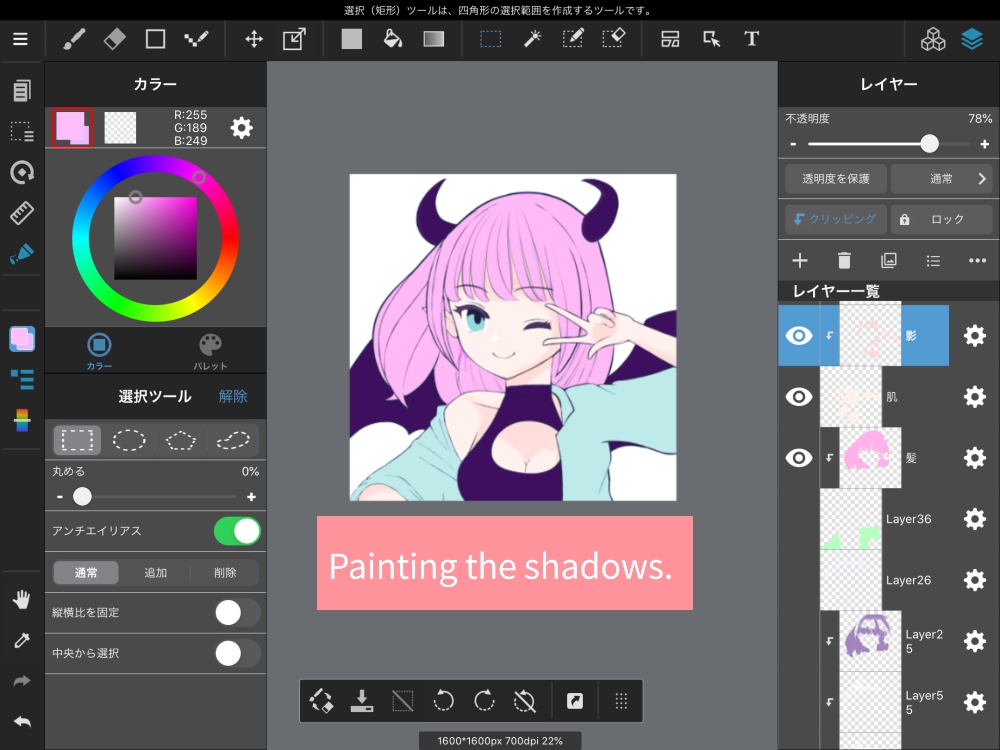
③Paint a shadow
Clipping Mask ON
Clipping Mask OFF
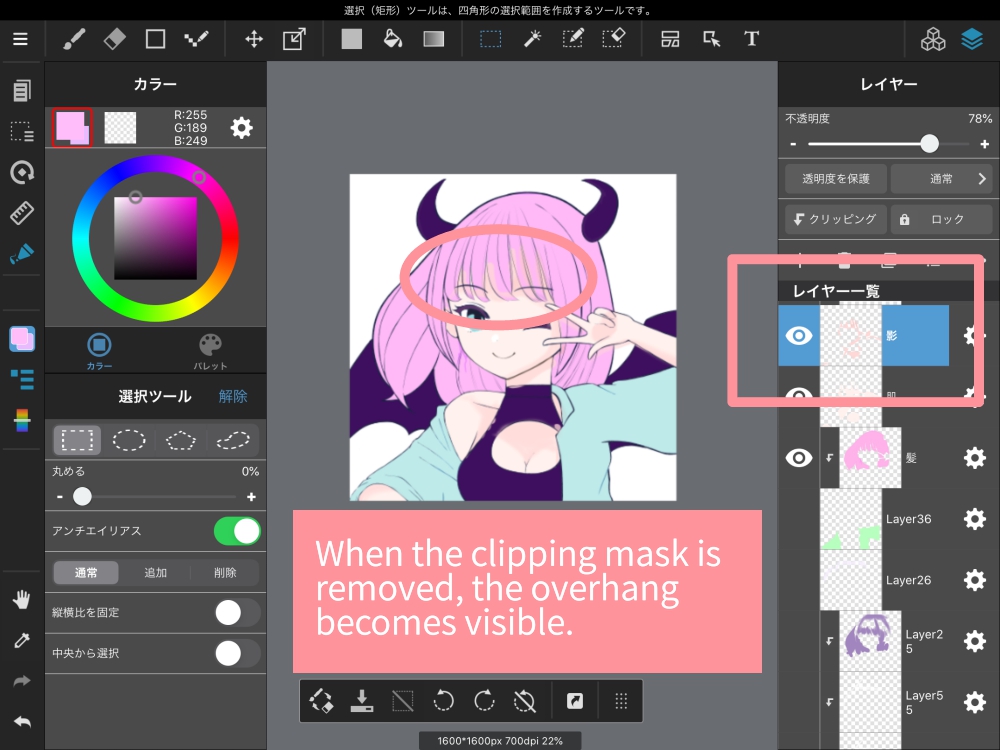
When you apply a clipping mask, you won’t be able to see anything beyond the colored portion of the bottom layer.
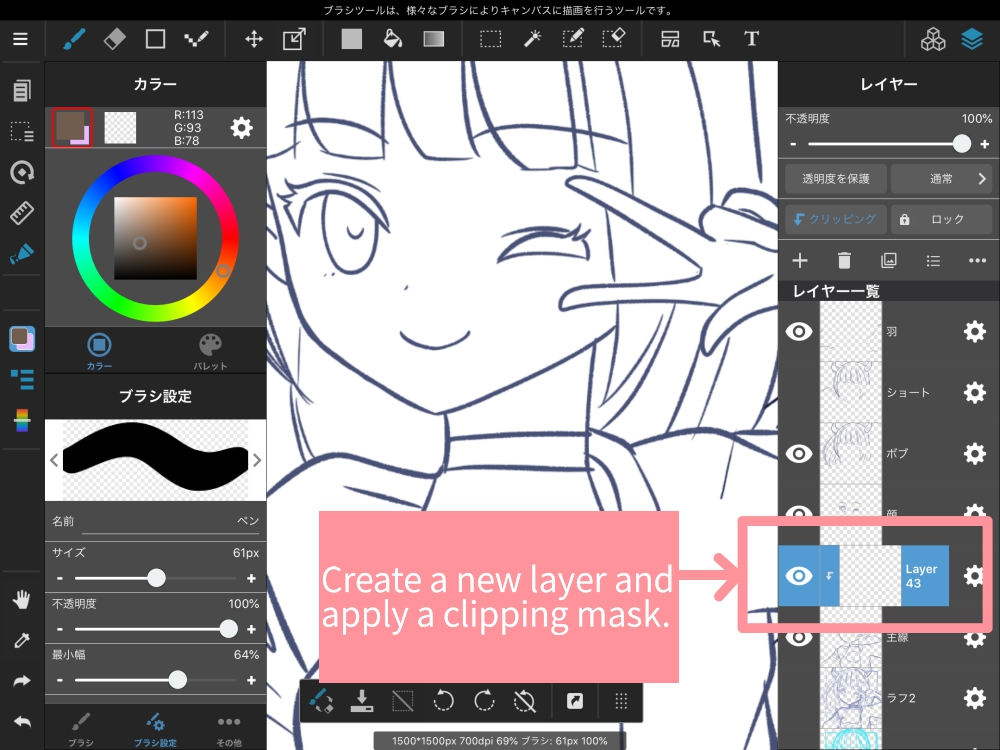
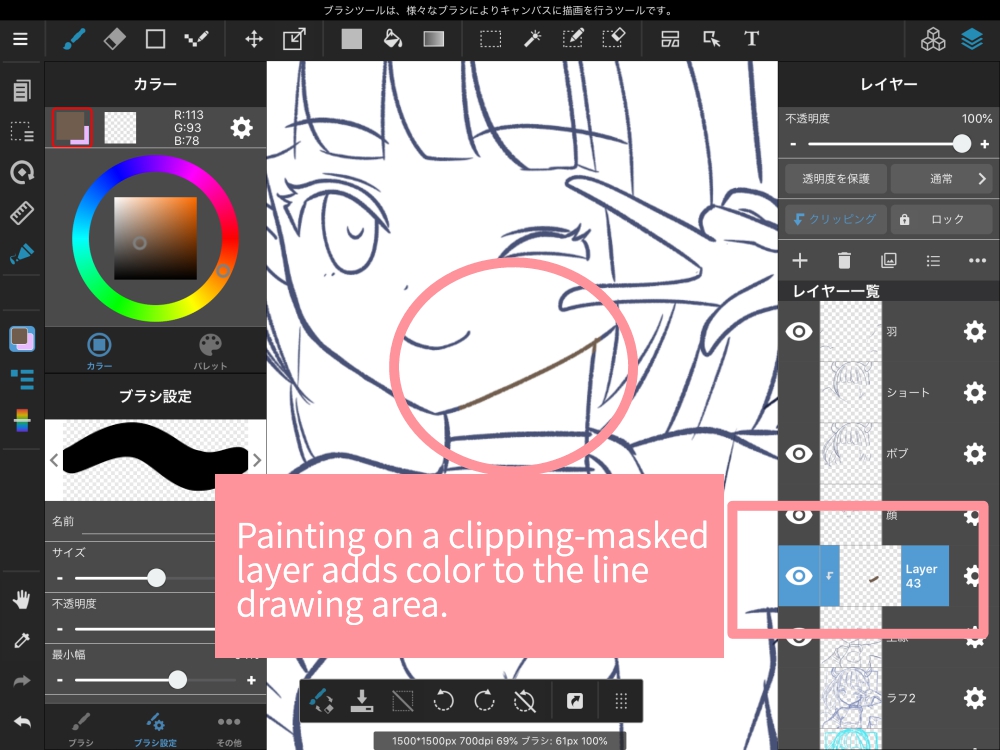
Using this function, you can change the color in a part of the line drawing to blend in with the illustration.
①Create a new layer on top of the line art and apply a clipping mask
②Paint only where you want to change the color
4.finishing touches

Now that the colors are painted in one way, I’d like to start finishing them.
◆Add a sparkle to your eyes
First, we want to add some sparkle to the eyes, so we’ll use a layered blend to add some light.
【What you can do digitally: 4.Layer blends to add light】
One feature that is unique to digital is the ability to add light to an illustration.
This feature can be used in a variety of ways, such as sunlight, sunlight through the trees, stars, traditional light, hair bathed in light, etc., but in this case I’m going to use it for the glow in the eyes.
①Paint the color where you want the light to come in
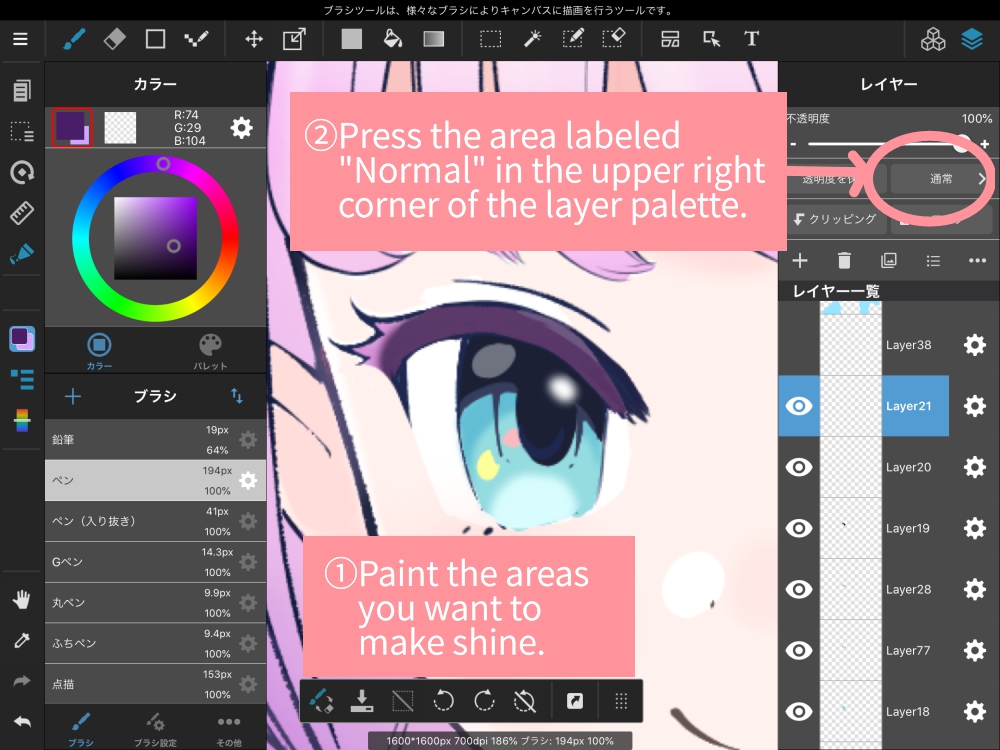
②Select Layer Blend > “Add”
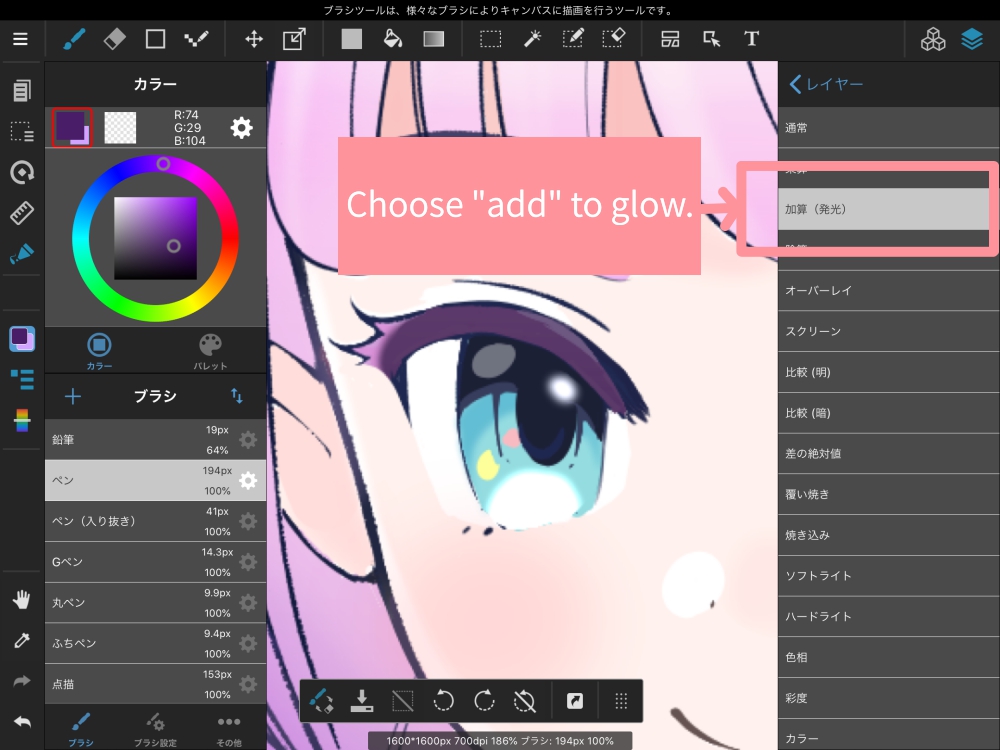
The added light has made my eyes look a little more glamorous.
◆Add a gradient
Now we’re going to change things up by adding gradients to the feathers and clothes.
【What you can do digitally: 5.It’s easy to create a gradient】
Gradients are a technique that can be used in both digital and analog.
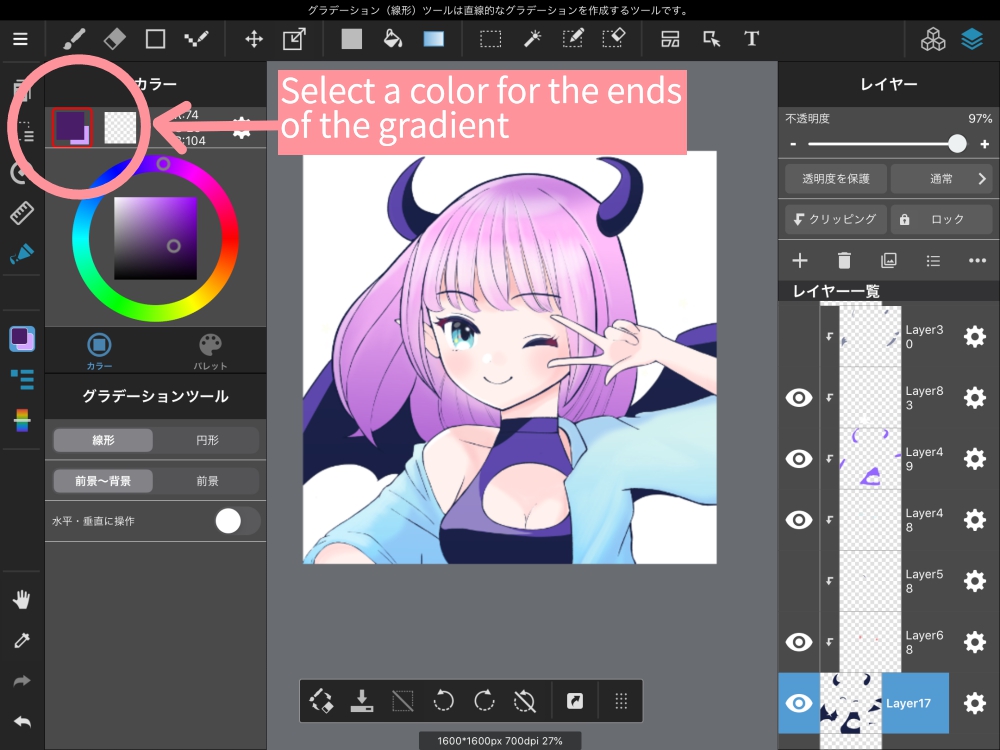
Digitally, you can create a gradient by simply selecting and dragging the color that will be the ends of the gradient.
①Decide on the color that will be the ends of the gradient
②Drag it onto the area you want to paint
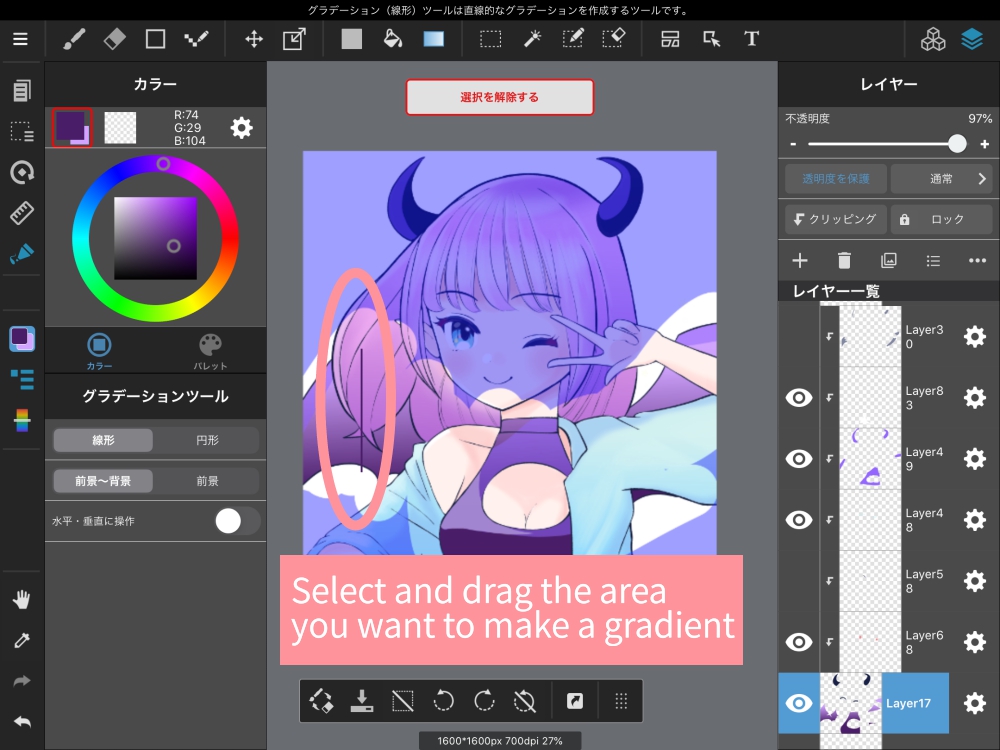

※If you want to add a gradient to only one part of the image, use Selection or Protect Transparency to specify the area you want to paint.
In this case, I used the Selection to apply the gradient only to the feathers and the clothes.
After this, we will apply the gradient to the horn as well.
▶︎One point technique you can use to finish off your hair with the gradient tool
Adjust the other parts of the image, draw the background, and you’re done.

5. Summary
What did you think?
When you draw an illustration digitally, you can draw it more smoothly if you know the useful functions and how to use them.
There are many useful functions in addition to the basic functions introduced in this article, so you can try them out little by little to find your favorite features and expressions.
(Pictures & Text by sakaki)
\ We are accepting requests for articles on how to use /

