2021.02.03
How to draw birds 1) [Let’s draw familiar birds].

Birds are relatively easy to see in the city, such as sparrows that crow in the morning with their cute appearance, crows that look good at sunset, and pigeons that coexist with people at train stations and parks.
The familiar birds we see in our daily lives are not only cute, but can also be used as motifs to represent time, such as “morning with sparrows” or “crows flying in front of the sunset.
In this article, I will show you how to draw such familiar birds.
1. The skeleton of a bird
When drawing a bird, the first thing to do is to check what the skeleton looks like.
By doing so, you can get some idea of the body’s construction and range of motion.
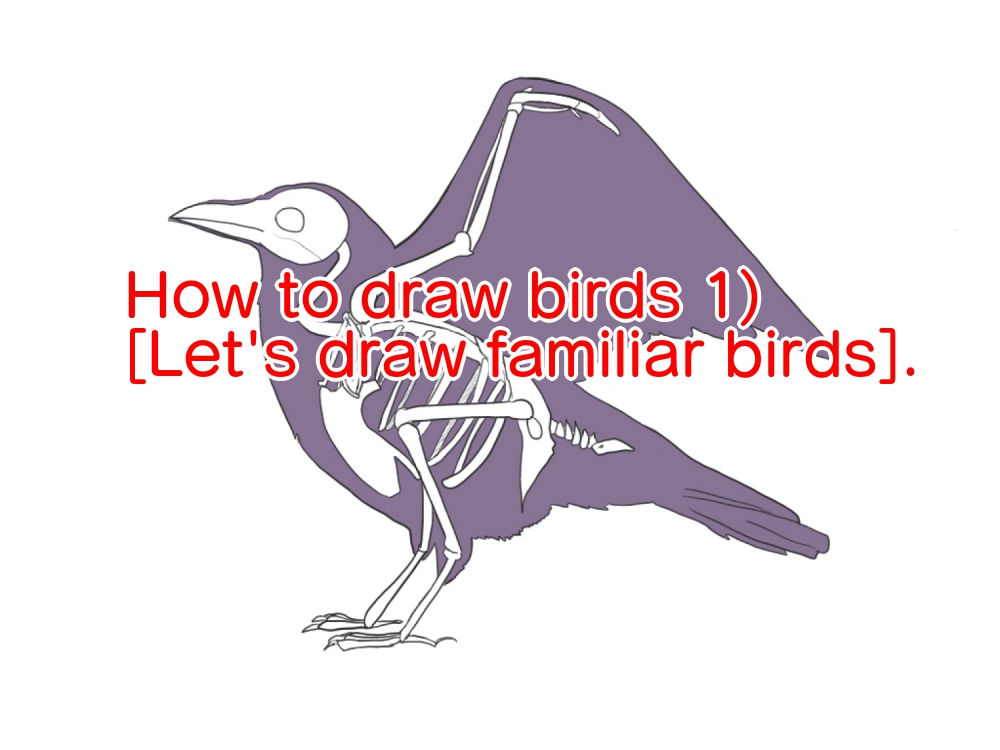
For reference, let’s look at the skeleton of a crow, which is often seen in the city.

[Wing].
The arm part is in the shape of a V. The wrist part is connected to the arm part by tendons.
The neck.
The bones of the neck are stored in a long curve, which allows the neck to be squeezed and stretched to some extent if necessary.
Feet
Most of them are buried in feathers up to around the ankles, and the feathers disappear from a little above the ankles.
The number of fingers varies depending on the type of bird, but crows and sparrows have four.
Body
The bones of the body are generally rounded.
The bones of the torso are generally round, so it is best to draw ovals and semicircles when drawing the bite.
The basic structure is the same for all other birds, but please check the skeleton of the bird you want to draw.
2. How to draw the bite
When drawing a bird, it may be easier to divide it into five parts: head, neck, body, legs, wings, and tail.
In this example, I used circles to roughly determine the position and size of the parts to be drawn, and then drew the skeleton to determine the details.

3. How to draw the wings
One of the most confusing parts of drawing a bird is the wings.
Once you learn the structure of the wing, you can easily apply it by deforming it or changing its direction.
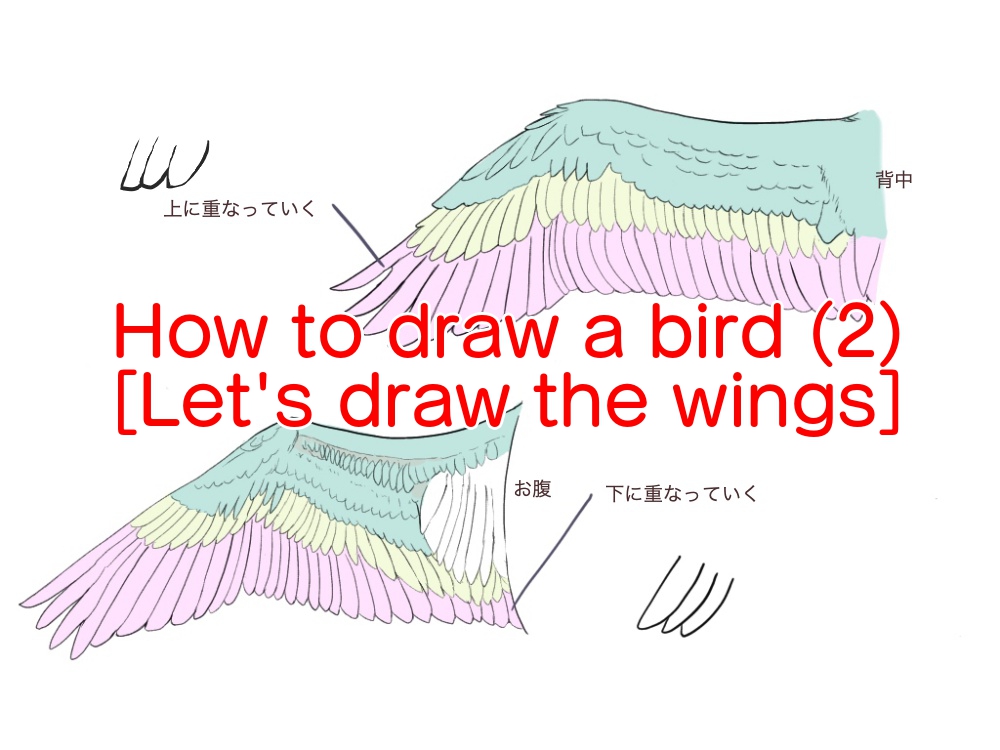
For more detailed information on the structure of the wings, please refer to “How to draw a bird (2) [Let’s draw the wings]”, and here I would like to briefly introduce the main points. (Coming soon)

The skeleton of the wing resembles a human hand, so a human hand in the same condition is drawn in the bottom row.
When a bird is perched on a tree, it usually folds its wings and holds them close to its body.
If you know how this works, you will be less likely to get confused about the pattern and how the wings overlap.
Basically, when the wings are folded, the arms are close together and the wrists are bent, as shown in the illustration.
As you pull your arms in, the feathers will come together and overlap.
The long outermost feathers stick out from underneath the arms and are visible.
4. How to draw familiar birds
Here we will introduce how to draw sparrows and crows, which are often seen in the city.
Please check out the characteristics of each.
◆ Sparrows
The sparrow has a short neck and an overall cylindrical silhouette.
When drawing the bite, it may be easier to draw the body as a half circle or oval and the head as a regular circle or rounded oval.

The lower part of the eye has a black pattern towards the beak.
The beak gets darker and darker as the animal grows from a young age to an adult.

Feather patterns may look complicated at first glance, but if you have a rough idea of what colors are on the wings, it will be easier to draw.
When drawing large deformations, it is a good idea to keep in mind the light brown, dark brown, and white lines.
Also, sparrows in winter have a lot of hair and become fluffy and fluffy, and are called “fluffy sparrows”.
When you draw sparrows in winter, try to express their plumpness and loveliness.
◆Crows
Crows are relatively sharp compared to sparrows.
For this reason, it is recommended to draw the bite of the body as a slightly elongated oval or semicircle, and the bite from the head to the neck as a slightly elongated oval.
The beak is long, with a gentle curve on the upper beak.
The tail is also relatively long, but the long wind feathers allow the wings to cover nearly the tip of the tail when folded.

When drawing a crow, it is easy to get confused by the fact that it is all black, so it is easy to assimilate the lines and eyes.
If you use the same black color for all the lines and fill, you won’t be able to see the eyes and lines and won’t be able to tell what’s what.
Therefore, it is recommended to create variations in black by adjusting the brightness and saturation or adding color to make the lines and fill different.
In the illustration above, purple and navy are used in the bright areas to create more color variations.
\ We are accepting requests for articles on how to use /


