2023.06.01
[For beginners] This is actually a crucial part! Review the techniques for drawing noses!
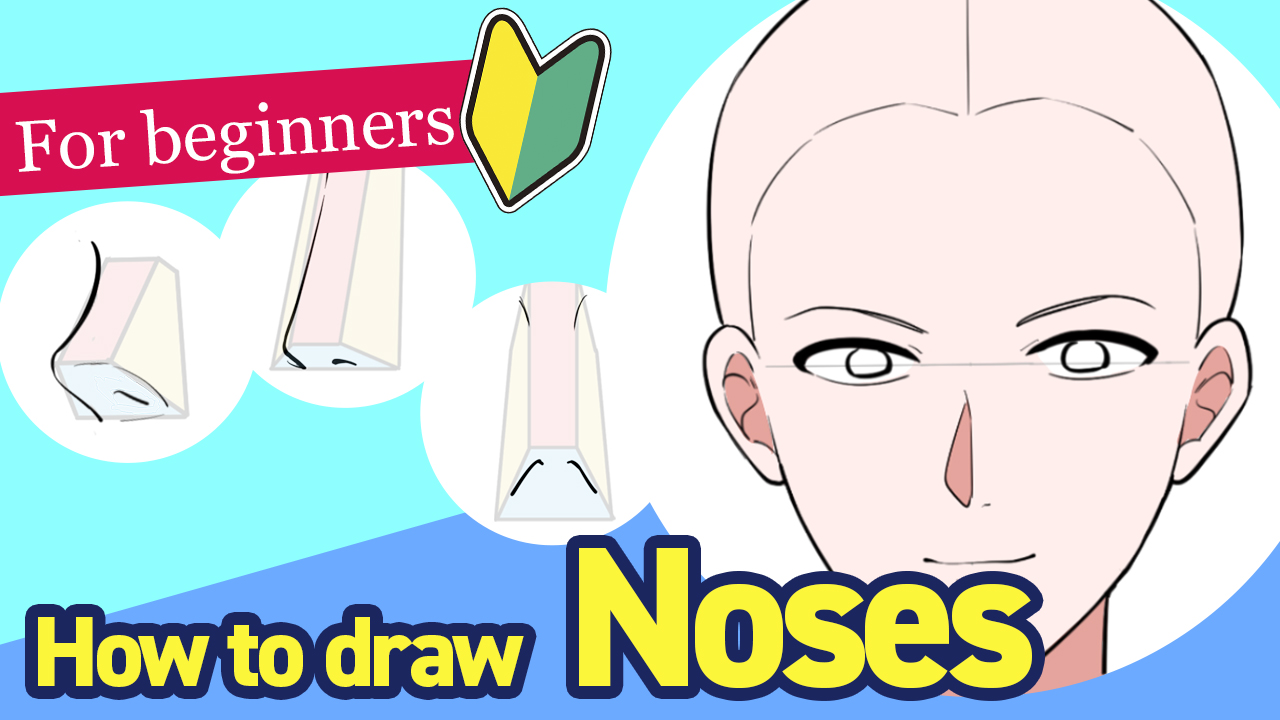
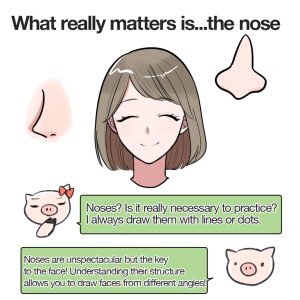
If you are to practice drawing faces, what part of the face would you like to draw first?
I think many of you would like to draw the eyes or the outline of the face.
In fact, there is another part that is just as important as these two. The noses.
I know there are quite a few beginner illustrators who think, “Now I can draw faces to a certain extent, but there still seems to be something missing…” or “I don’t know what noses look like when they’re at angles other than the front”.
At first glance, noses look unspectacular, but they are so important to the quality of the whole face.
Learn their structure to improve your illustration skills!
What is the structure of the nose?
Have you ever thought about the structure of the human nose?
Some of you might think: “I only draw simplified noses. I don’t need to study noses in real life!” But even if you only draw simplified noses, the quality of your work will change profoundly if you understand the structure of noses in reality!
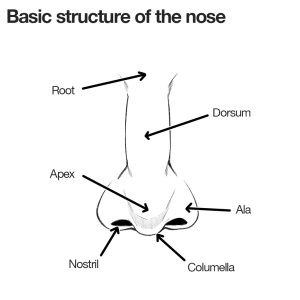
This is the basic structure of the nose.
Each area has a different name, but you don’t need to remember them all.
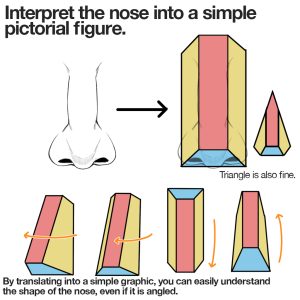
Divide the real nose into 4 simple parts and create a pictorial figure.
- Upper side of the nose (ridge of the nose)
- Sides of the nose (left and right)
- Bottom of the nose (hole of the nose)
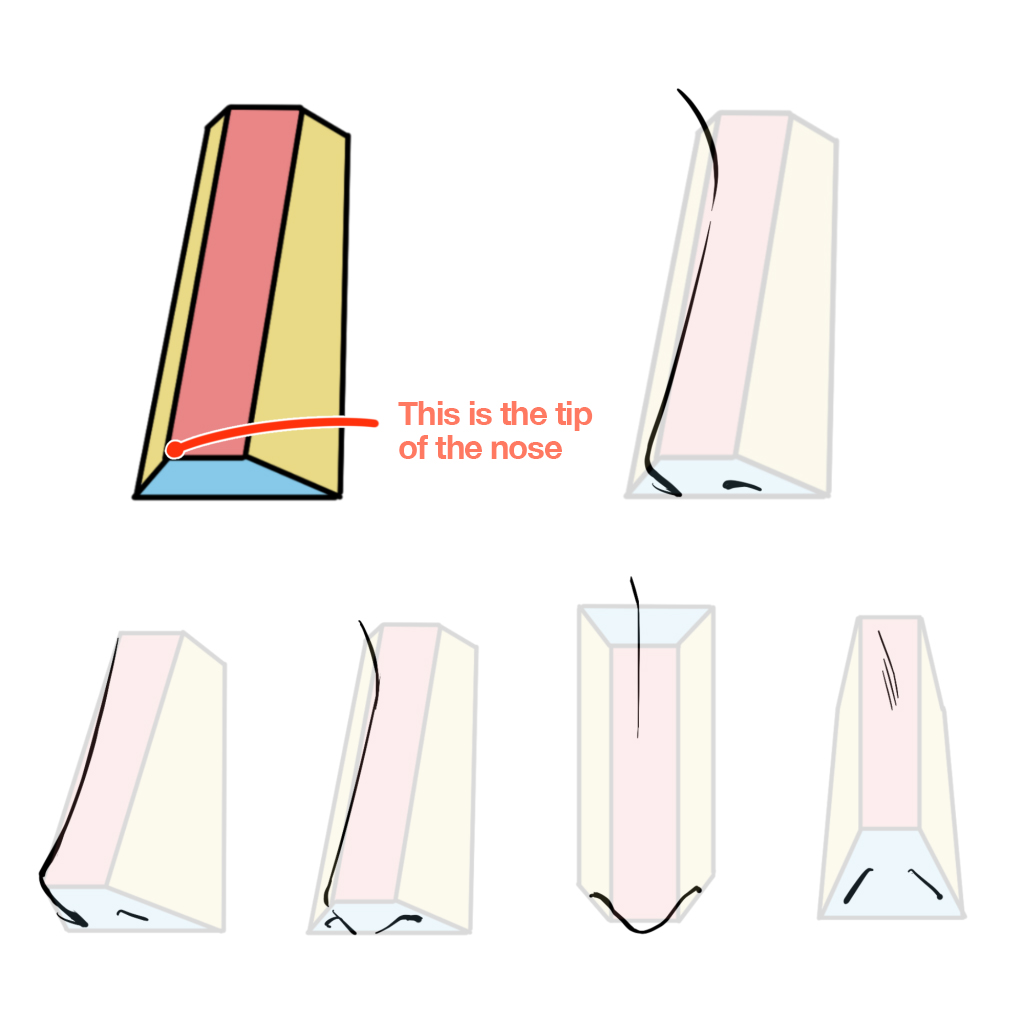
The image above shows what it looks like when familiar distorted noses are incorporated into the figure.
Using this figure as a guide, you can draw sophisticated noses even when the face is angled.
The common mistake made by beginners is that “the angle of the face and the angle of the nose are not the same”.
If you can only draw the nose at one angle, draw the nose using a guide with figures, even if it’s bothersome. This will increase the range of angles you can draw.
I would like to draw it using abbreviated points.
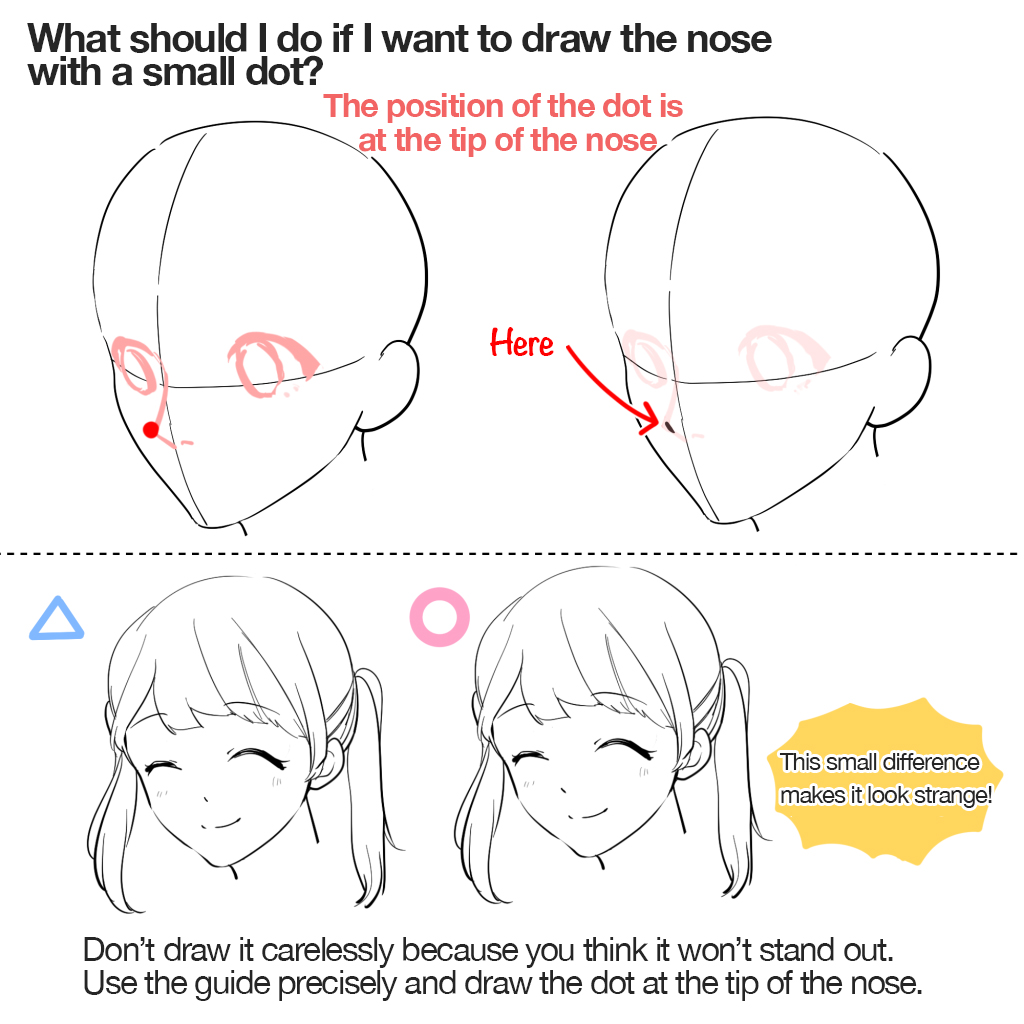
Not a few people abbreviate the nose with a dot when drawing girls or children.
Can you guess which part of the nose the dot represents?
That is the tip of the nose. See above what it looks like when the dot is incorporated into the previous figure guide.
There is a huge difference between placing the dot with no clear intention and with a definite focus of “this is the tip of the nose”. Even if it’s tedious, I encourage you to draw a guide in the form of a figure or a cross-line to confirm the position of the nose before you draw the dot.
Let me tell you how to draw the nose at each angle.
Front face
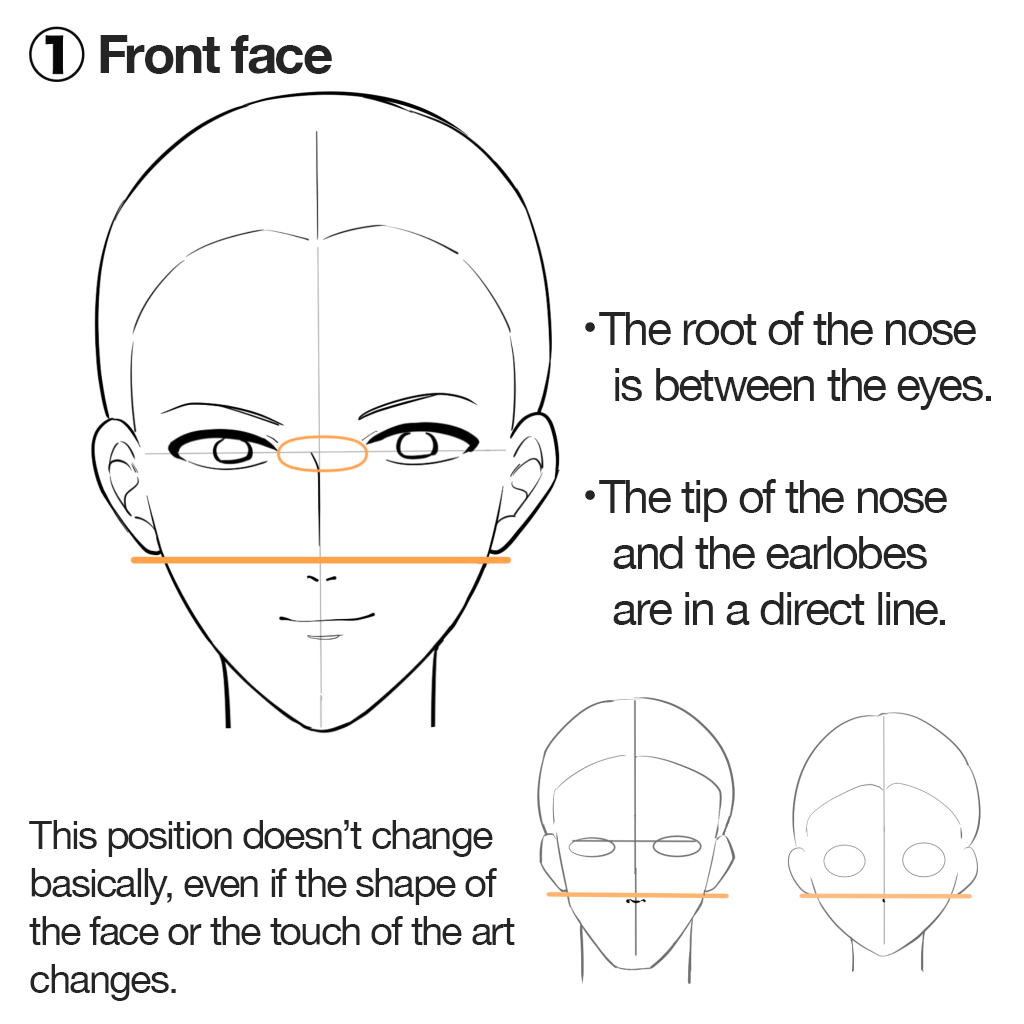
Start with the front face.
Incorporate the previous figure into the front face.
The root of the nose is located between the eyes, and the tip of the nose is in a straight line with the earlobes.
The common mistake is not to have the nose tip in a direct line with the earlobes.
Aside from characters with big noses, remember this earlobe line to draw noses in a stable proportion.
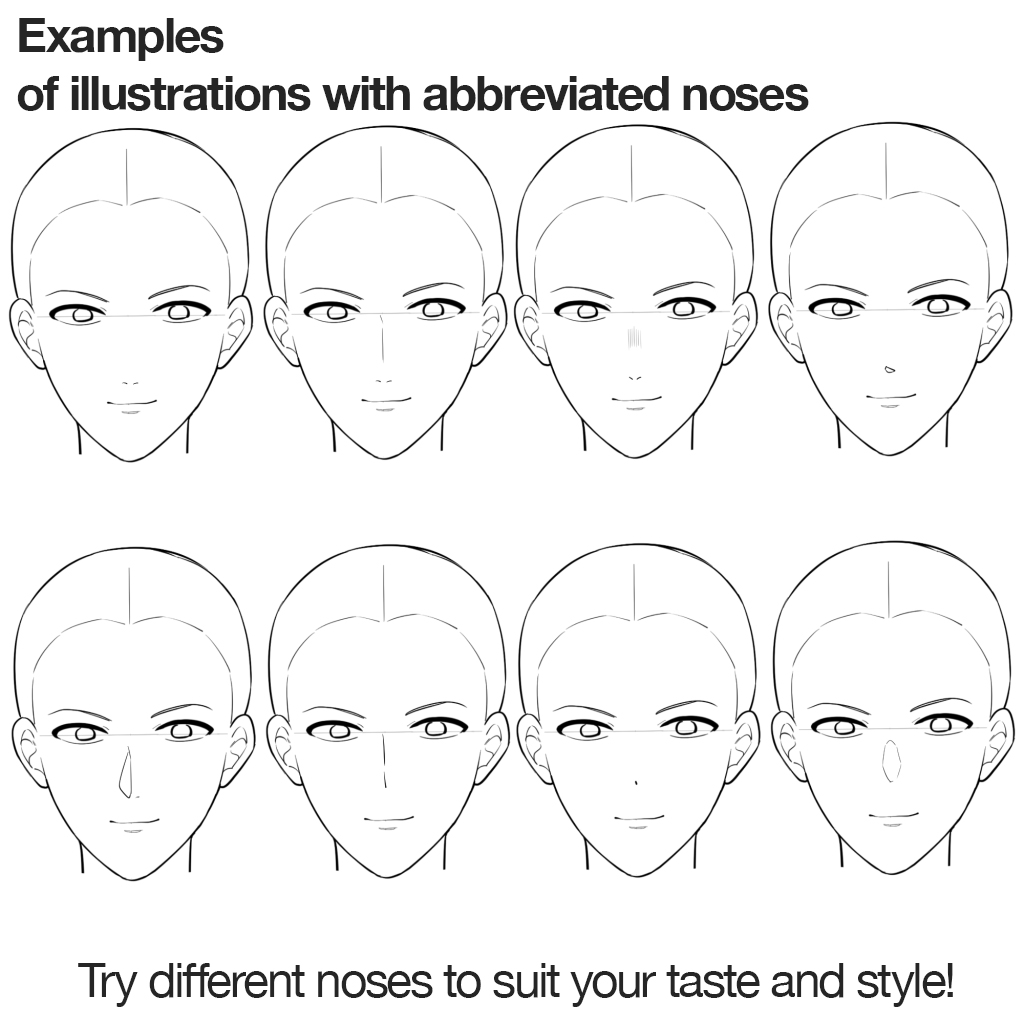
Here are the abbreviated noses you usually see with the front face.
There are different ways of abbreviating, depending on the art style: Draw/not draw the nose ridge, draw only the holes, draw only the dot, draw shadows of the bottom… Try to find the style you think is suitable for your purpose. You can also study the style of artists you admire.
Again, when drawing simplified noses, it is important to have a deep understanding of “what is this line describing?”.
No matter how you draw noses, try to imagine the actual nose, or create a guide to drawing it. You will not improve your art by drawing out of sheer habit.
Front face looking upwards
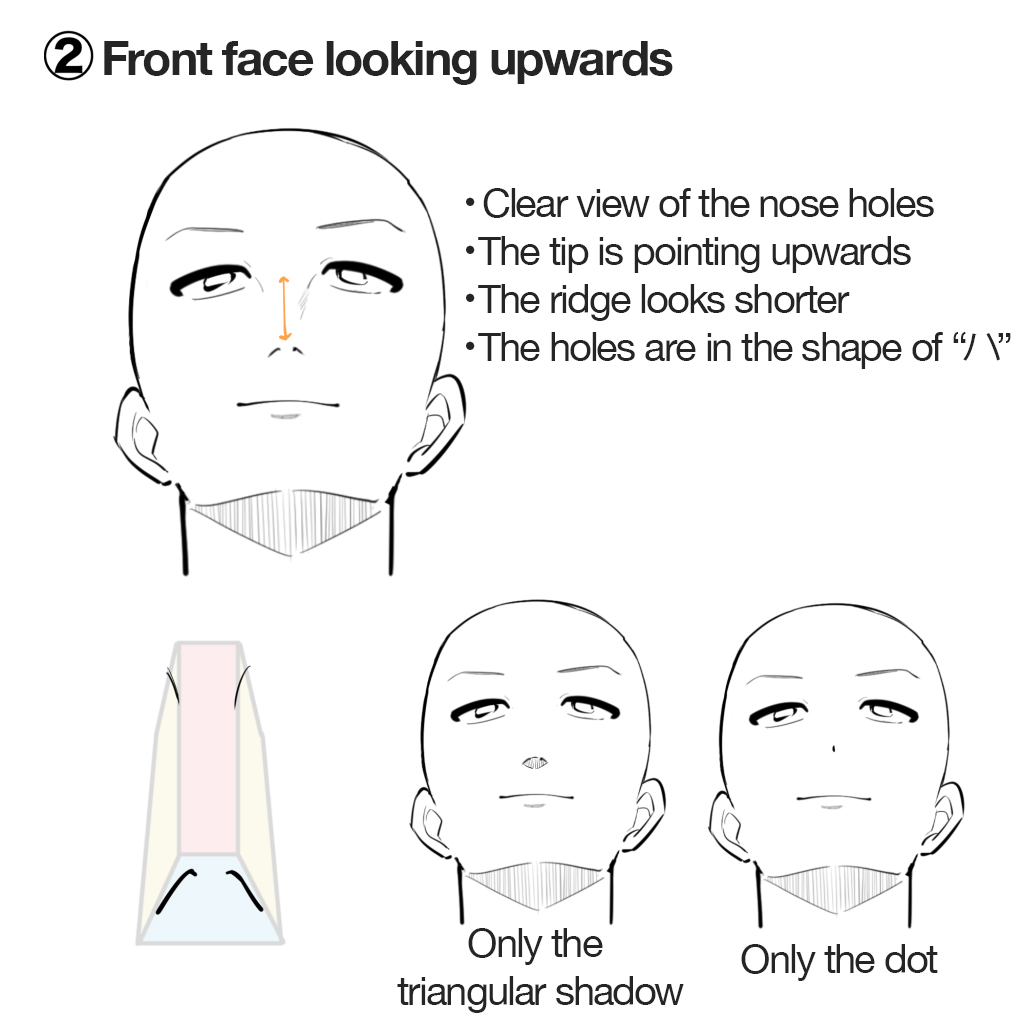
Once you are able to draw the front face, try drawing faces at angles.
Start with the face looking up. Things to remember are the following:
- The nose holes are clearly visible
- The tip of the nose points upwards
- The ridge of the nose is slightly shorter and looks as if it is pressed flat
The shape of the nose holes is like the Japanese character “ハ”.
Front face looking downwards
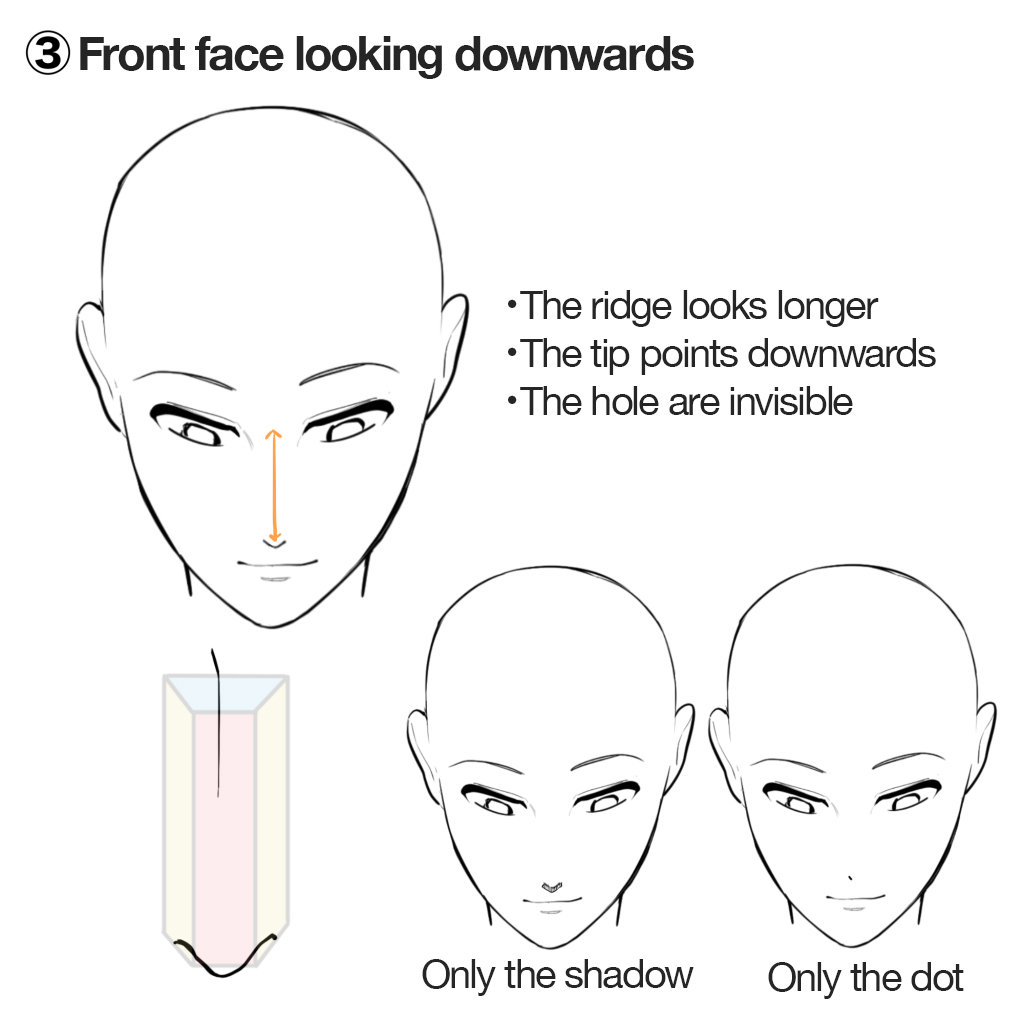
Things to remember for the face looking down are the following:
- The nose holes are invisible
- The shape of the tip of the nose looks sharp
- The ridge of the nose is longer and closer to the mouth
There are many mistakes, where the face is looking down, but the nose angle is the same as the front face and the holes are clearly visible.
Remember that the nose holes are not visible when looking down. Make sure the nose also points downwards.
Face looking diagonally sideways
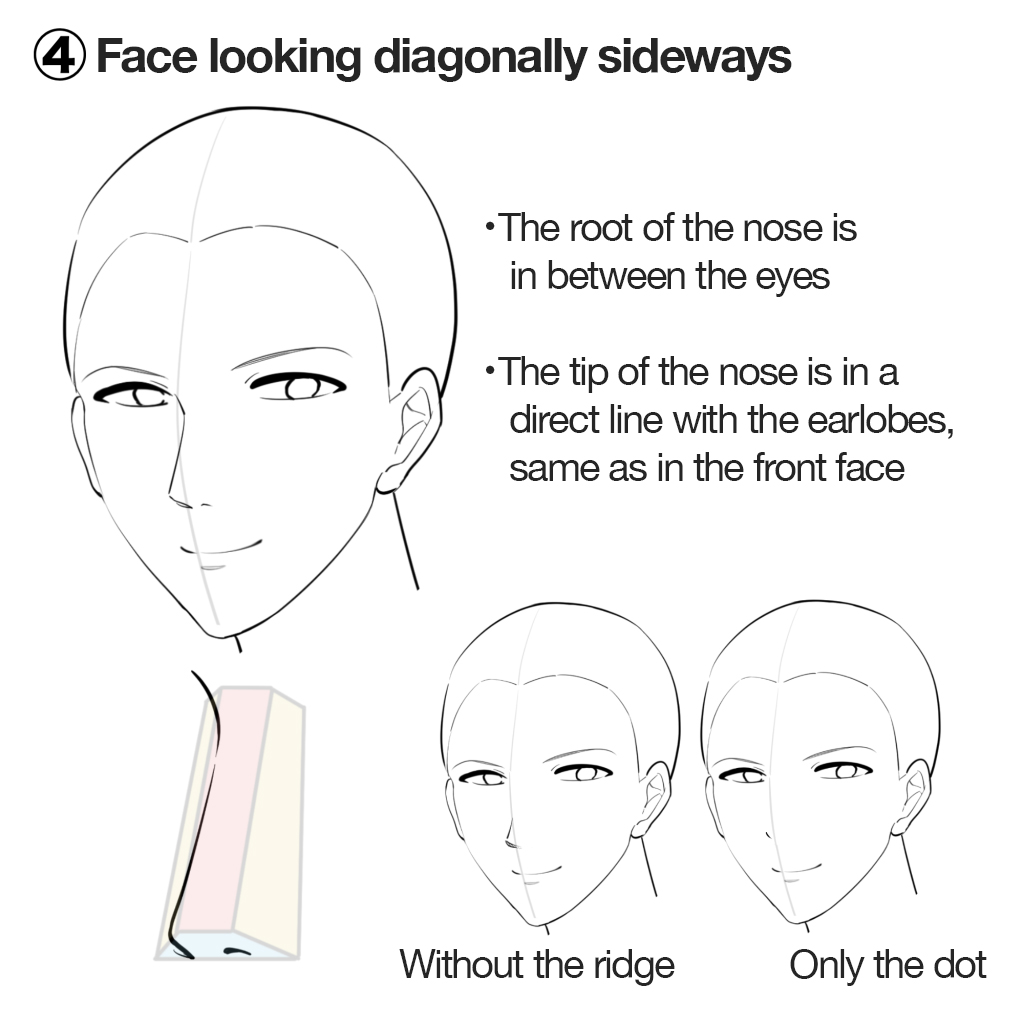
Now let’s draw the face at a diagonal angle. This angle is common for the illustration.
See how it looks when the guide figure is adopted. The most popular way of simplifying the nose is to draw a triangle to describe the ridge to the tip, and draw a line for a visible hole.
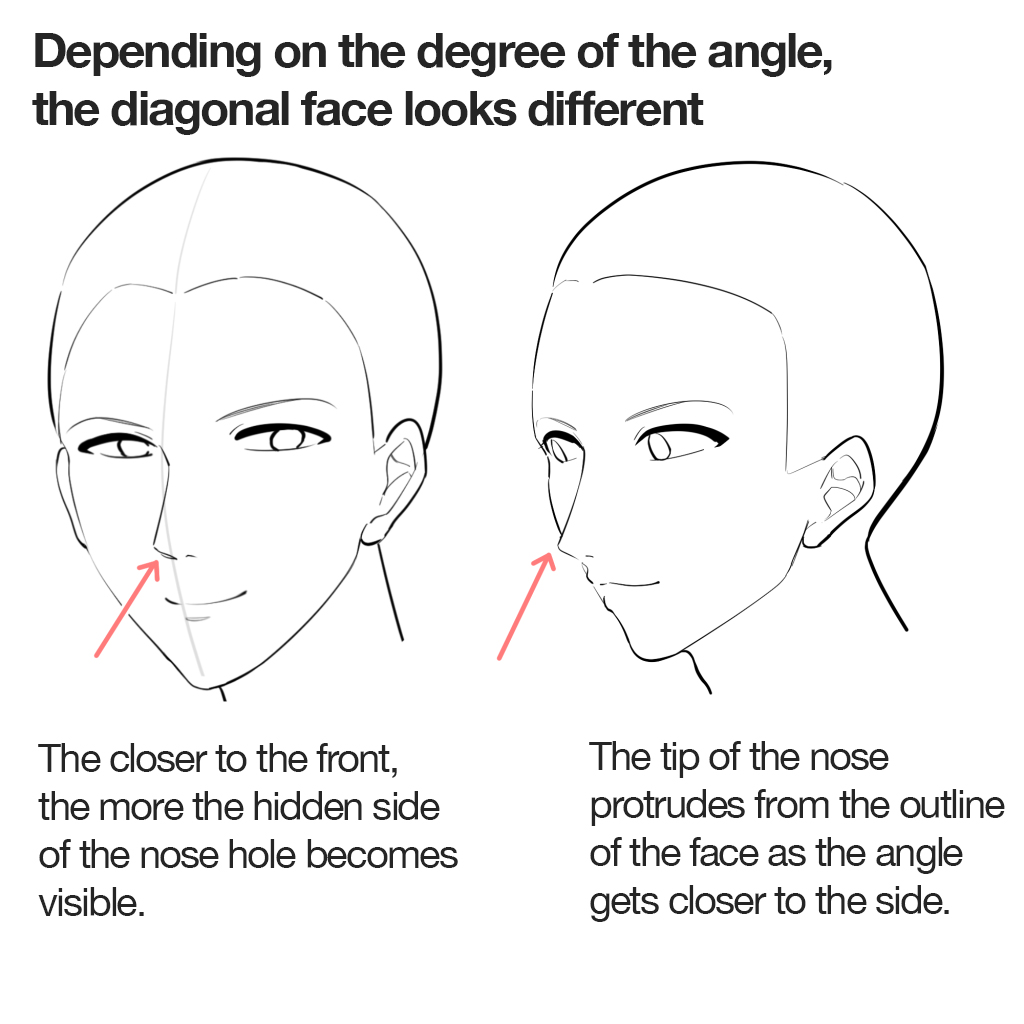
The nose of the face looking diagonally sideways looks slightly different depending on the degree of the angle.
- Both of the nose holes are visible when the angle is close to the front.
- The nose tip becomes sharper and protrudes a little from the face silhouette as the angle gets closer to the side.
It may be difficult, but once you get used to it, I’d like you to draw with these little differences in mind.
Face looking diagonally upwards
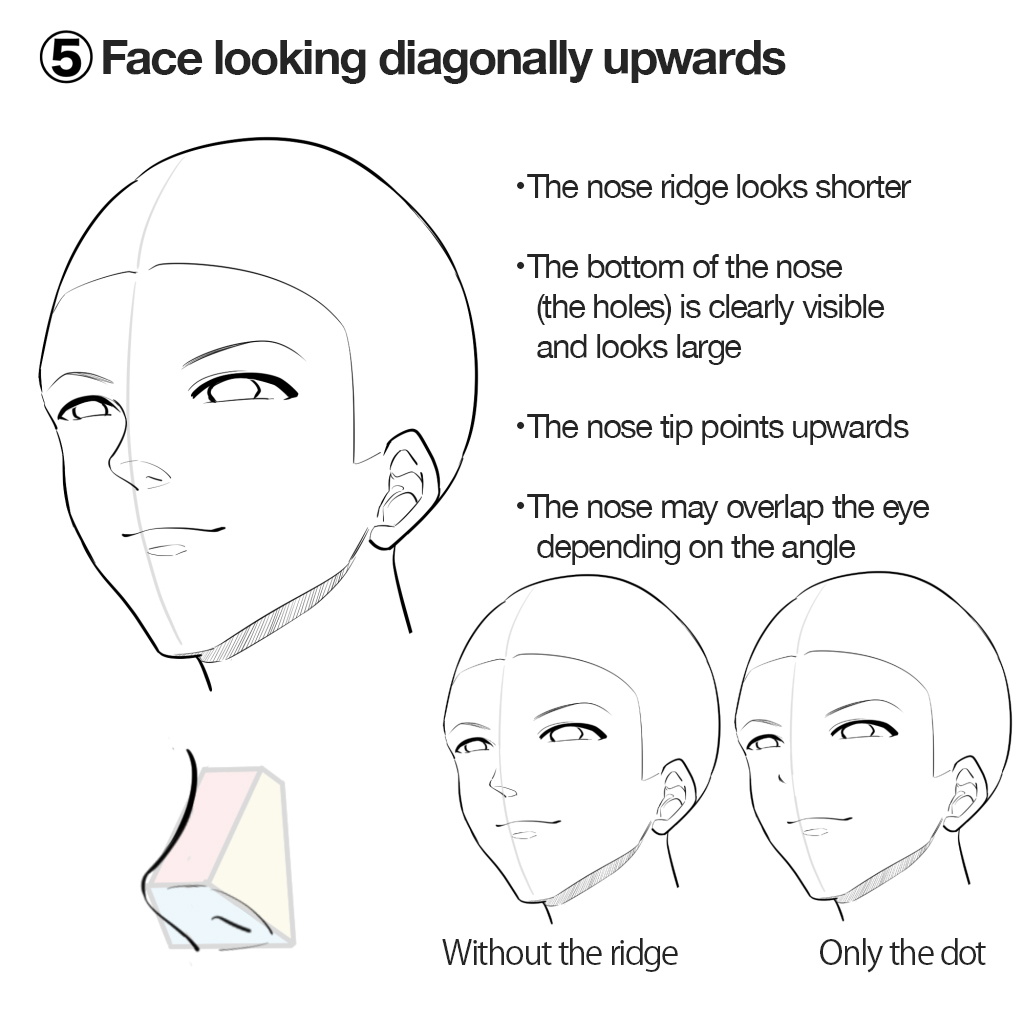
It can be challenging for beginners, but you can draw the nose with a steady balance by carefully creating a guide. Proceed step by step.
Here are the things to remember:
- The bottom of the nose looks big
- The tip of the nose points upwards
- The ridge of the nose becomes shorter and hides the eye, depending on the angle.
The most important thing is to show the bottom of the nose clearly. Even if you don’t draw the nose holes, you should draw a triangular shape to give the nose a three-dimensional feel.
Also, if you want to describe the nose using only the dot, remember that the position of the dot is considerably high as the tip of the nose is high. There are common mistakes made by novice illustrators where the nose is low although the face is looking up. Draw the nose by concentrating on the position of the tip of the nose.
Face looking diagonally downwards
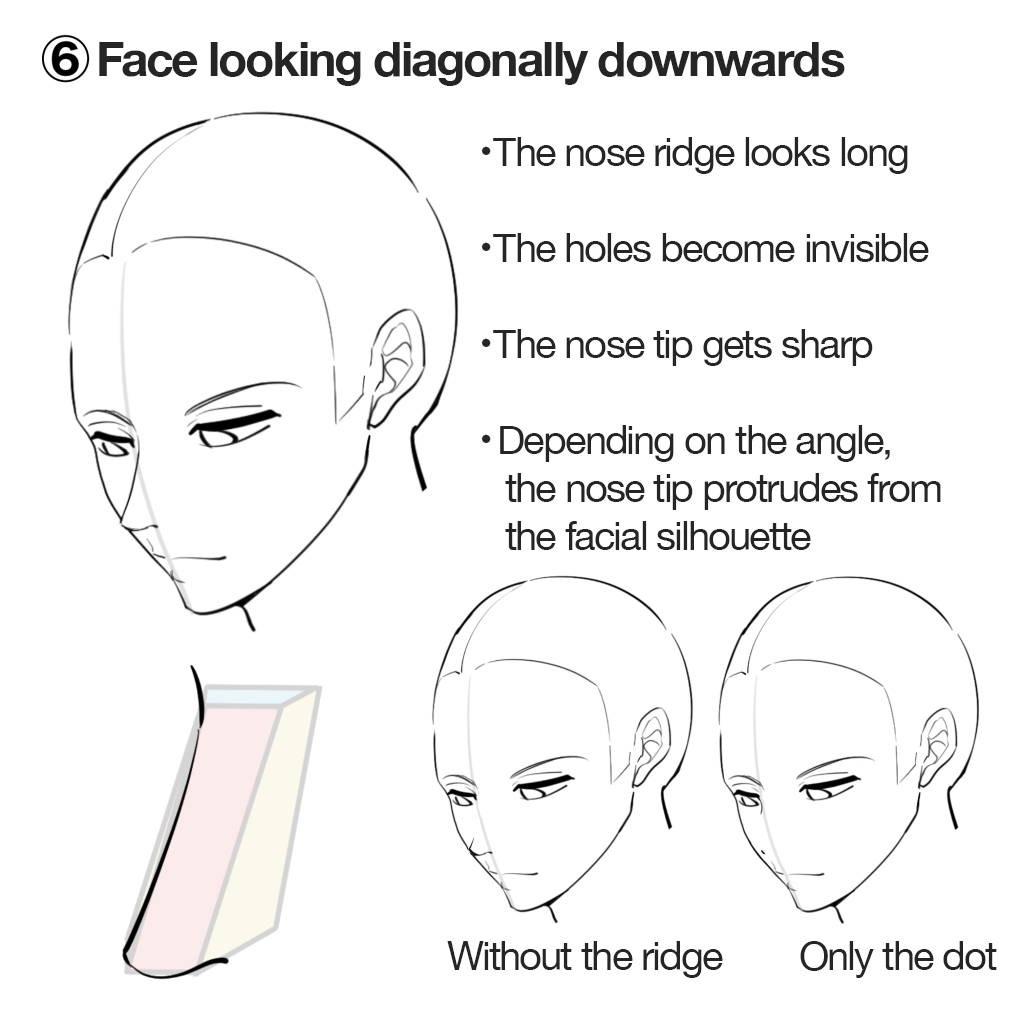
Next is the face looking diagonally downwards.
Things to remember is the following:
- The holes of the nose become invisible
- The ridge of the nose gets slightly longer, and the nose tip gets sharper
- The tip of the nose sticks out from the silhouette of the face depending on the angle
The features are almost the same as the features of the front face looking downwards.
Depending on the angle, the nose tip can protrude from the silhouette line of the face.
Side face
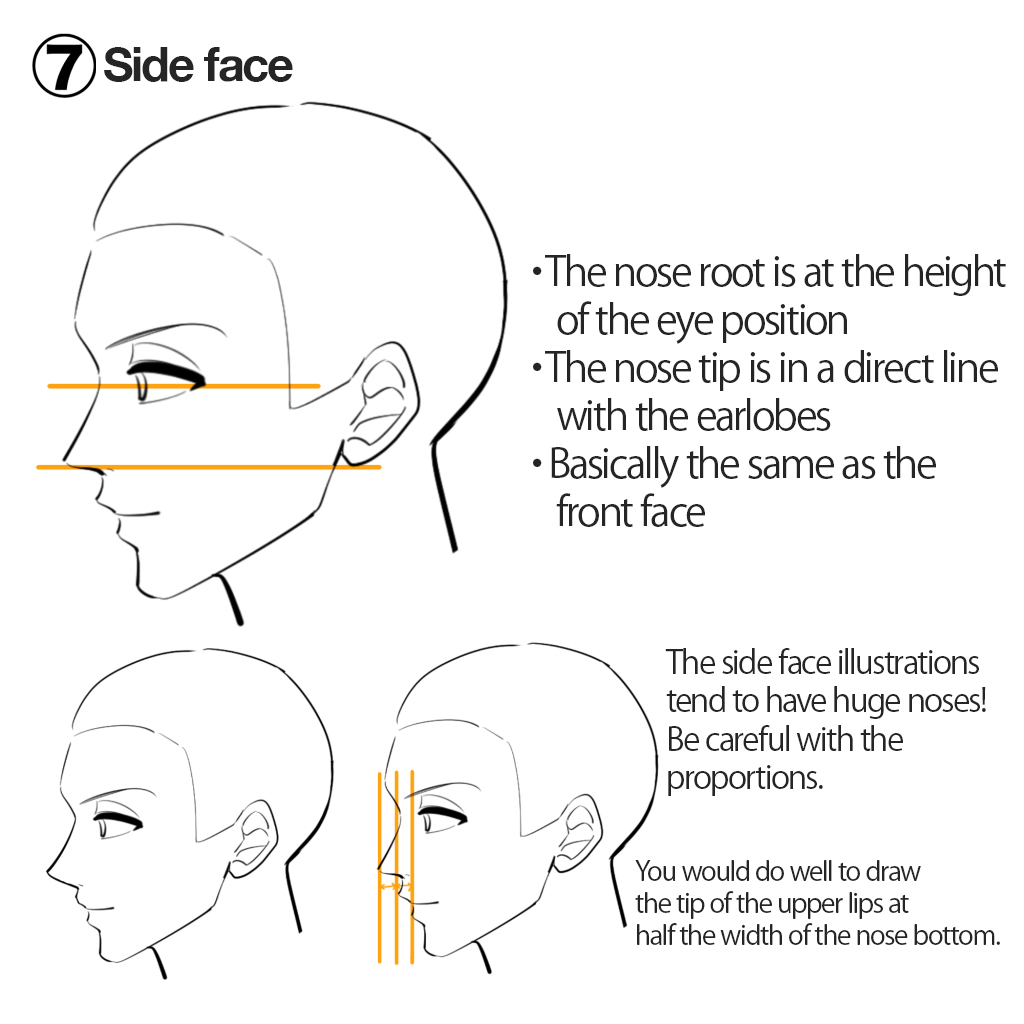
It may seem easier to draw noses from the side, but actually it is not, as the proportions can easily collapse.
Here are the things to remember:
- Do not make the nose too big
- Be careful with the position of the nose root
- Be careful with the position of the nose holes
The most common mistake is to draw the nose too large and prominent. This often happens when drawing handsome characters. The ridge of the nose is too long, or the whole triangle of the nose is too big.
The basics are the same as for the front face: the root of the nose is in between the eyes, and the tip of the nose is in a direct line with the earlobes. I also encourage you to draw the nose a little lower than you think it should be.
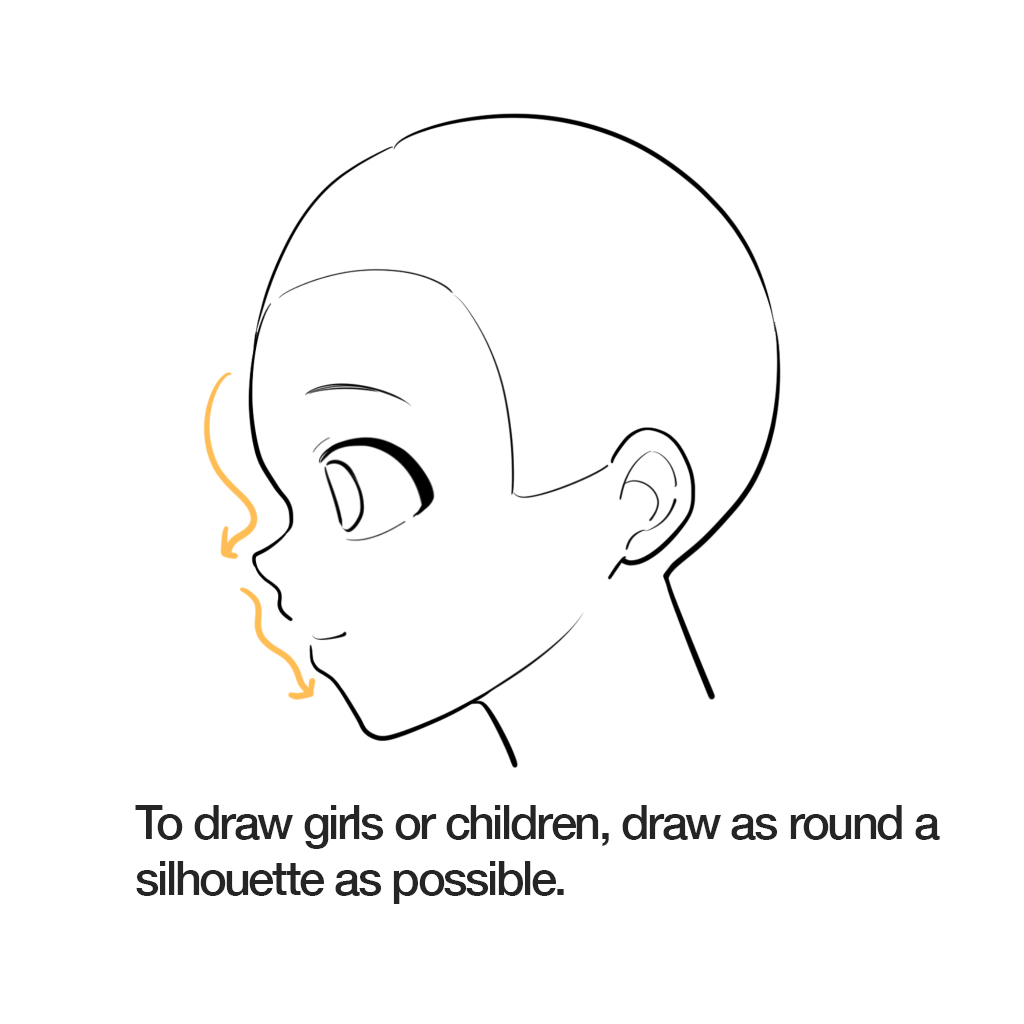
When drawing girls or children, refrain from drawing the nose with a lot of undulation, so that you can make them look cute.
Drawing the side of the face with lots of ups and downs can give the impression that “the nose was just a dot on the face at other angles, but the nose gets so bumpy only when looking at it from the side”. Try to concentrate on drawing a nice round silhouette.
Bonus: Is it a shadow or a light? What is THAT thing everyone is drawing?
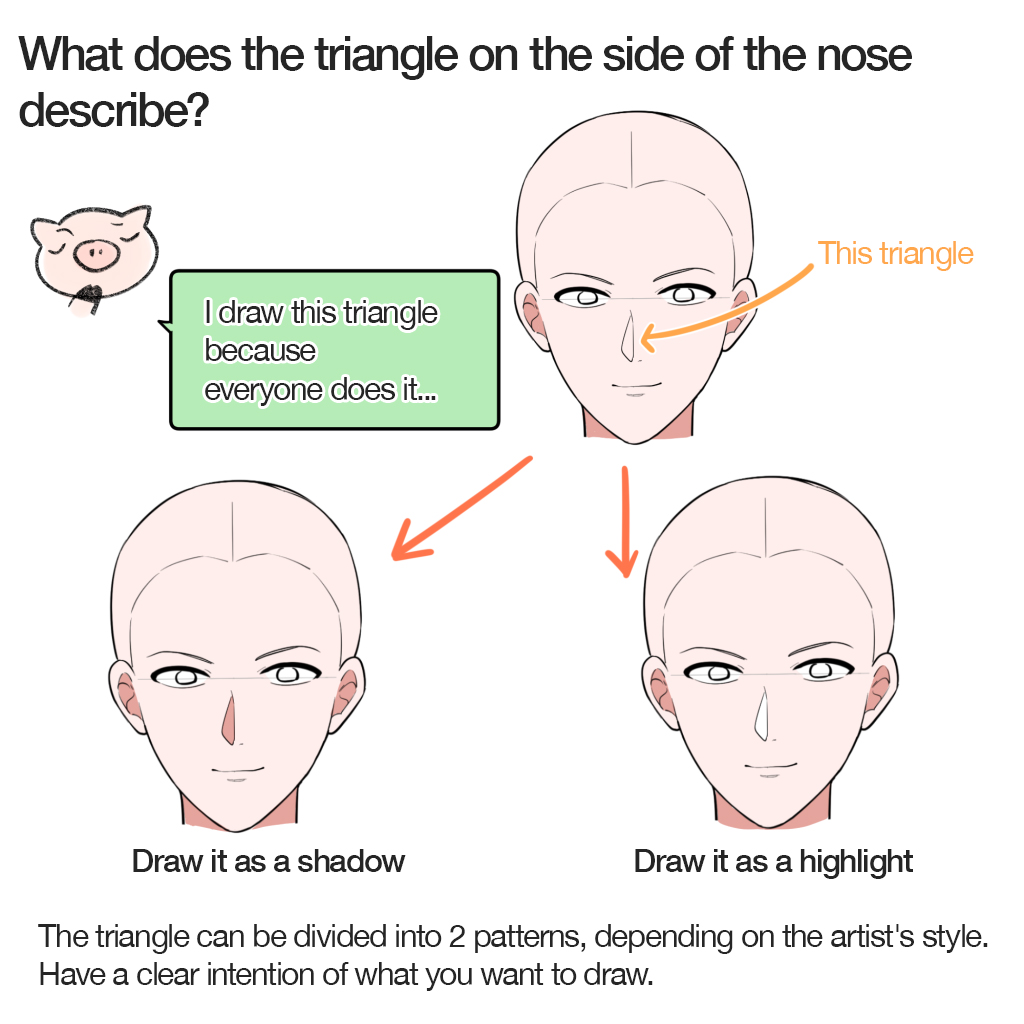
In most illustrations, especially of handsome men, the area from the ridge to the side of the nose is described as a triangle. I suppose most beginners imitate this method.
But do you understand what the triangle is for? The purpose of the triangle is divided into two, depending on the artist: for the shadow of the nose or for the highlight.
In color illustrations, artists who use the triangle as a shadow paint it in a shadow color, and artists who use it as a highlight paint it in a lighter color.
In monochrome or manga illustrations, shadow artists fill the triangle with slash lines or tones.
Instead of imitating your favorite artist without a clear intention, draw the triangle with a precise purpose and understanding of what you are drawing it for: the shadow or the highlight.
Today’s article was about the nose.
We tend to draw the nose without a clear intention, but it’s a crucial part of the face that defines proportion.
I hope you will draw the nose by concentrating on its construction!
(Text・Illustrations / はらなおこ)
twitter: @nao_comic
\ We are accepting requests for articles on how to use /

