2021.07.19
[For beginners] Let’s try coloring! How to paint basic colors [Smartphone version]

Here, we will introduce “Basic coloring procedures” and “How to use the tools” for those who are going to use MediBang Paint to draw.

Index
1. Create a color rough
The first step is to draw a color rough to decide what colors to put where.
(※ If it’s a simple drawing, you can decide the colors in the rough.)

Color rough is…
This is the process of roughly applying colors and deciding what colors to put where.
Advantages
● It takes less time to make corrections because the colors are applied roughly.
● The image you want to draw can be fixed in advance.
1.1 How to make a color rough
① Prepare a rough or line drawing.
It is recommended to work in the following order: rough + color rough, line drawing, and coloring.
② Create a folder for the color rough.

③ Create a new layer and paint the image.
It’s rough, so it’s okay to be rough.
Use a pen brush or a Bucket Tool to draw the image.

It’s rough, so don’t worry too much about overflowing.
Rather than painting carefully, concentrate on creating an image of where and how to place the colors.
<OnePoint>
It is recommended that you check the color roughness as you paint. It’s a good idea to check the color rough as you go.
If you have purchased the MediBang Paint Creative Pack for your iphone, you can use the document function, which makes it easier to check the color rough.

What is the Document function?
This function allows you to open a document window on the canvas and draw a reference material.
It also has an eyedropper function, so you can use the eyedropper to take the color of a color rough that is open as a reference and use it in your illustration.
▶ Learn more about color roughs here.
Improve your illustrations easily by posing and color roughing!
2. Underpainting
When the color rough is done, draw a line drawing, and then paint underneath it.

Primer paint…
・You can paint shadows without overflowing with a clipping mask.
・The color of the base is fixed, so it is easy to choose the color of the shade.
It has these advantages.
2.1 How to do the primer
① Save the colors of the color rough to the color palette.
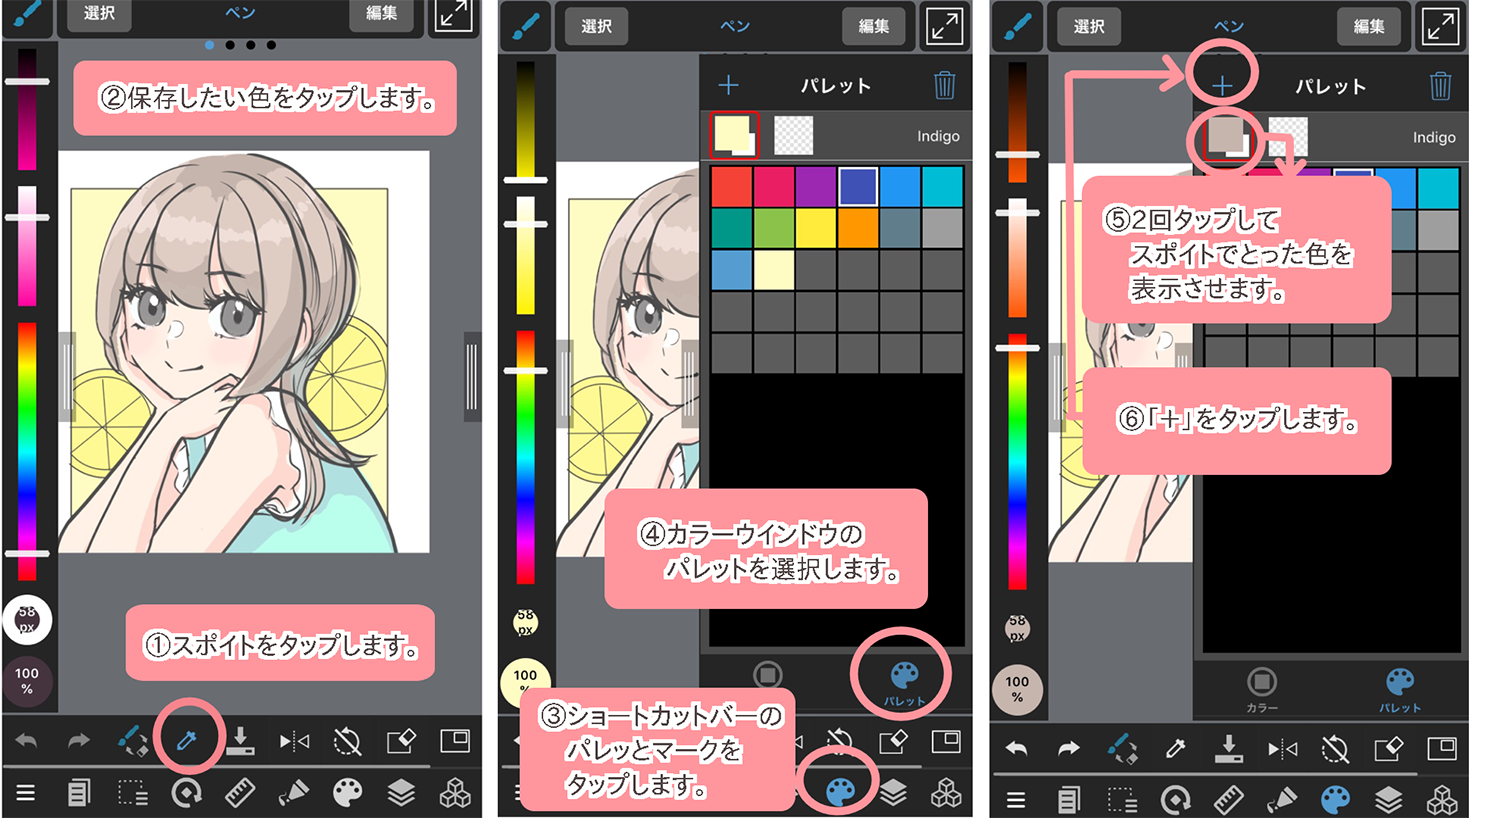
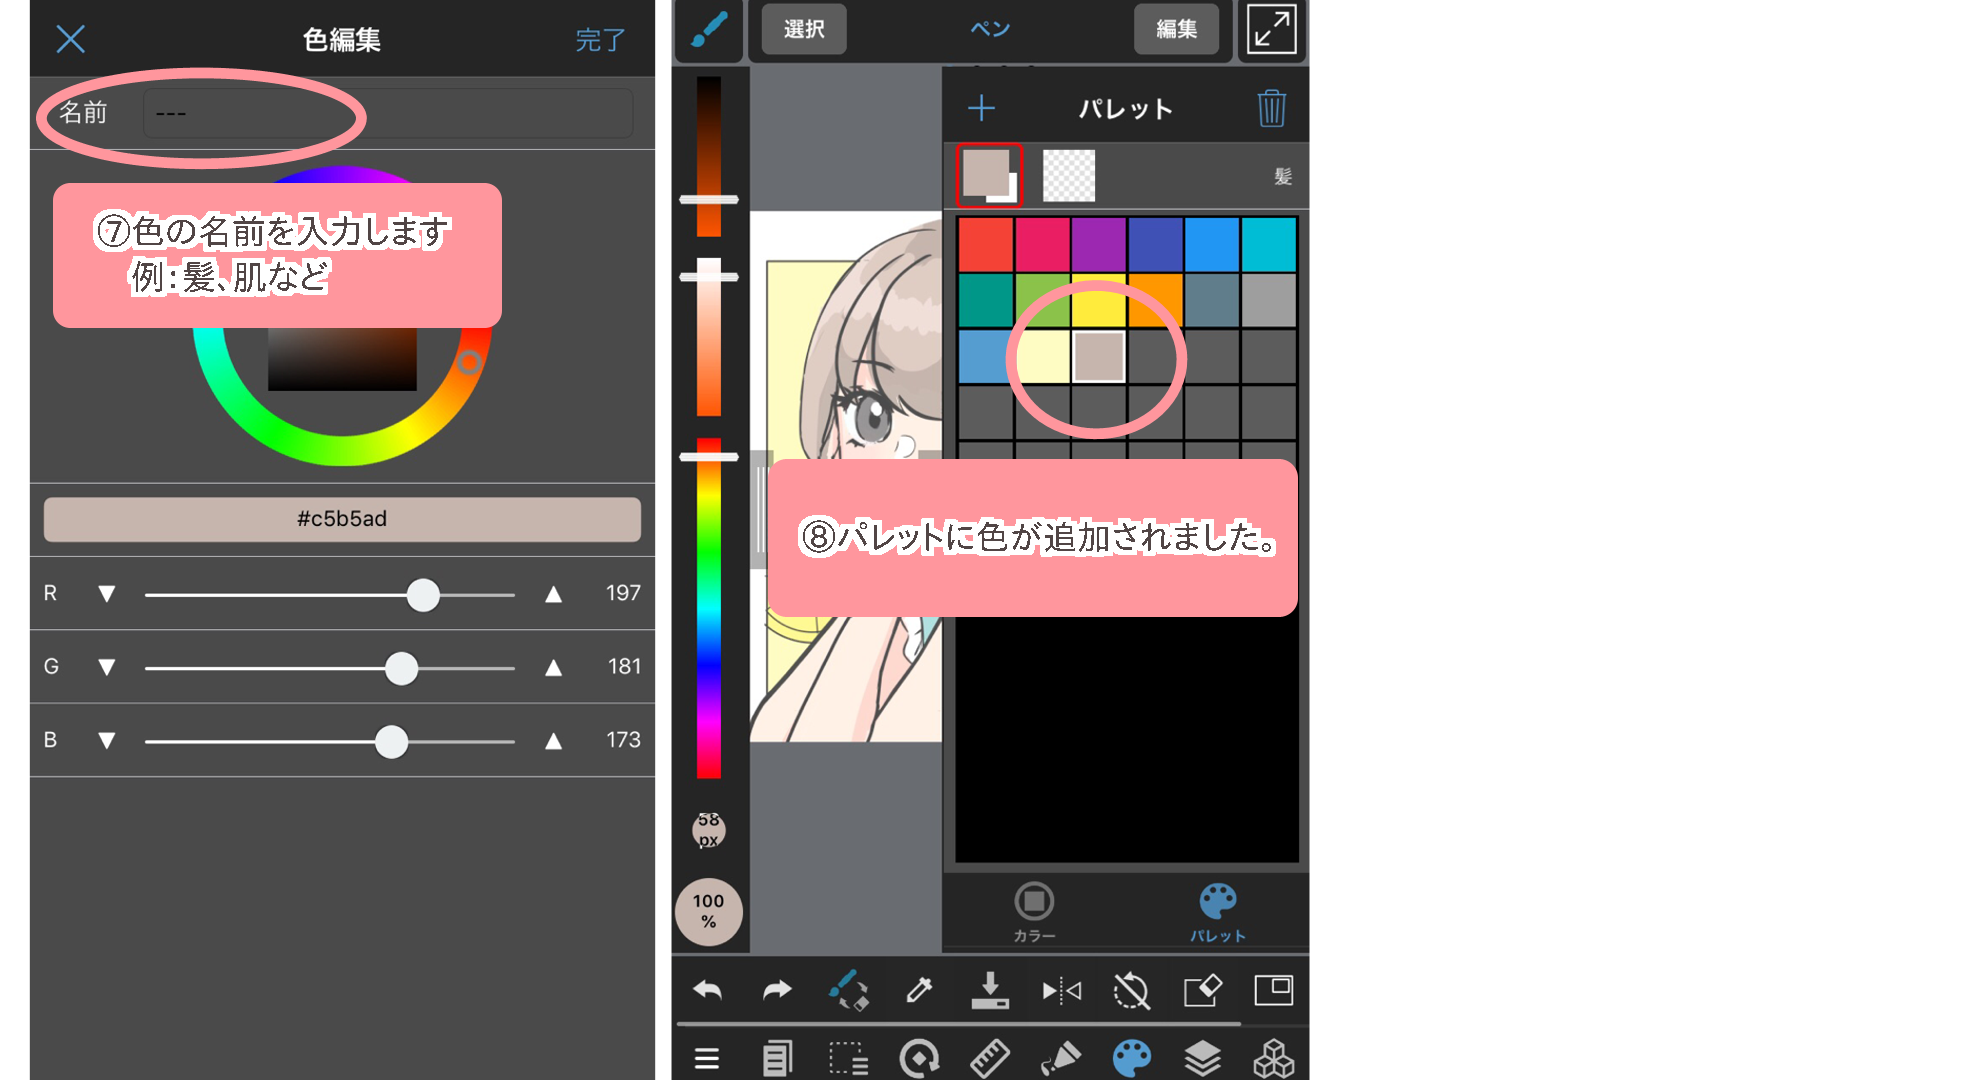
※ If you can use the document function, use the eyedropper function in the document window to take the color of the color rough.
② Create a folder for the primer and paint the color on a new layer.
※ If you don’t make a color rough, you can start from here.

③ Use the Bucket Tool and pen to apply the color.
At this time, separate the layers for each part such as hair, skin, etc. so that you can easily adjust or apply a clipping mask later.
If the bucket tool leaves a gap or color overflow, try adjusting the “Close Gaps” or “Expand” of the bucket tool.
<Close Gaps>
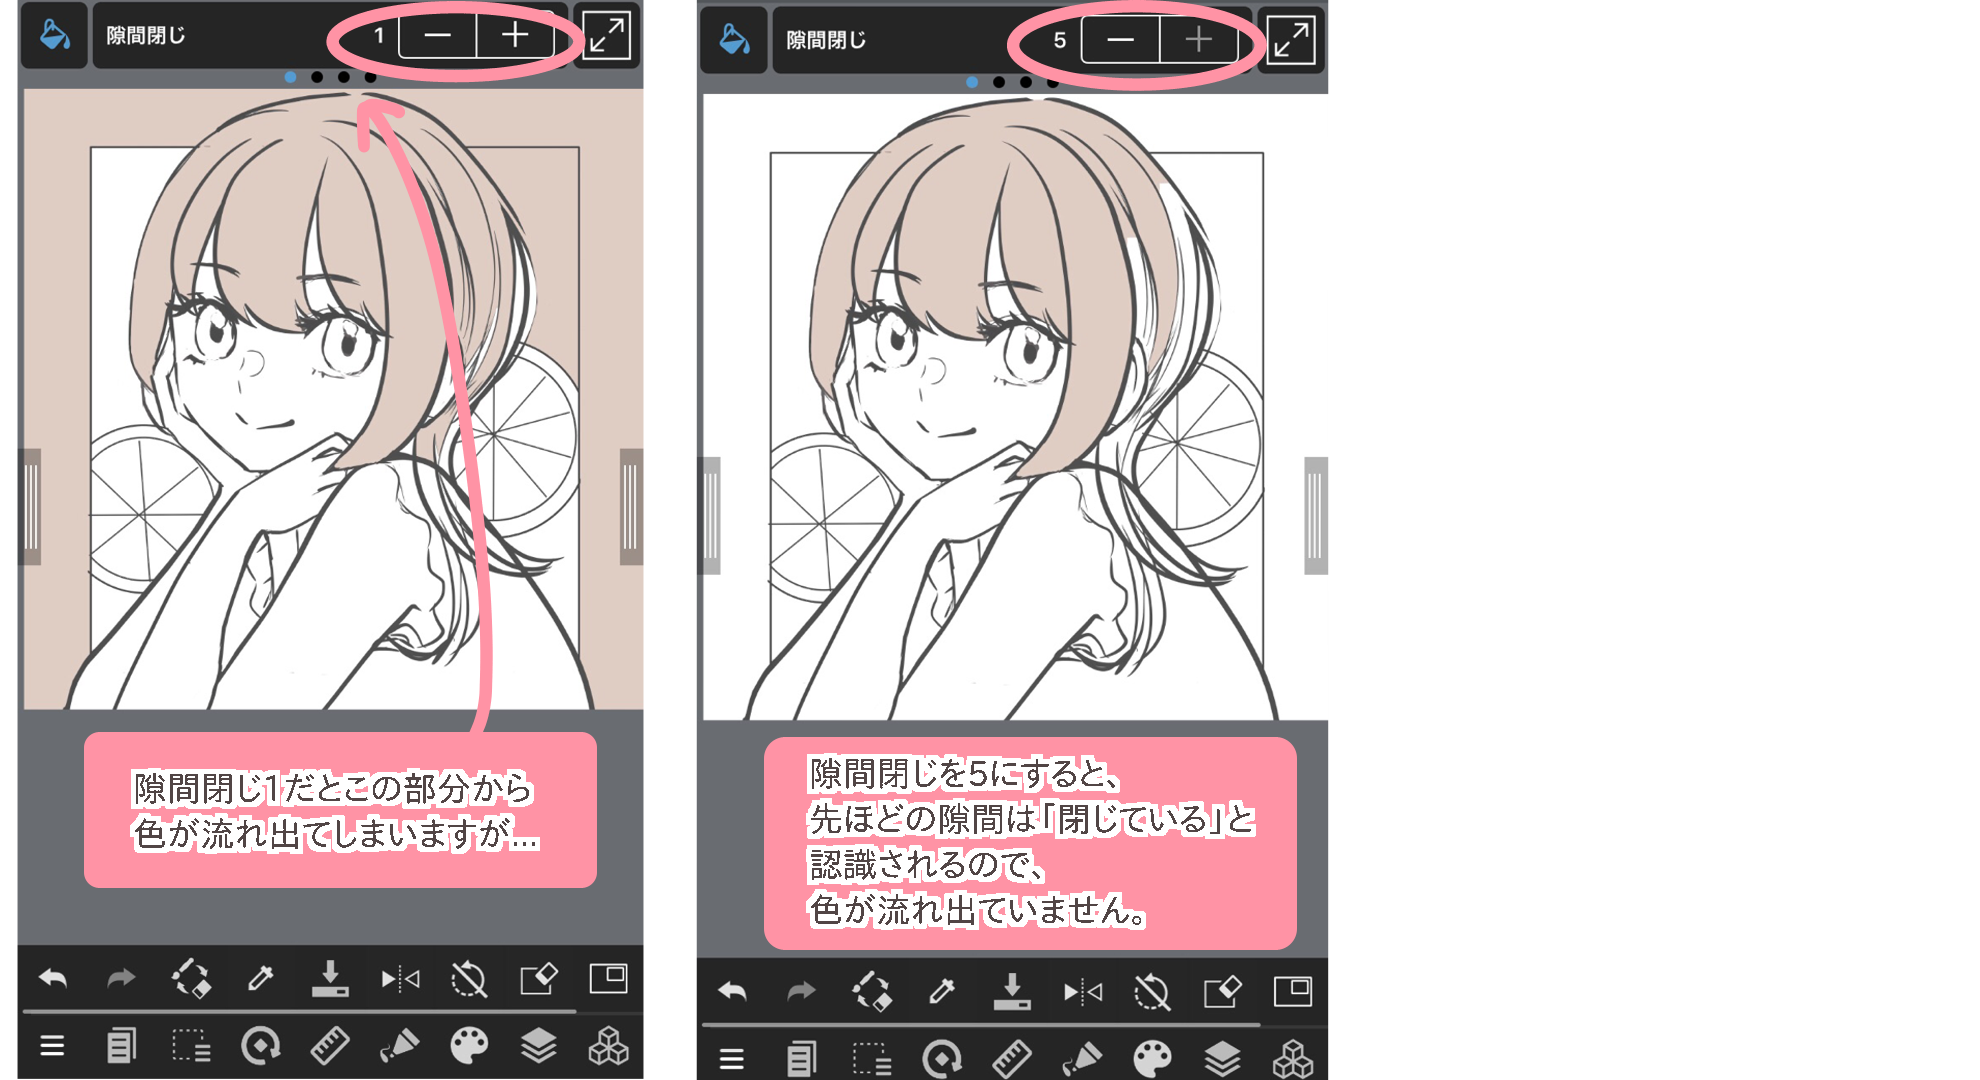
(Left) When the Close Gaps is set to 1, the color flows out of the gap indicated by the arrow…
(Right) When theClose Gaps is set to 5, the gap is recognized as “closed,” so the color does not flow out.
<Expand>

(Left) If gaps appear when painting with the bucket tool, adjust the value of the “Expand” tool on the screen.
(Right) Increasing the value of the “Expand” tool from 0 to 3 eliminates the gap.
The primer is now complete.

3. Paint the shadows
Once the underpainting is done, we can paint the shadows.
The way to paint the shadow depends on the pattern, but this time we will paint it simply.
① Decide on the light source.
It is easy to lose track of the position of the shadow when you start painting without knowing what to do.

This time, I want to use the upper left corner as the light source.
※ If you have already drawn the shadows in the color rough, refer to the shadows in the color rough and draw them.
② Draw the shadow using a pen and an Airbrush.
When drawing the shadow, it will be easier to draw if the layer for the shadow is clipping masked to the skin layer.

To determine the shadow color, basically shift the hue of the base color a little more toward blue, increase the saturation, and decrease the lightness a little.
4. Add highlights
Once the shadow is drawn, it is time to add the highlight.
We will highlight the areas where the light hits the most, such as the top of the nose.

In this case, I used an Airbrush and lowered the Opacity to give a fluffy impression, but I sometimes use a pen to draw a clearer image.
5. Paint the cheeks and eyes
Once the shadows and highlights are drawn, paint the details such as the reddish cheeks and eyes.

6. Color Tracing
Color tracing is a way to change the color of the lines to blend in with the illustration or to express light and shadow.

Create a new layer on top of the line drawing you want to change the color of, and apply a clipping mask to it to apply the color.
7. Finishing touches
Finally, draw a background pattern or apply a layered effect to the whole image to finish it.

(Text and pictures by sakaki)
\ We are accepting requests for articles on how to use /


