2022.11.04
Painting the skin ~Drawing a girl with translucent skin~
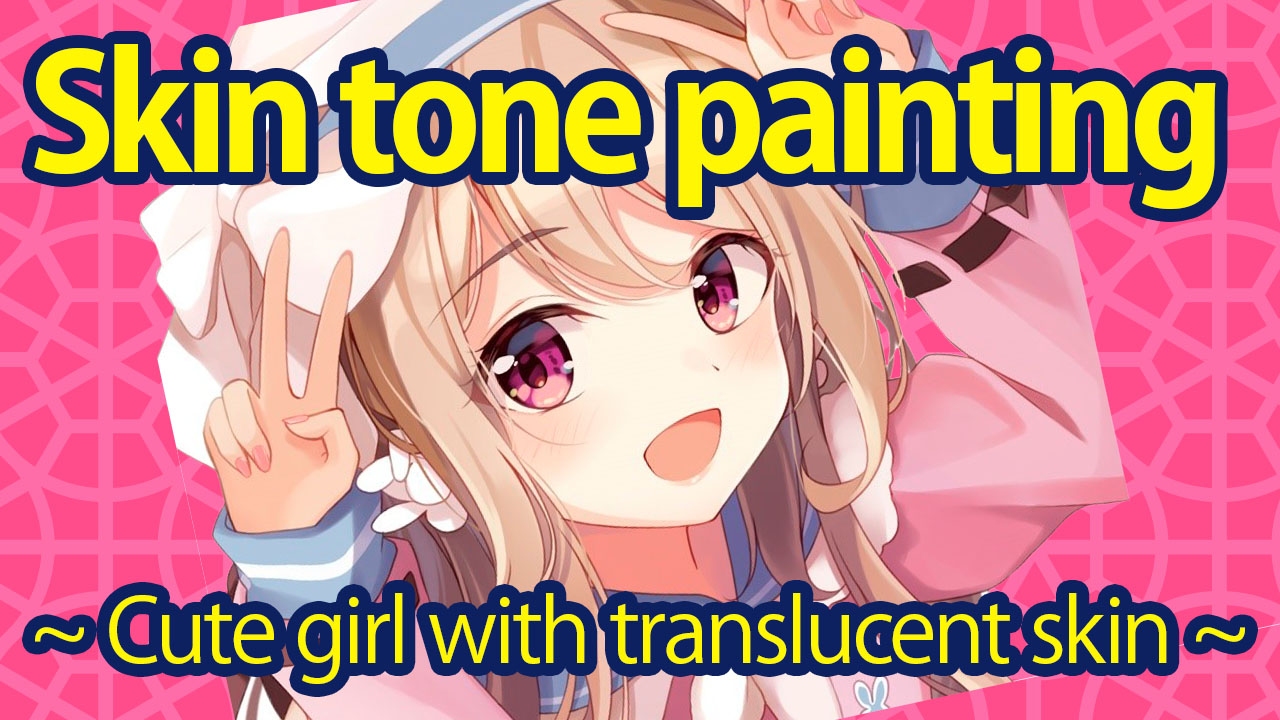
Changing the color palette, changing the brush… Skin tone painting is a profound process due to its variation.
The impressions of illustrations change a lot with how the skin is painted.
In this tutorial, I will introduce ways to highlight the translucent skin of a girl with your skin tone painting!

・Brushes
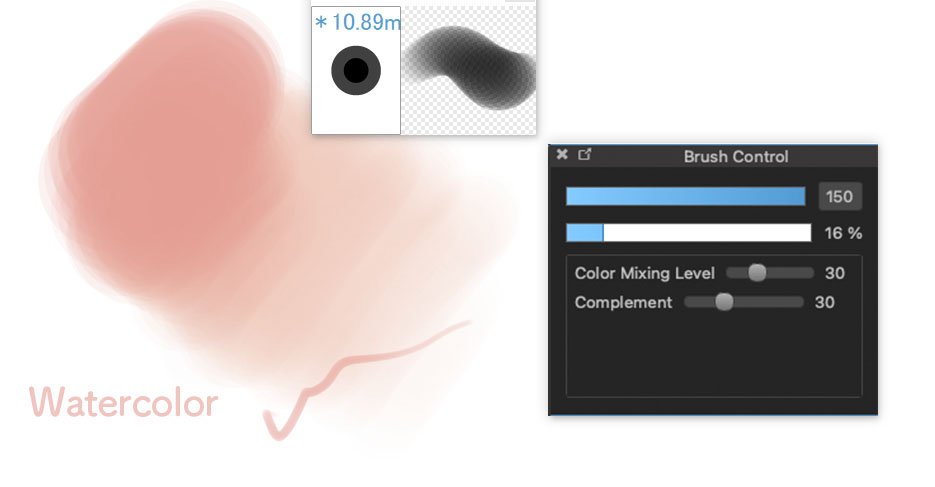
Since I want to paint a soft atmosphere unlike the anime painting, I will be using the Watercolor brush as my main brush for painting.
Let’s add the Watercolor brush to your brush library.
If you don’t understand how to add new brushes, please read the article below.
■ How do I download the Cloud Brushes?
Next, I will adjust the settings of the Watercolor brush.
This depends on your preference but I’ve set mine to “Color Mixing Level: 30”, “Complement: 30” and “Opacity: 20% or less” (from the Brush Control panel).
By checking the box for “Size by Pressure” and “Opacity by Pressure”, you will be able to layer your painting and create a natural gradation so make sure to have them turned on.
・Layer Structure
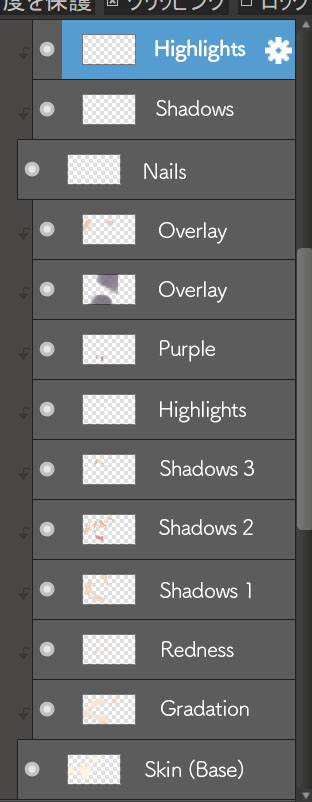
Before I start painting, I will show the structure of layers I’m working with.
If you keep drawing/painting without changing the name of your layers, you will be very confused later when you want to fix some things so don’t forget to set the name every time you create a new layer.
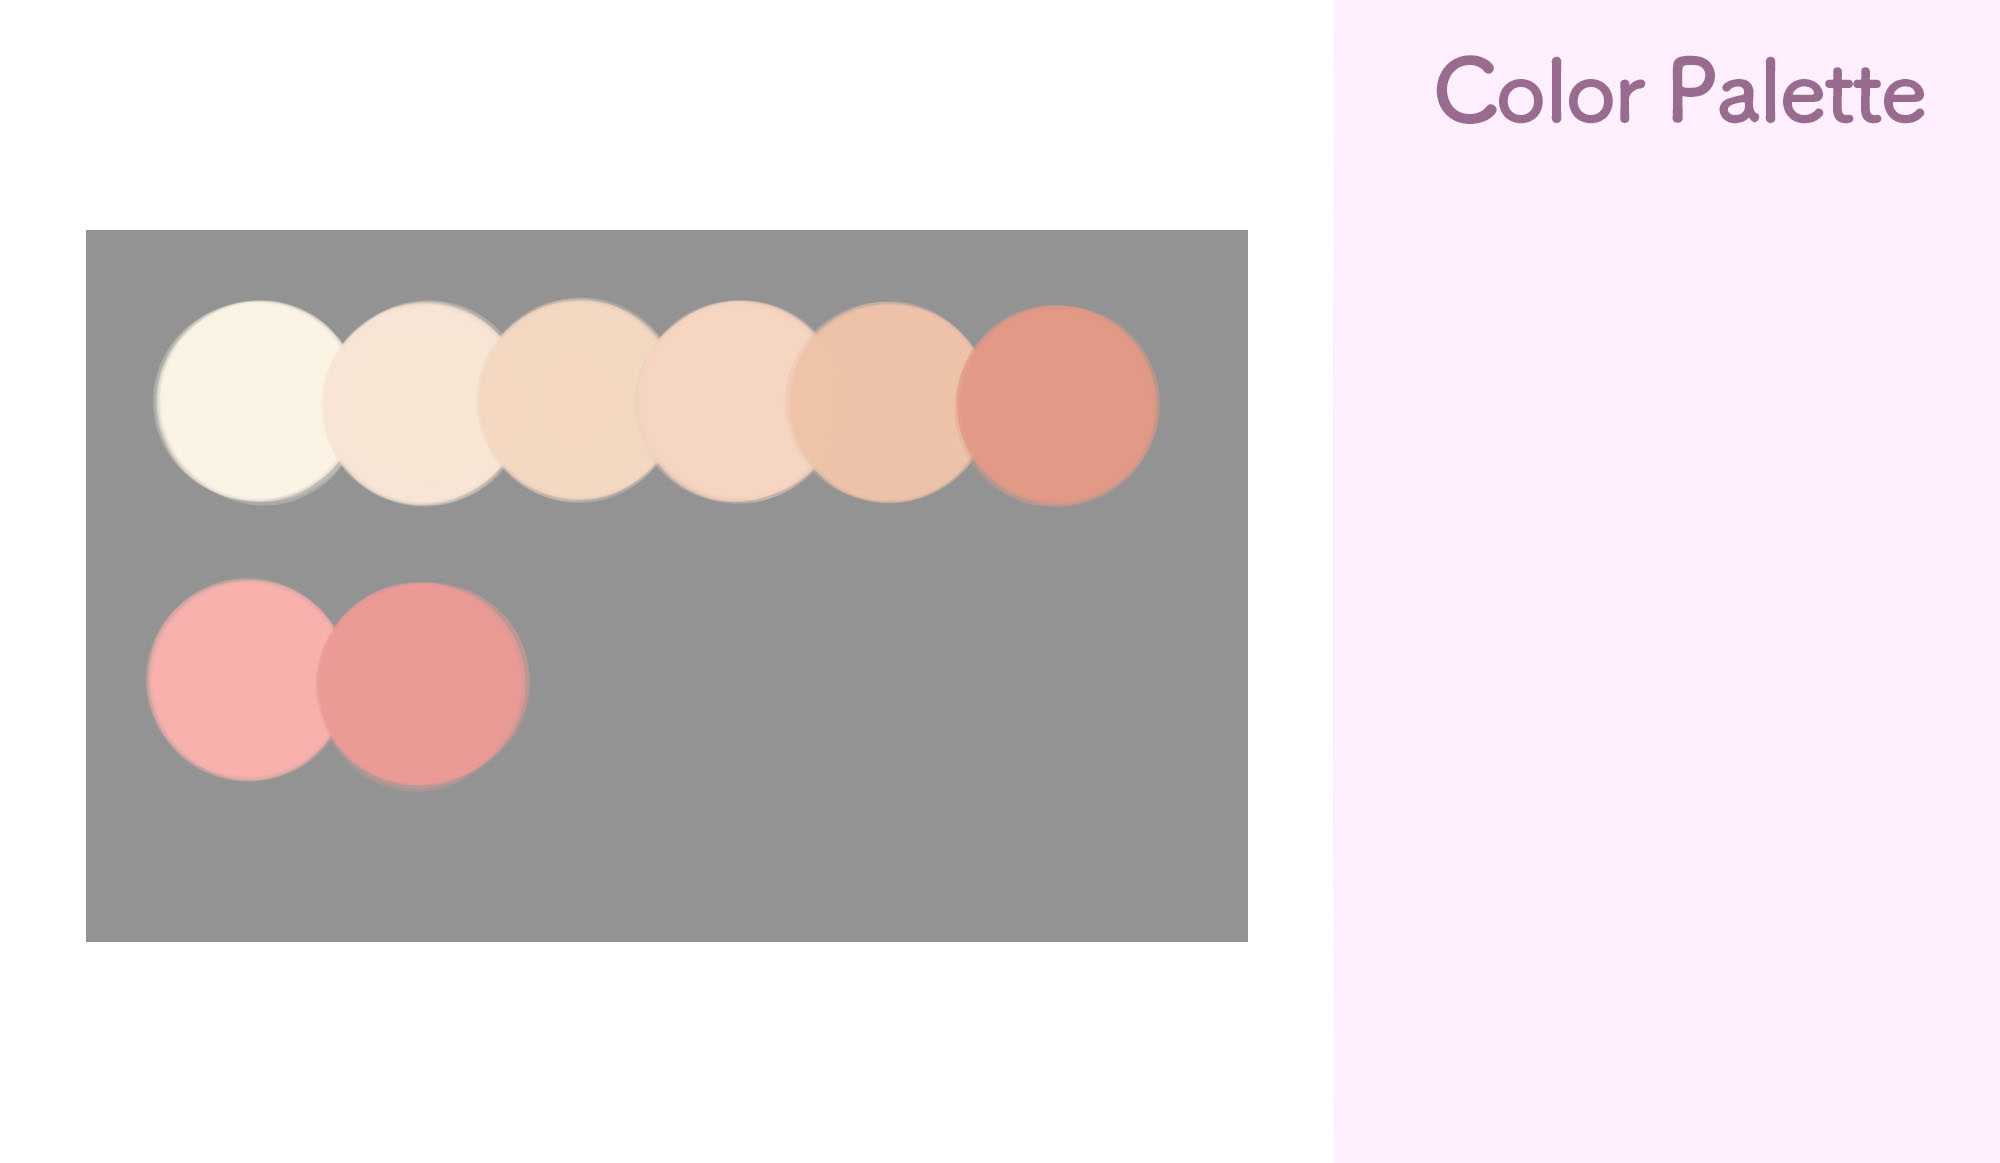
・Color Palette
I change the color depending on the character and the mood.
By using a more reddish shade, you can portray good complexion whilst with yellowish shades you can make the skin look natural.
It would be best to try out a different set of shades to fit the atmosphere of your illustrations.
The palette I introduce in this tutorial is as below. I use this combination the most.
・Base Color
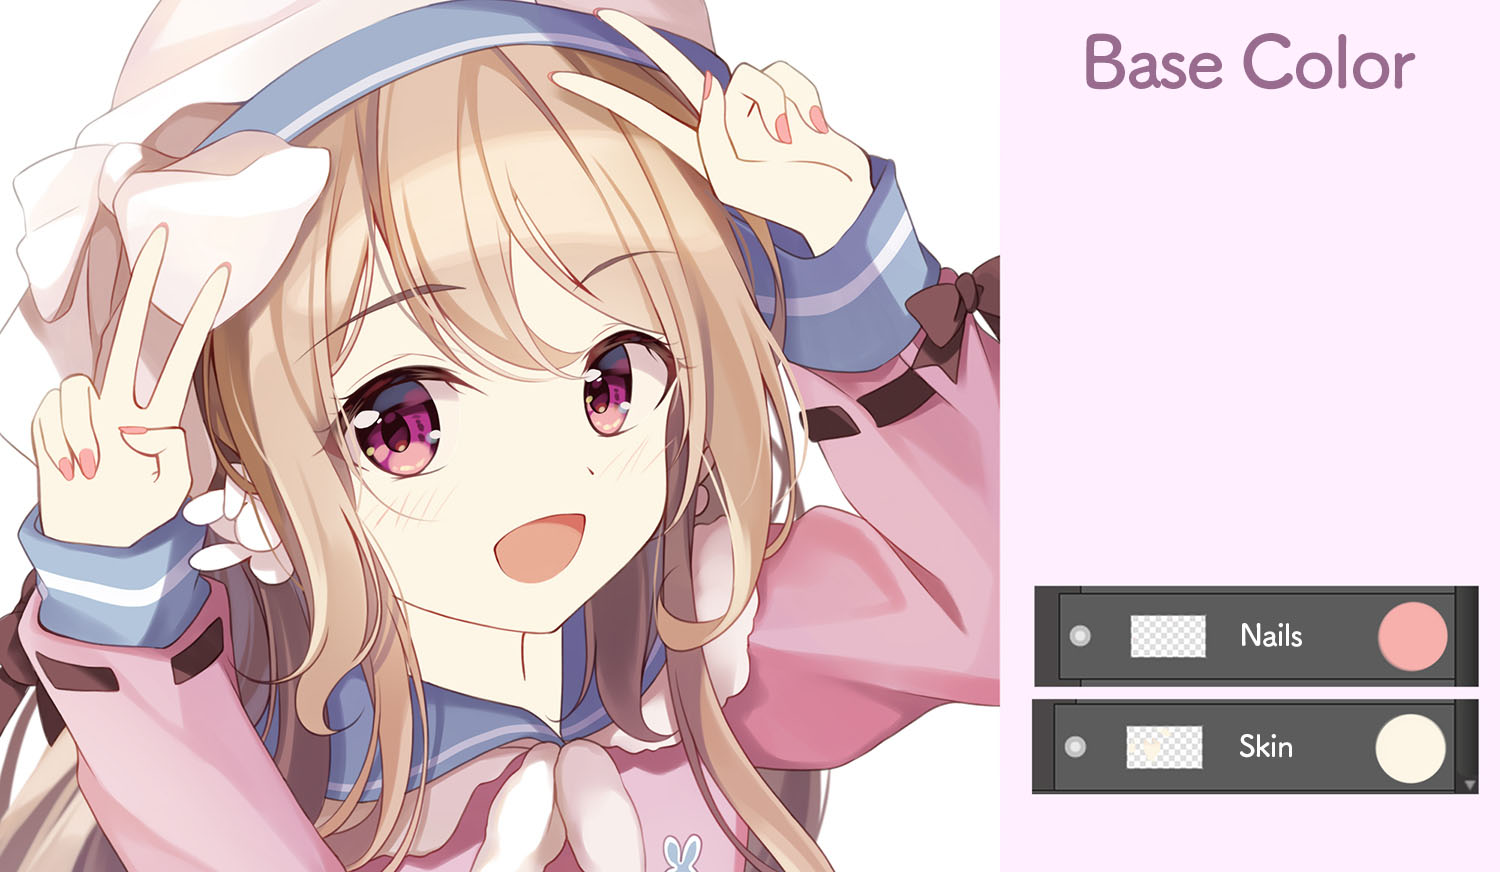
Create each layer for the skin and the nails and I painted the base color.
Since this is a base color, make sure to use the Bucket Tool or a hard brush with opacity of 100%.
Nails tend to not receive much attention but I personally love to draw the nails properly.
It’s because girls are cute even up to the tip of their fingers…
I went for a pink manicure using a slightly thick peach color.
I think you can match the base color of the nails with the color of her outfit as well.
・Gradation
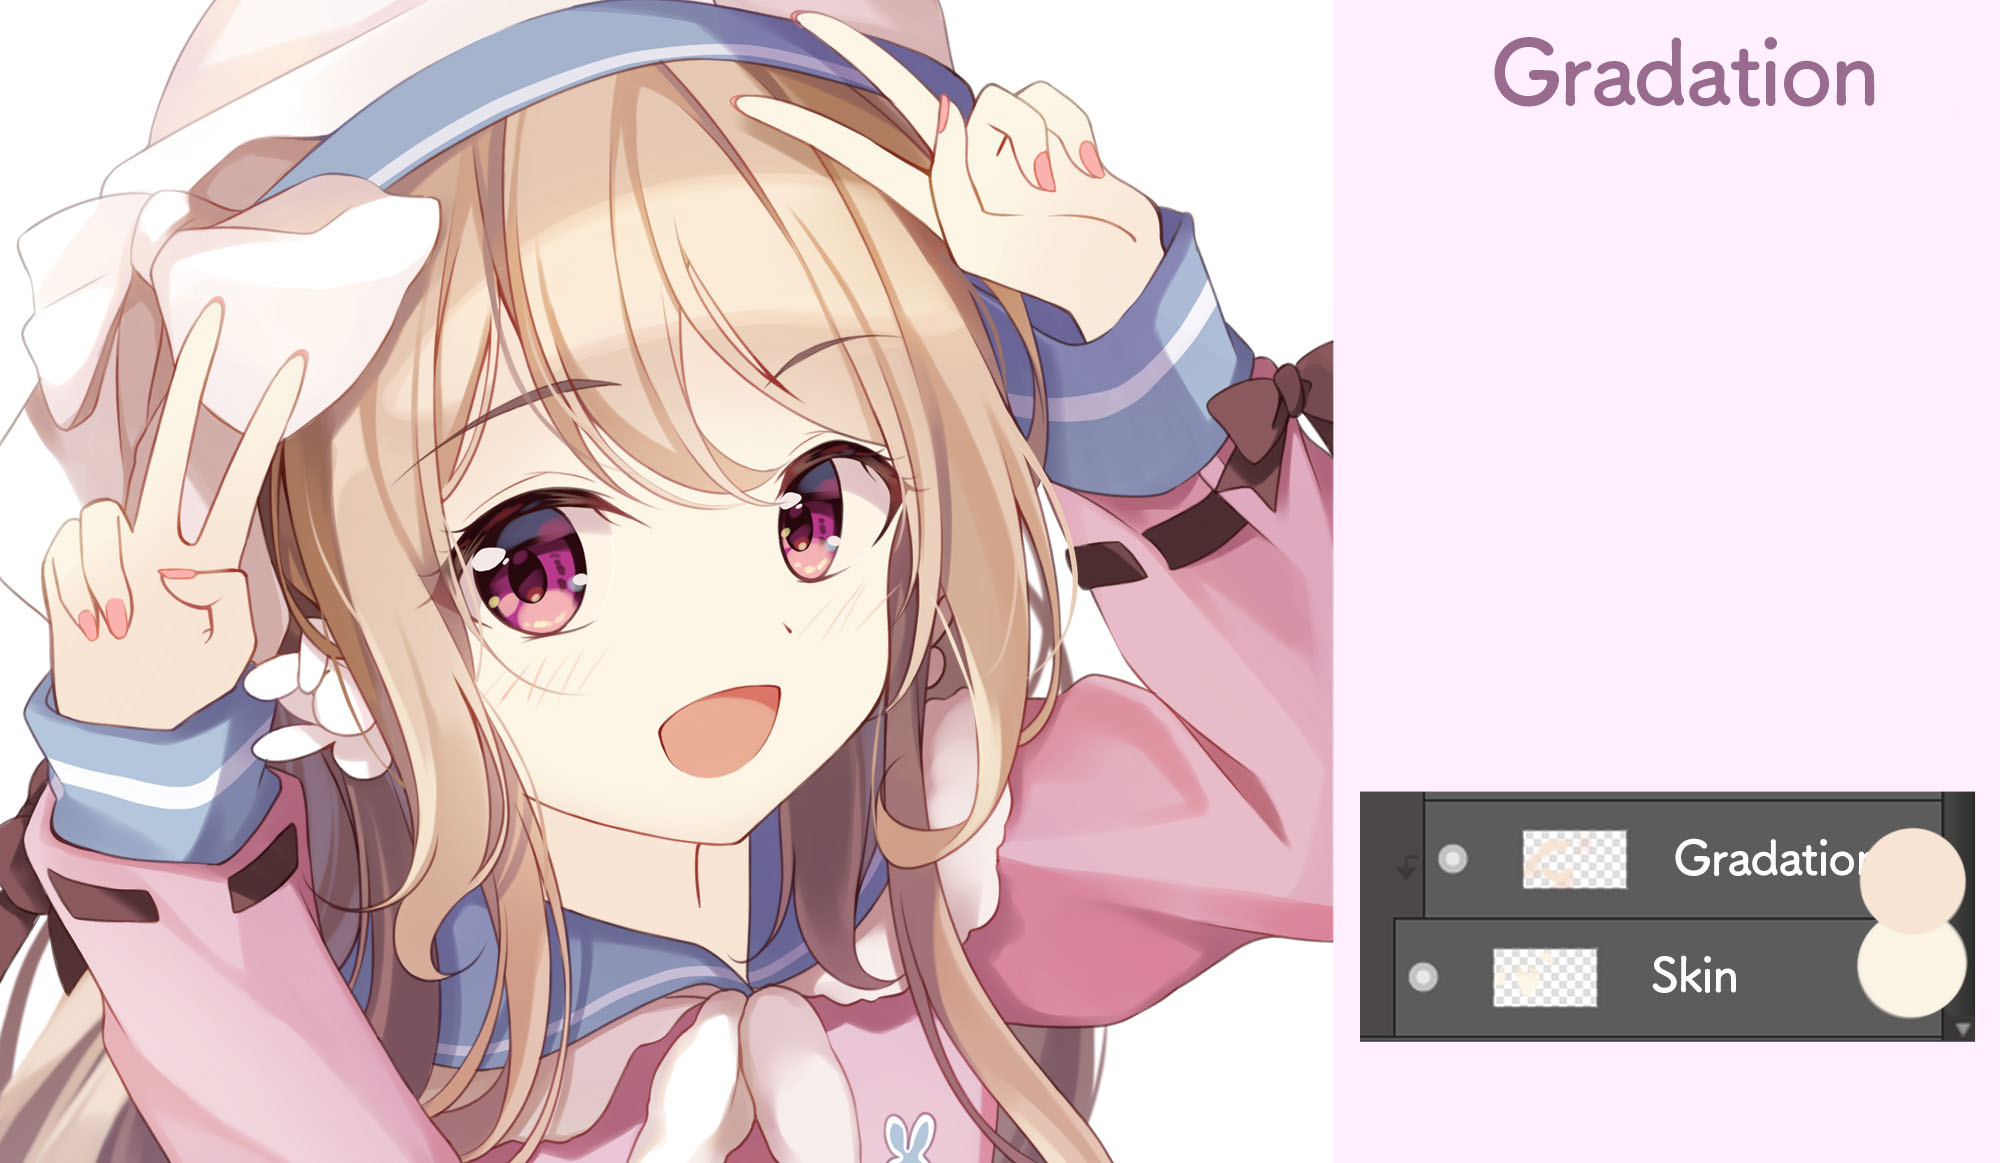
Create a new layer on top of the base color layer and check the box for Clipping.
For all the steps onwards, I will proceed by creating each layer on top of each other, with Clipping on the base color layer.
Using the Airbrush, add some light gradation on the forehead and around the line drawing.
This is so that you can create three-dimensionality around the face.
It is super important to pay attention to making a three-dimensional look, during the painting process.
・Redness
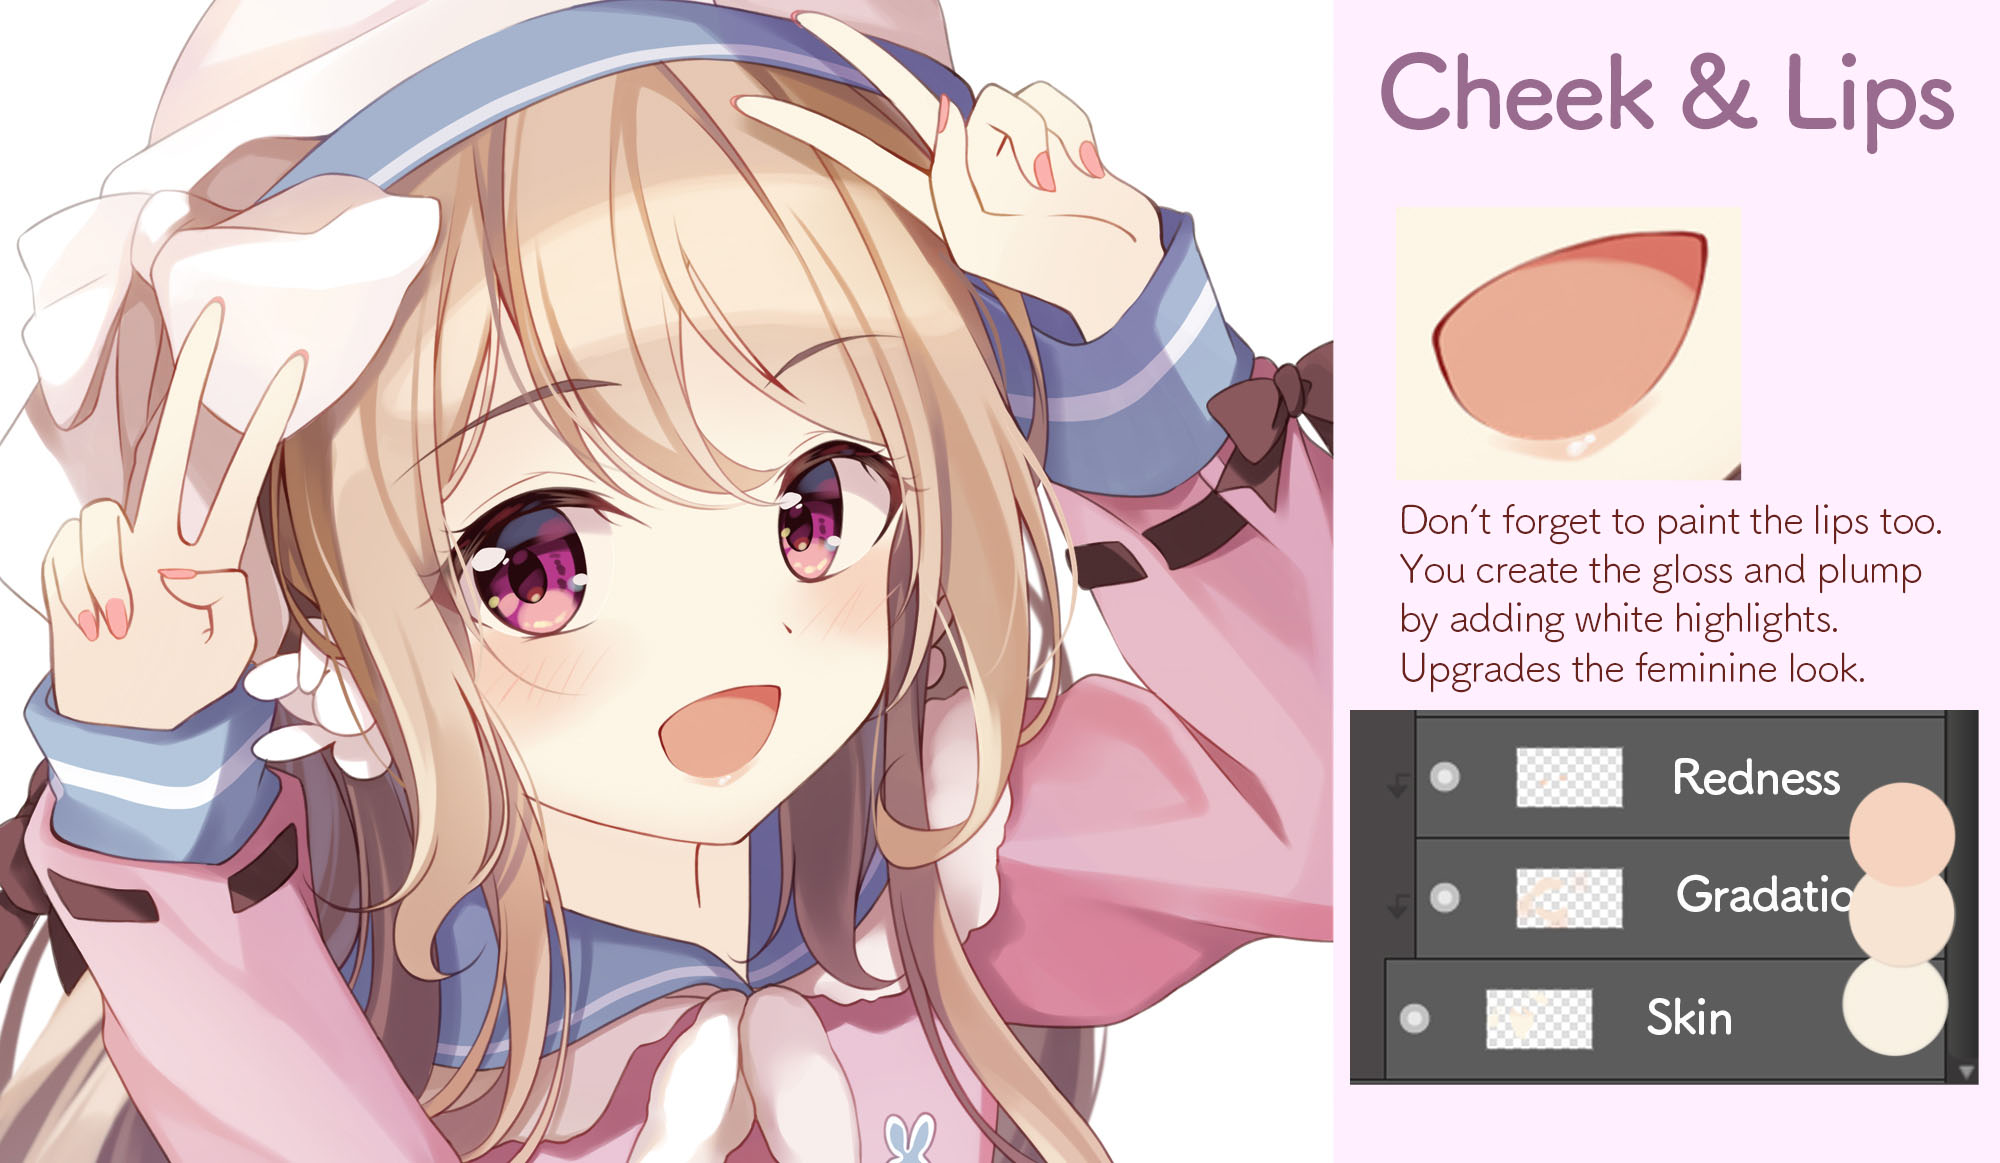
I enjoy this process of painting the cheeks the most so I tend to do this first.
Use the Watercolor brush or Airbrush and add some redness around the cheek and the nose to paint a cute impression.
I also pay a lot of attention to painting the lips as well.
I want a natural look for this illustration so I painted with a very light orange, as I did for the cheeks.
The girlishness doubles by blending them moderately with the skin tone.
I also used the Watercolor brush for the lips as well.
If you want to achieve a soft, realistic look for the lips, layer a bit of white a couple times in the center of the lip.
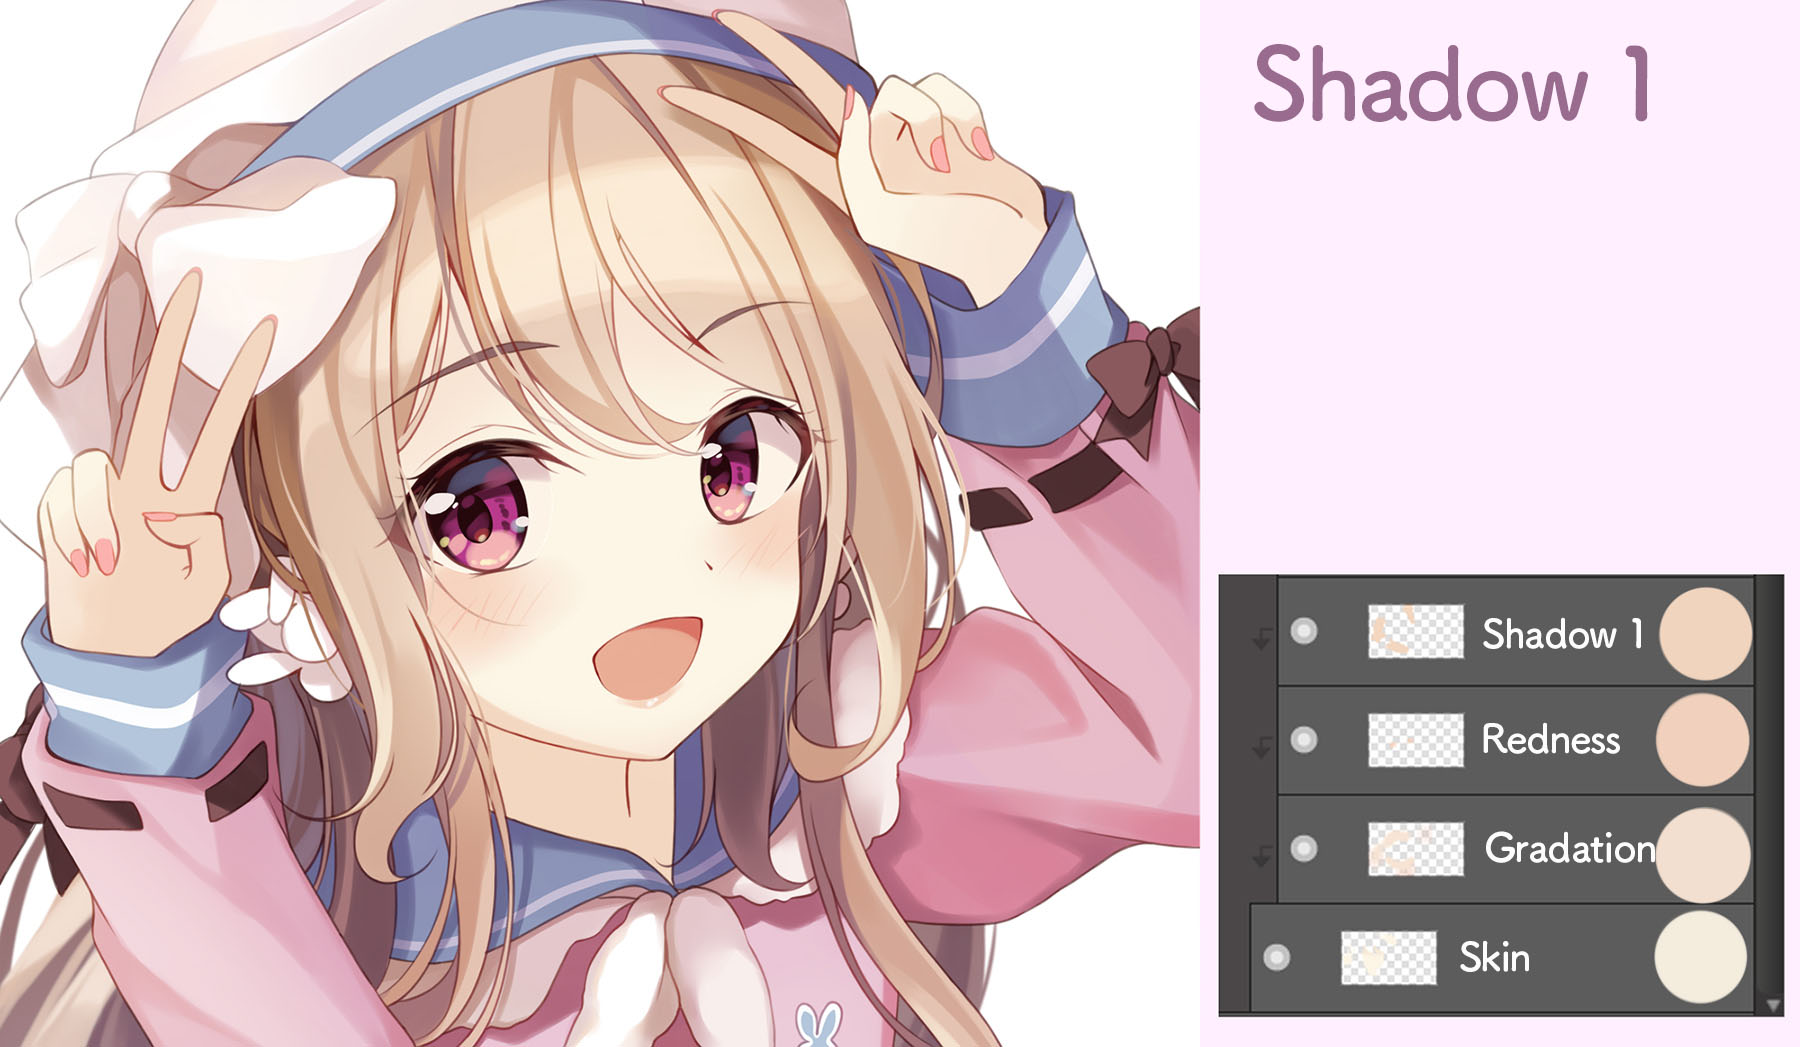
・Shadow 1
Since the skin needs to be soft and smooth, I use the brush with a soft edge like the Watercolor brush.
For the same reason, I separated the shadows into 3 different layers, painting in the order of light (thin enough to blend well with the skin) to dark shades.
I start from the lightest color.
Think of this process as painting along the line drawing.
I will not yet be painting the parts of her forehead that will be hidden with the bangs.
Since there will be a drop shadow of her hair, the shadow must be much thicker.
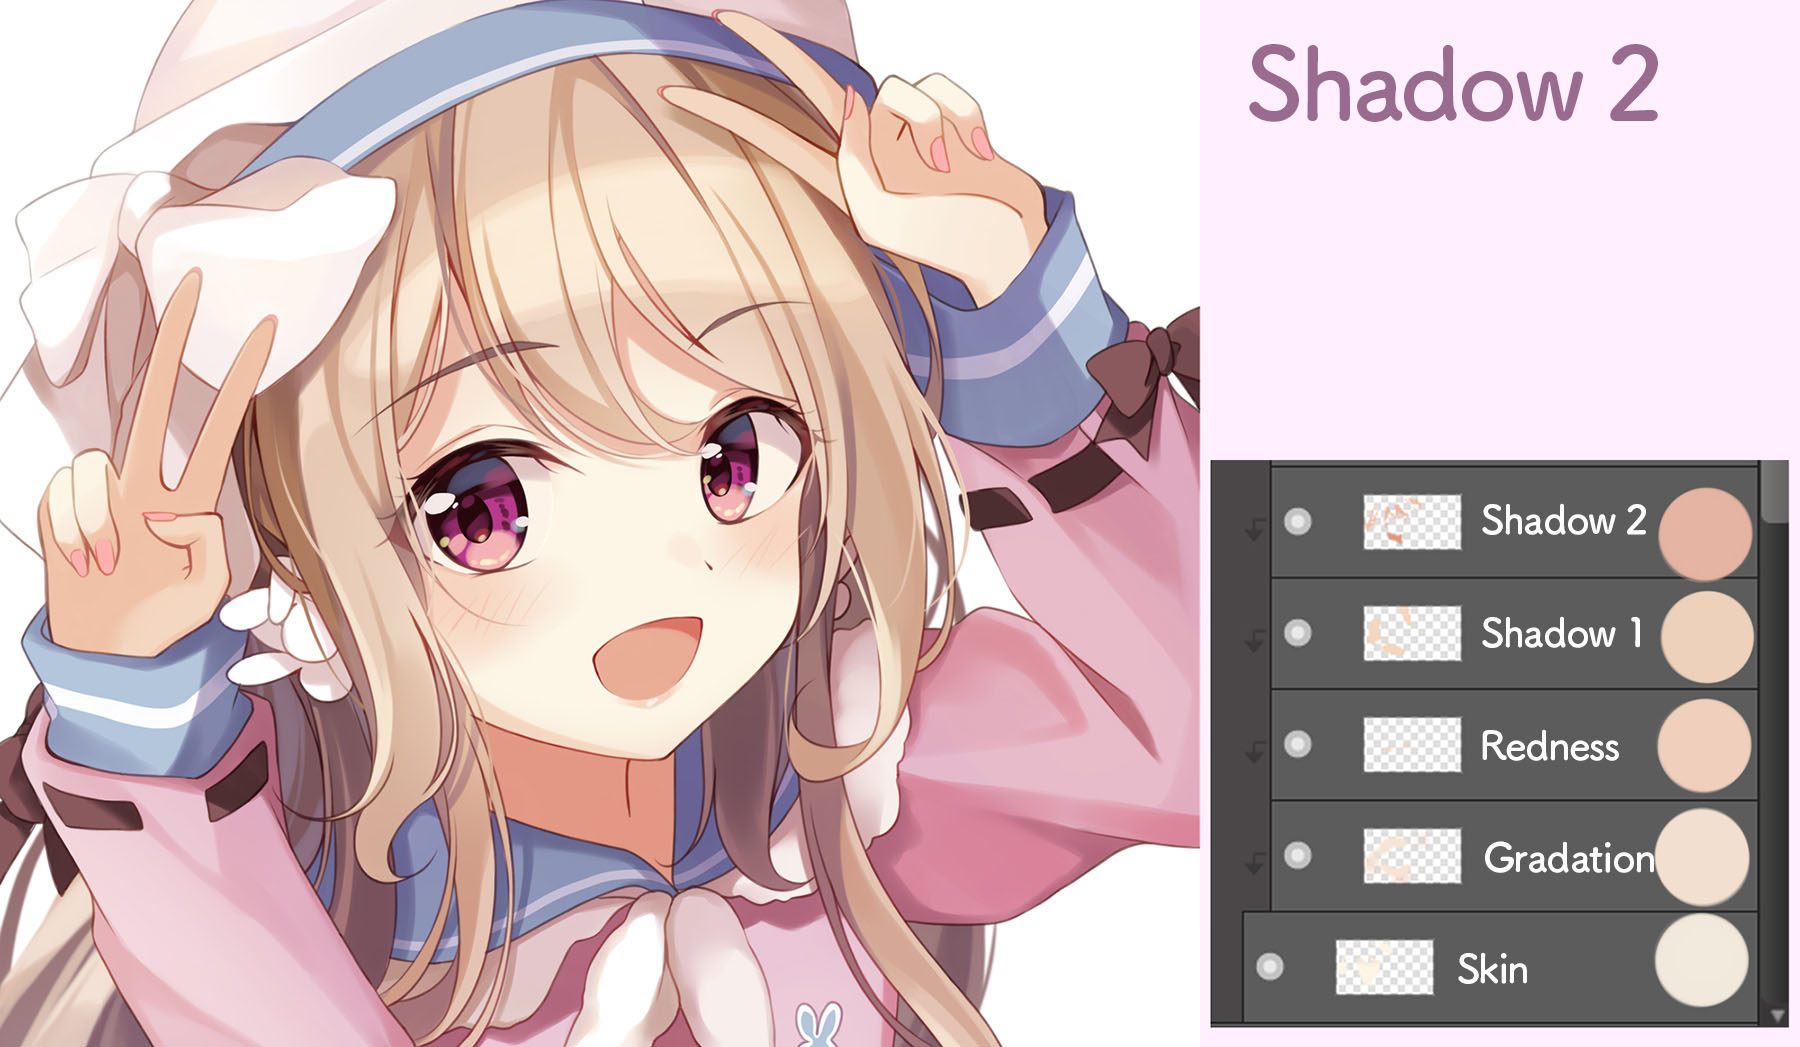
・Shadow 2
This is where I paint the said drop shadows.
You have to be careful with the “three-dimensionality of the face”.
Make sure to pay attention to the three-dimensionality of each part like the hair and the face when you are adding the shadows so it doesn’t become flat.
As you can see in the comparison example below, I don’t recommend this painting method of changing the color used for the base color and sliding it downwards.
Remember that the hair is layered softly on the forehead, which means there will be a large area of shadows.
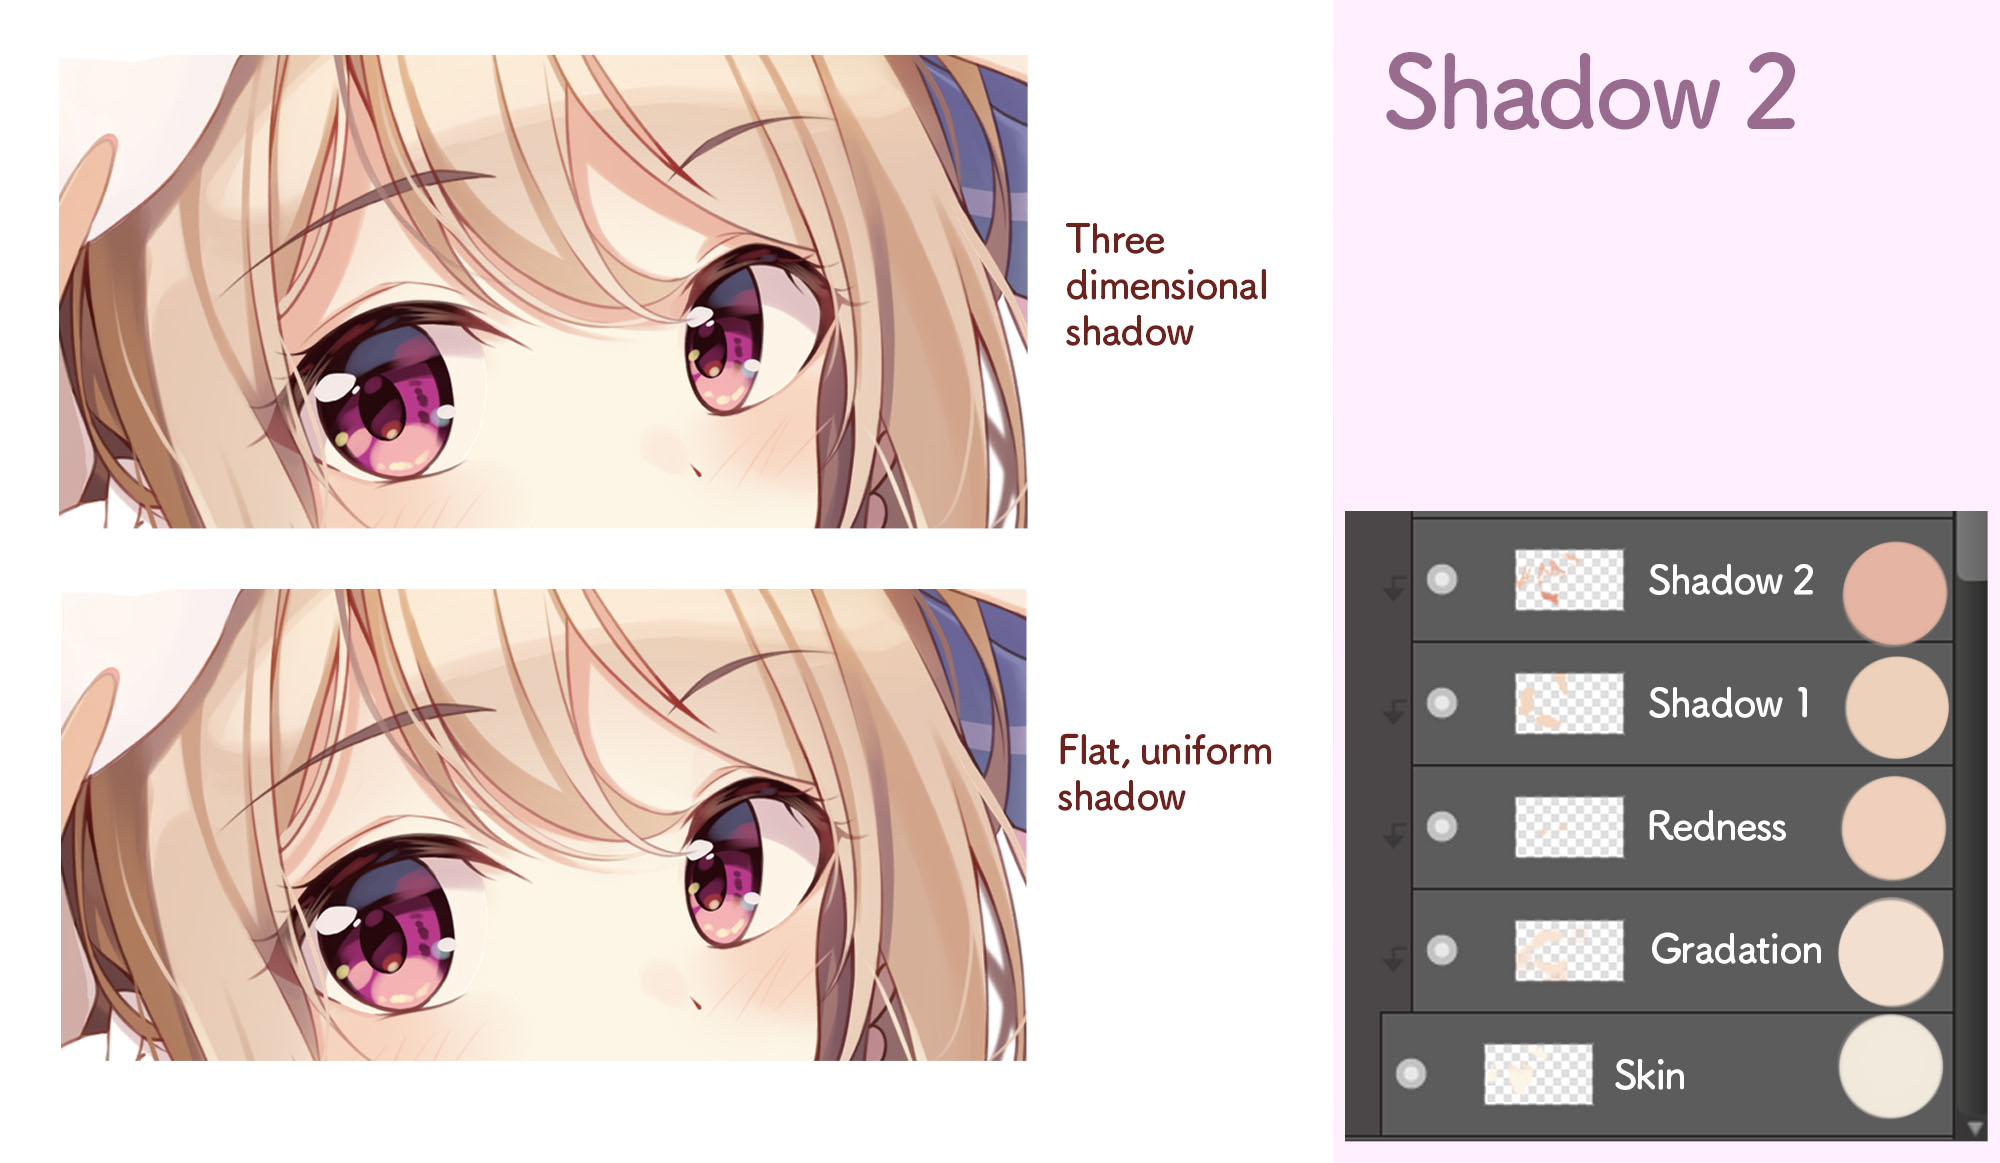
Besides the forehead, I also painted the neck and the palms as well.
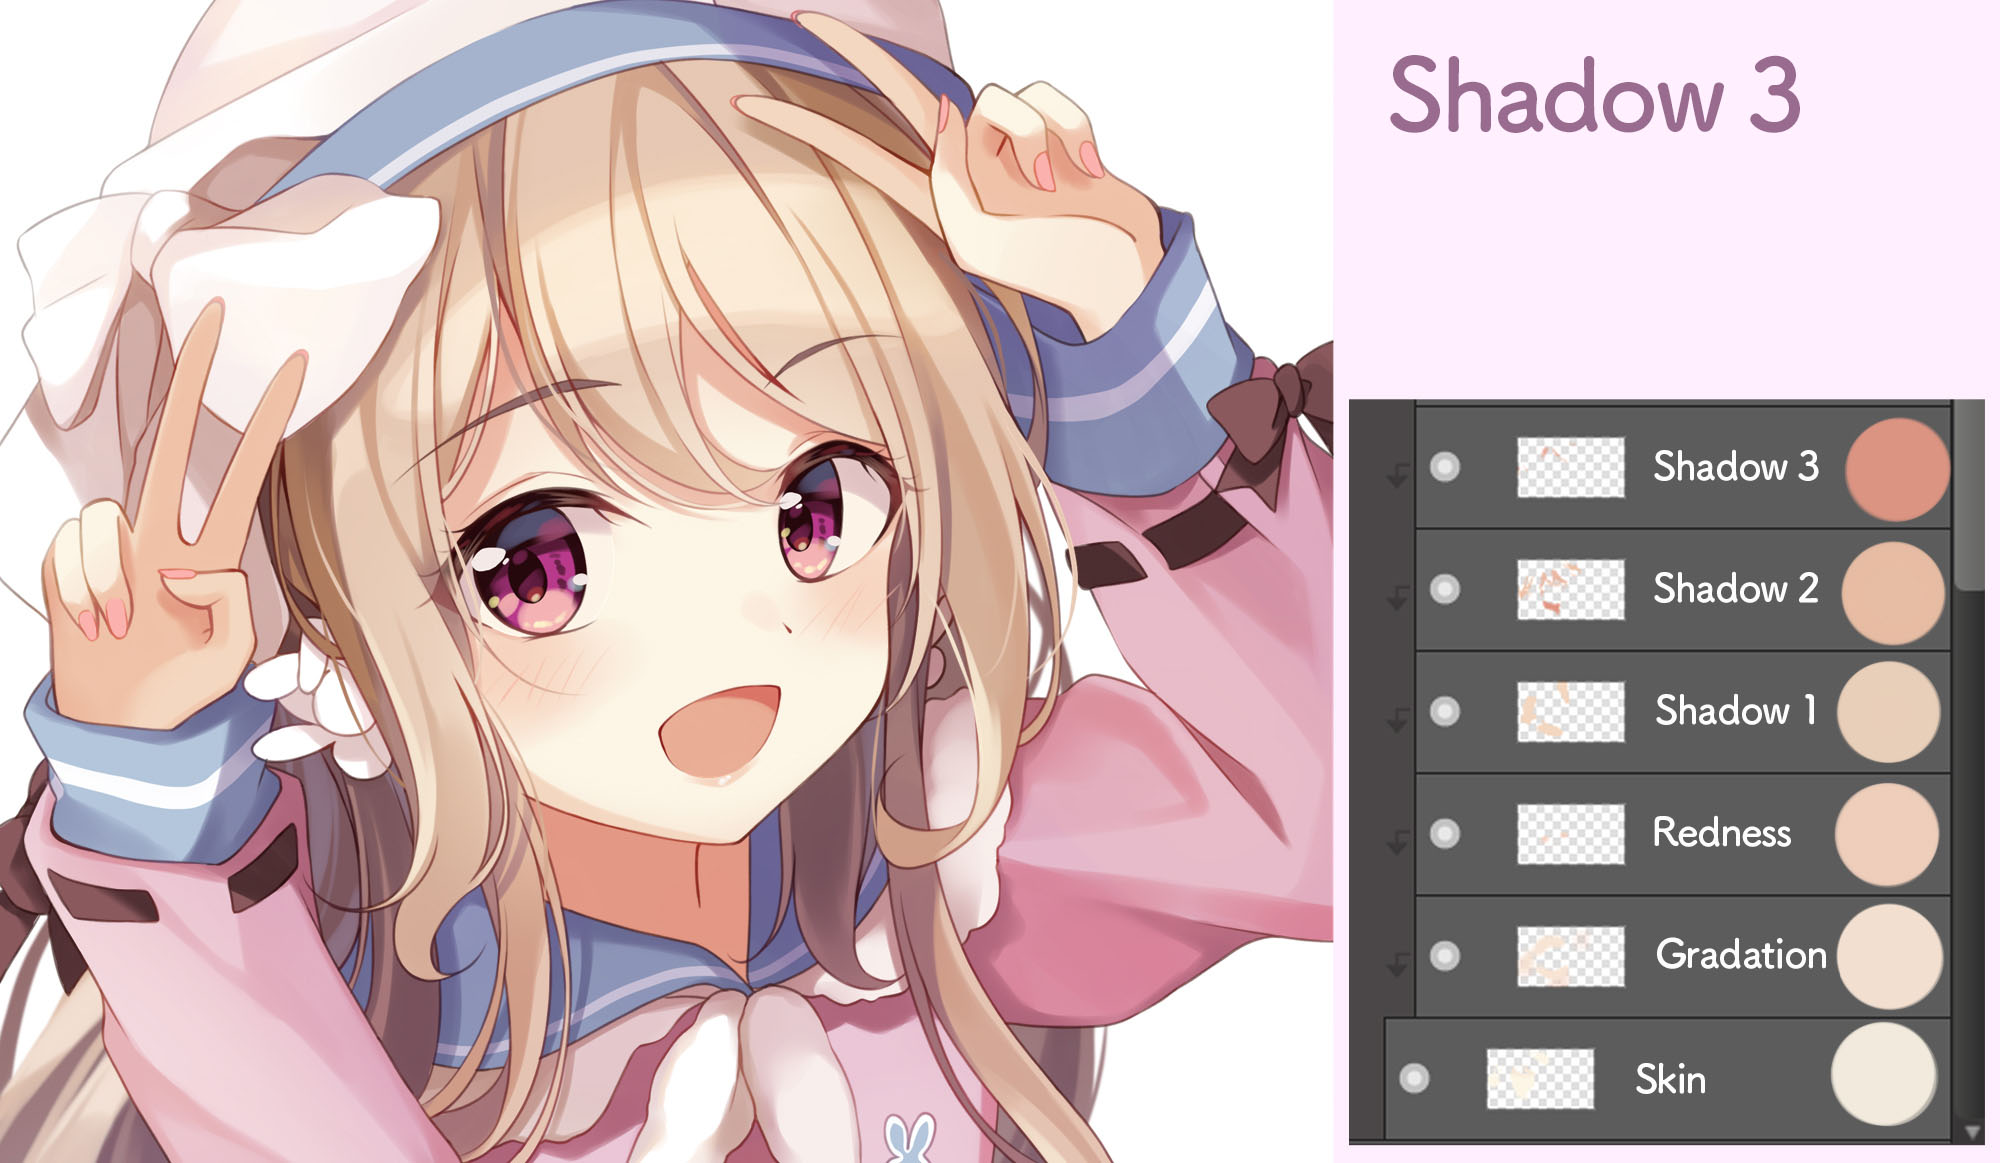
・Shadow 3
I will paint this shadow using a color with much more redness.
The area of painting is as done for Shadow 2 but here I paint the darkest parts, to blend from top of Shadow 2.
For instance, the darkest part of the drop shadow from the bangs and the whole neck.
Since I made her do a V sign here, I also added drop shadows behind the fingers folded too.
・Highlight
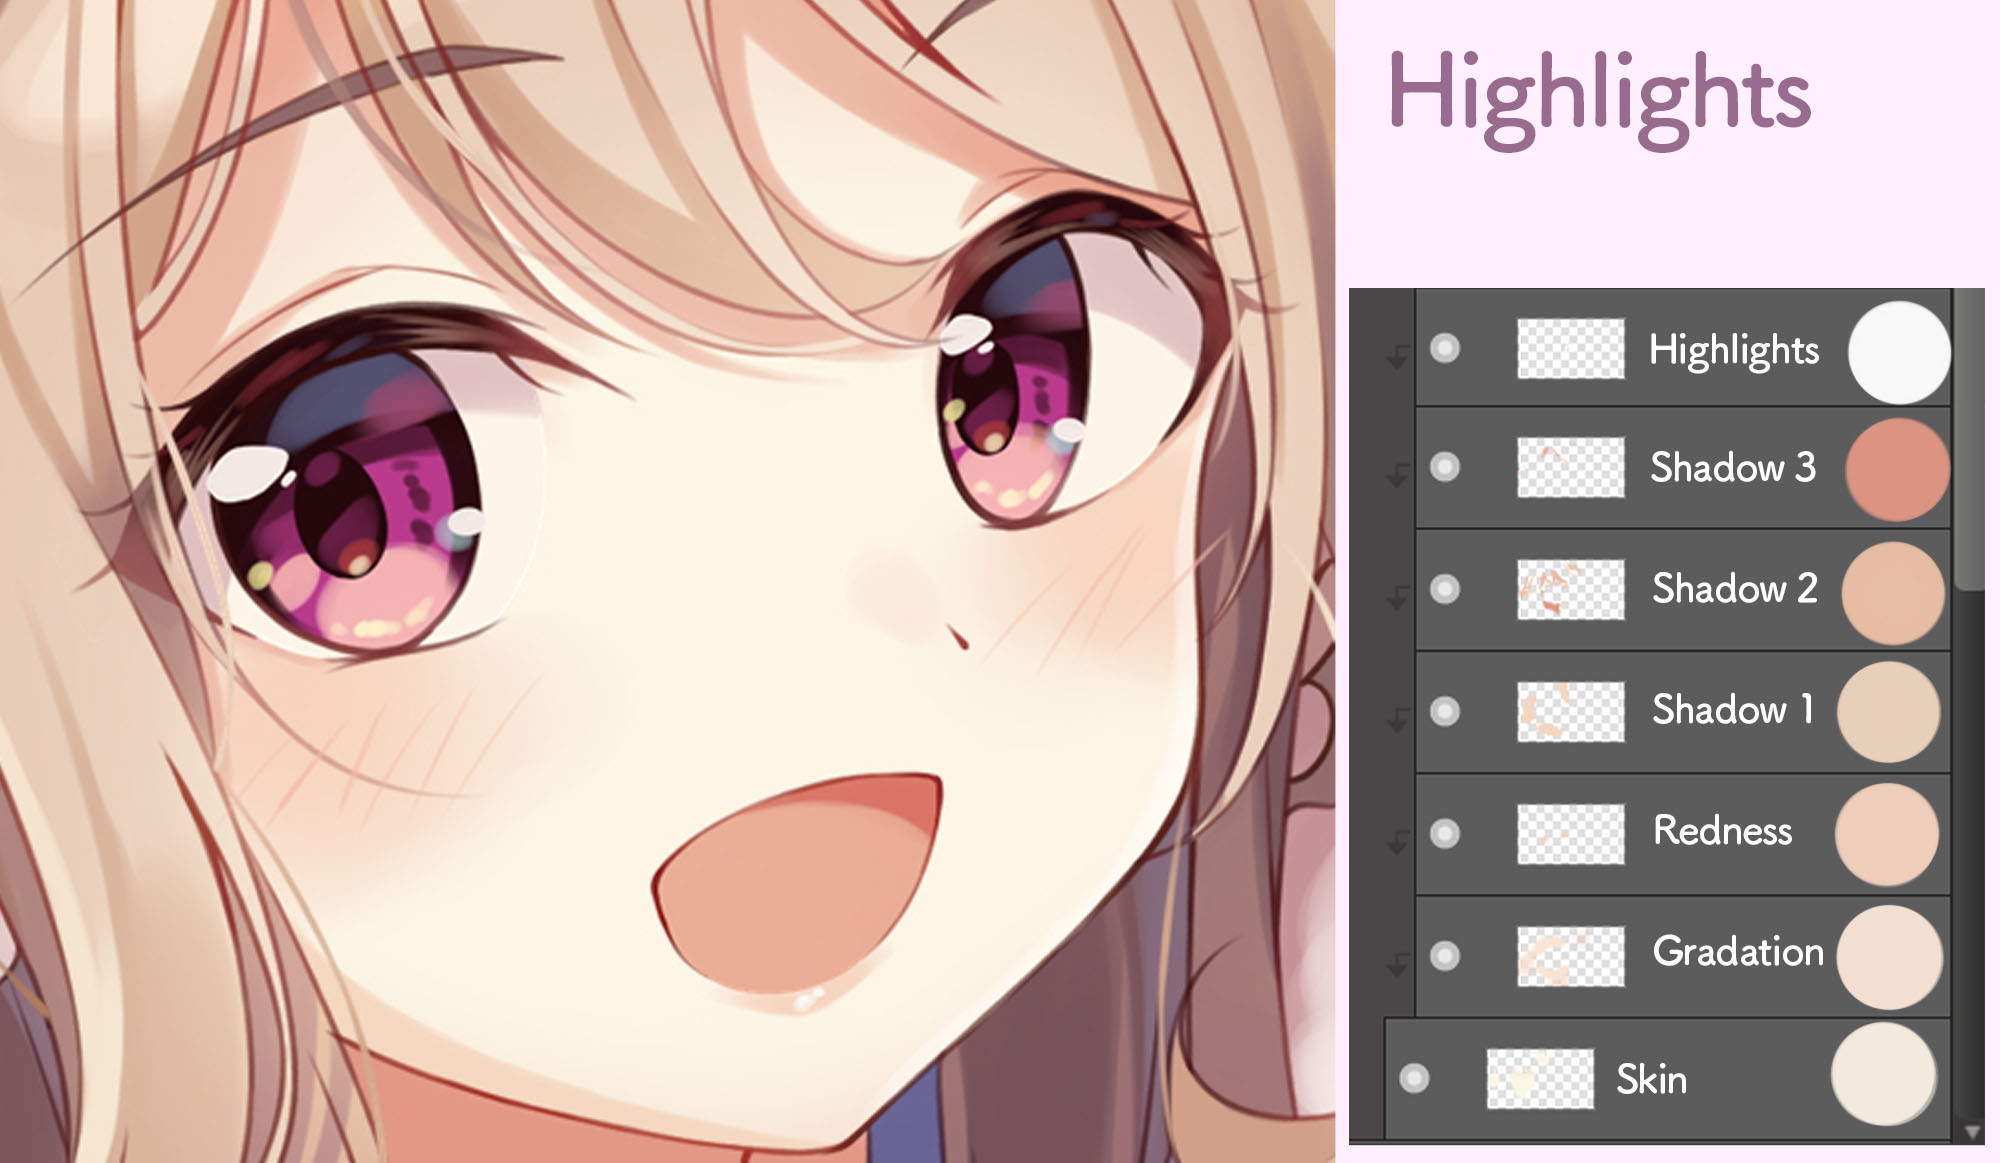
Highlights are essential for portraying the glossy texture of the skin.
Create a new layer and set its Blending to “Overlay” before adding in the white highlights on her nose tip and the facial outline.
If the white stands out too much, it will look very unnatural so keep the opacity of the highlight layer appropriate.
I think it would be nice to blend the contour using the Blur brush or the Smudge brush.
・Adjusting with Overlay
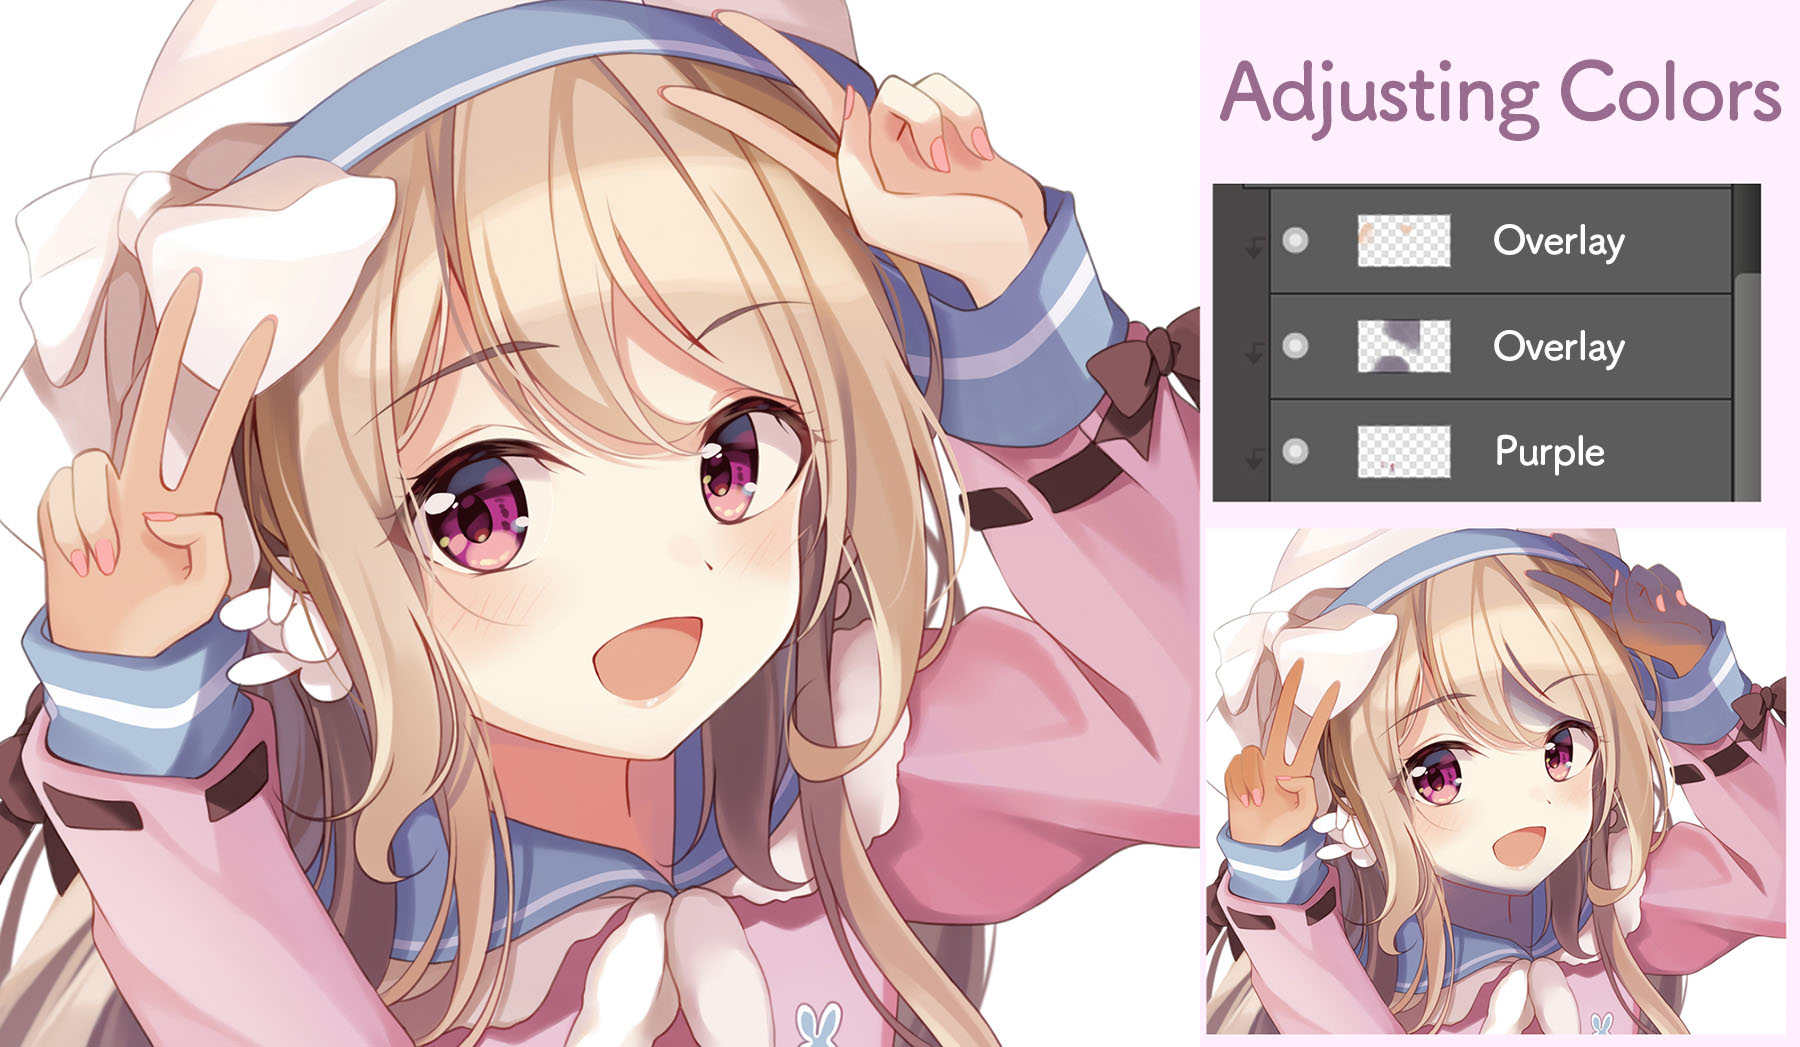
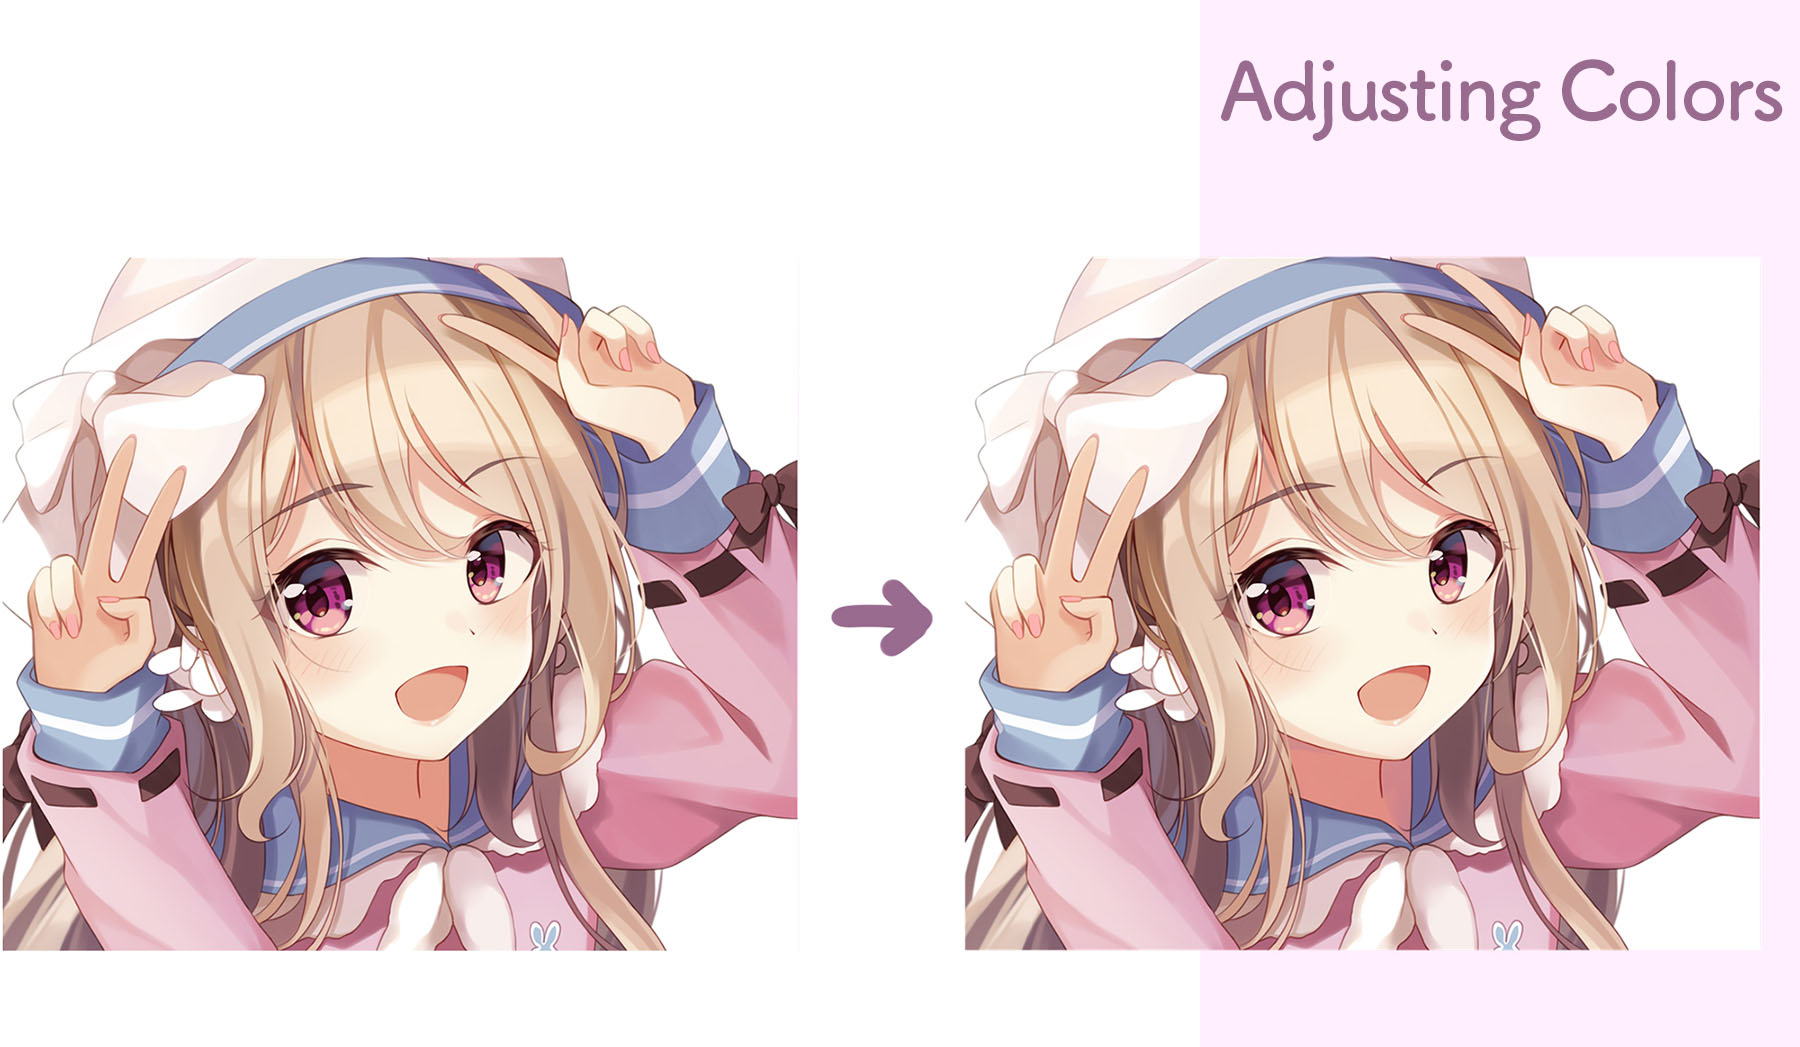
You can upgrade the texture of the skin by adding blue or purple on top of the warm shade of skin tone color.
For this tutorial, I used Overlay to add purple to the shadowed parts and a bit of orange to the bright parts.
You can illustrate the complexion by adding red or orange, creating a dynamic in the plain color of shadows.
I blended them naturally by lowering the opacity of the layer and by adjusting the saturation and brightness with “Hue (Ctrl+U)” from the Filter tab.
・Nails
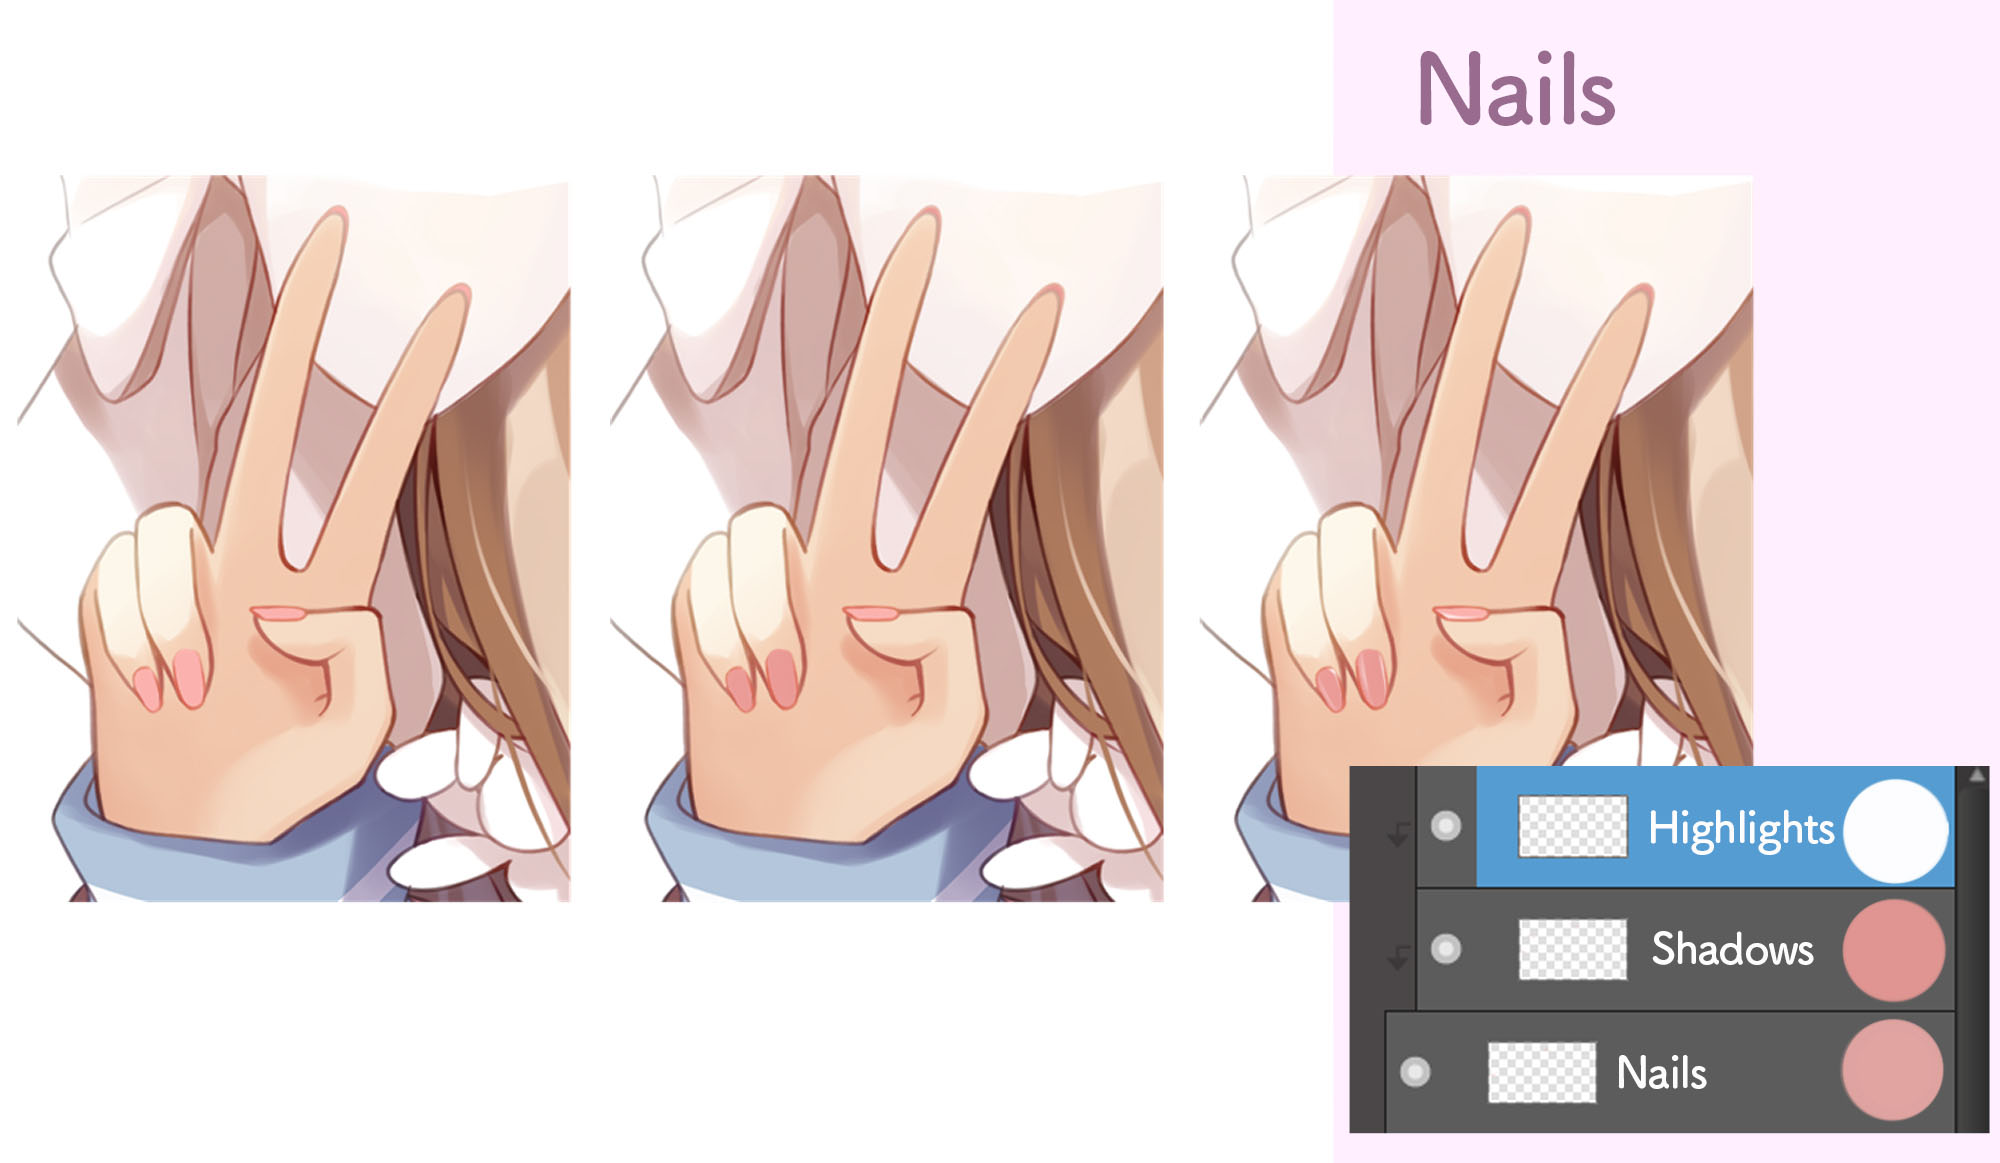
Repeat the same process for the nails as well. Clip the layers in the order of highlights on top of the shadows on top of the base color.
You can create the glossy look by tracing the line drawing with white highlights.
This completes the illustration!
I hope you can use my painting method for reference with your future drawings.
Let’s upgrade your skin painting skill by repeating the practice!
(Text・Illustration/でぺ)
Twitter / https://twitter.com/depe874
ART street / https://medibang.com/u/depe874/
\ We are accepting requests for articles on how to use /

