2023.04.24
Manga Tutorial for Beginners Vol.16: Publish your finished manga
Hi, this is “ГФ”.
In the previous tutorials, we’ve looked at the process of creating manga, including outlining, naming, filling in with black and adding tones.
The final step in creating digital manga is to arrange the format of the manga so that others can read it.
Today we’ll learn how to export and publish manga created with MediBang Paint.
Index
Export all the pages of your manga at once!
The data format for creating manga in MediBang Paint is “mdp”, a proprietary format that cannot be opened in other applications, uploaded to publisher websites or submitted to printers.
By exporting mdp files, you can convert them to jpg, png or psd formats that can be opened in other applications.
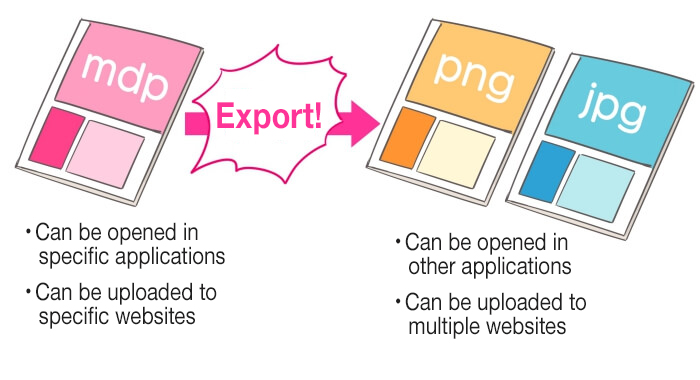
Layers are merged when the file is exported.
For manga data stored in the cloud, all pages can be automatically exported at once with “Export All” (the operation is performed while communicating with the data in the cloud storage, so make sure the communication environment is good enough).
Select the title
Click the button ![]() to open the Project panel, select the work you wish to export and click the OK button.
to open the Project panel, select the work you wish to export and click the OK button.
As we are going to be creating a B4 sized manuscript for commercial use, I hate to be arrogant but I will use my own work as an example.

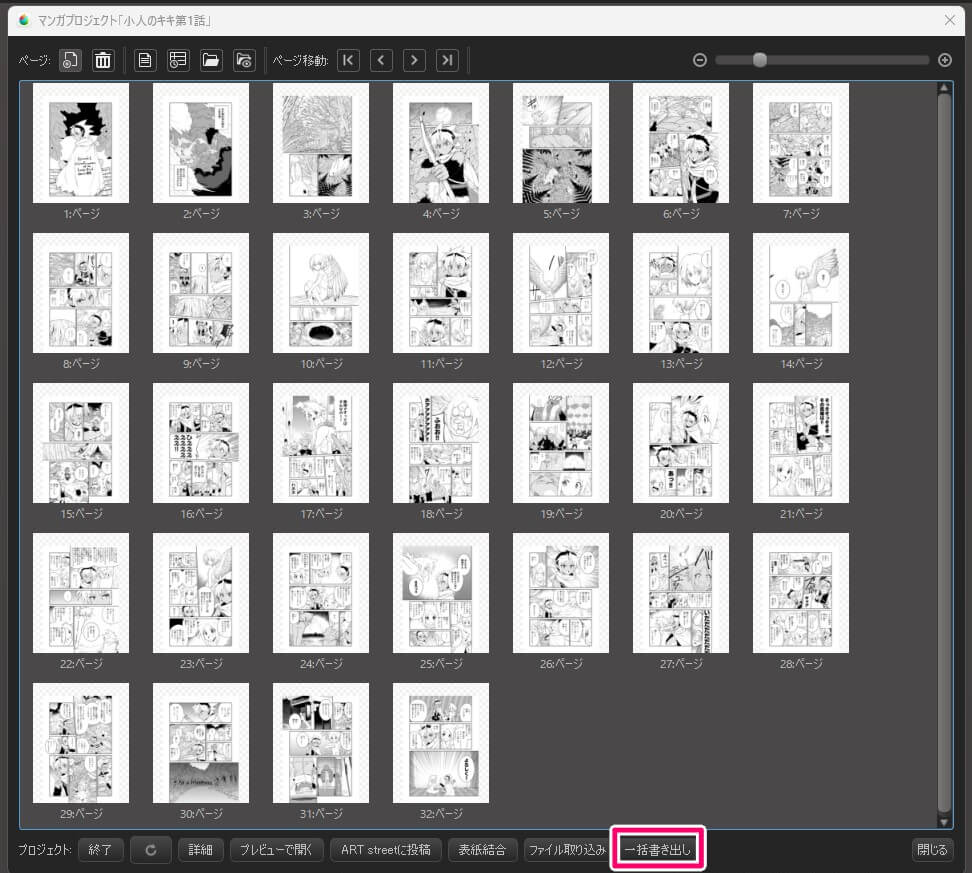
After confirming that you have opened the work project, press the Export All button at the bottom of the panel.
Select the file format
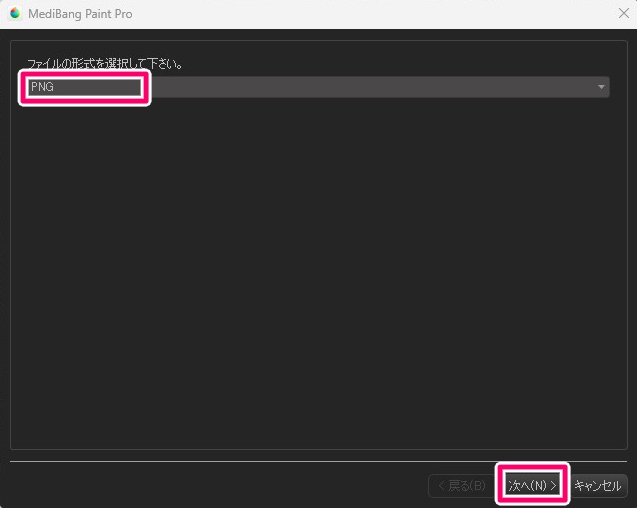
A window will appear, select the file format you wish to export from the pull-down menu.

The jpg and png formats are commonly used on image posting sites.
Select jpg if you want to use a lower quality image but a modest amount of data, or png if you want to create more data but with a better resolution.
In this case, select png and click “Next”.
Export settings
In the next window you can select the export settings for the file.
Check the Rasterize box if you are exporting to psd format.
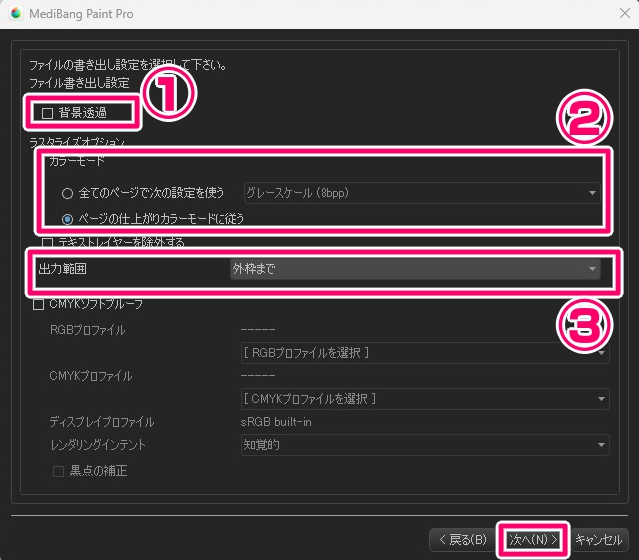
① If you tick the transparent background box, the background of the pages will be a transparent color.
As I want the background to be white, I don’t tick the box.
② As for the color mode in the Rasterize option, you can leave it at Match the final color mode of the page if you want to export it with the initial settings.
For example, if you want to export a color manga as a monochrome manga, select the Glay Scale from the Apply this setting to all pages.
③ For the Output range, select the Outline border as we are creating data for web posting.
Select the Bleed if you are creating doujinshi.

You don’t need to change the following settings.
Click the Next button.
Manuscript can be reduced in size
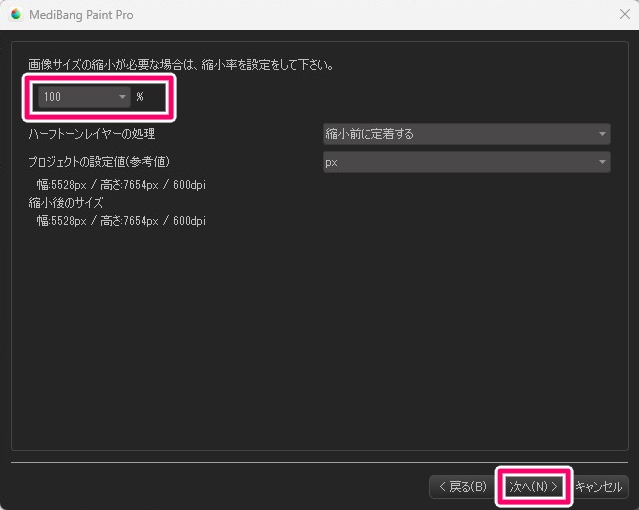
The next screen allows you to set the reduction ratio when reducing the size of the original document for export. However, if you use this function to reduce a monochrome binary document, the image quality will be very poor because the document is reduced in its monochrome binary state.
Therefore, it is recommended to export the data at its original size (100%).
(If the data is not monochrome binary data, it is OK to export the data at a reduced size at this point).
Confirm that the size is set to 100% and press Next.
Set the page numbers
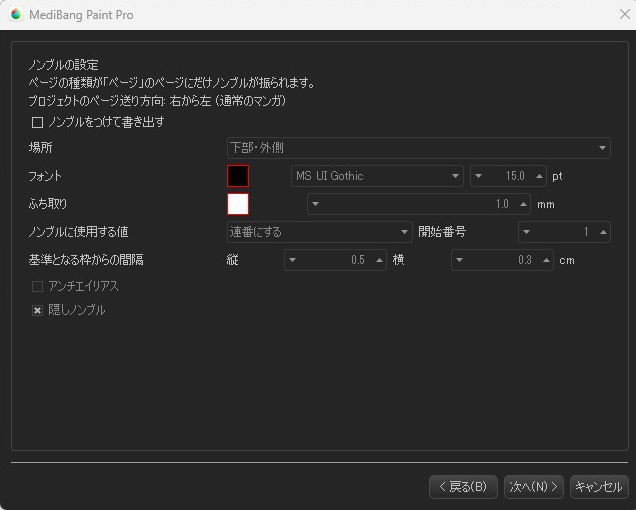
When you press Next, the window changes to “Folio Settings”.
Folio means page numbers.
As for posting on the Internet, it is up to you whether you put folios on the pages or not, but if you are going to submit your manuscript to print shops for doujinshi, etc., you must always put folios on the pages (check the submission rules of each print shop when submitting).
It’s OK to use the text tool to put the folios on the pages one by one, but with this Export All function it’s useful enough to allow you to put the folios on the set area on each page. You can also place the hidden folio.
If you tick the Export with Folio box, you can specify the folio placement, font, size, bordered/unbordered or start number.
You don’t check the box for the monochrome binary data, but you can check antialiasing to folio numbers by checking the Antialiasing box.

For your reference, if a B4 commercial manuscript is exported with the above settings (using font size 30), the folios will be added as follows.
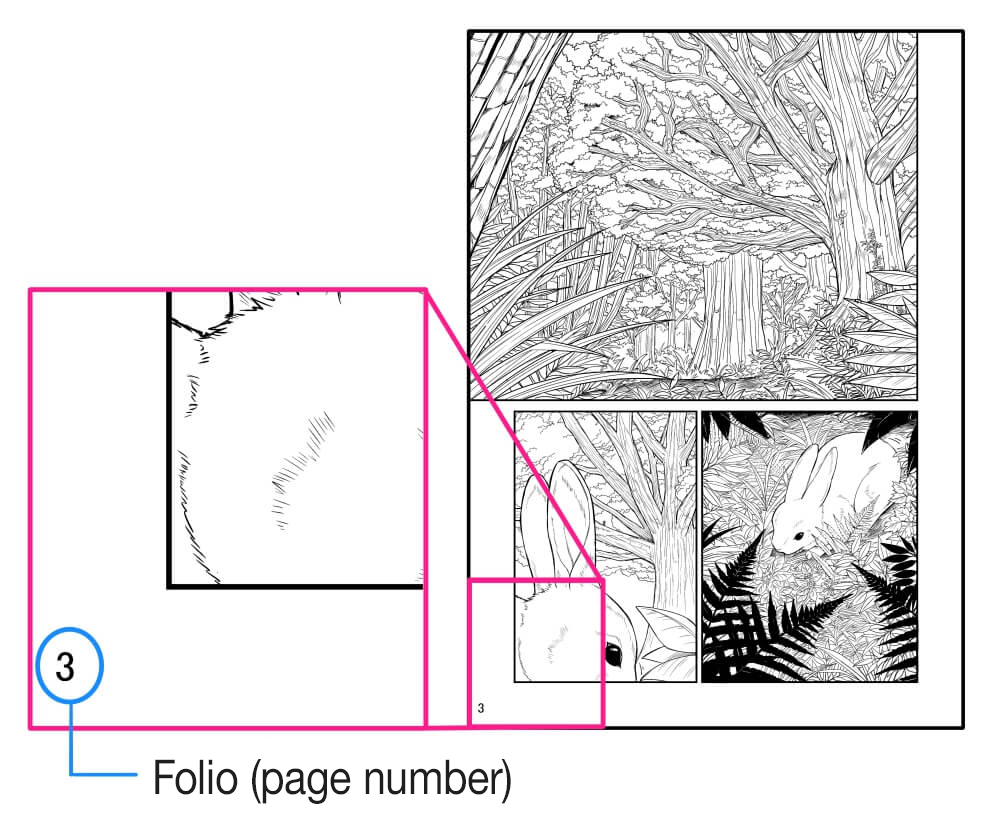
Hidden folio is an inconspicuous folio that is placed near the gutter of books and is used to prevent page numbers from being too visible.
Checking the Hidden Folio box allows you to set the distance of the folio from the trim line, folio font and size, bordered/unbordered and start number (placement is set as the inside of the bottom of the page).

For your reference, if a B4 commercial manuscript is exported with the above settings (using font size 8), the folios will be added as follows.
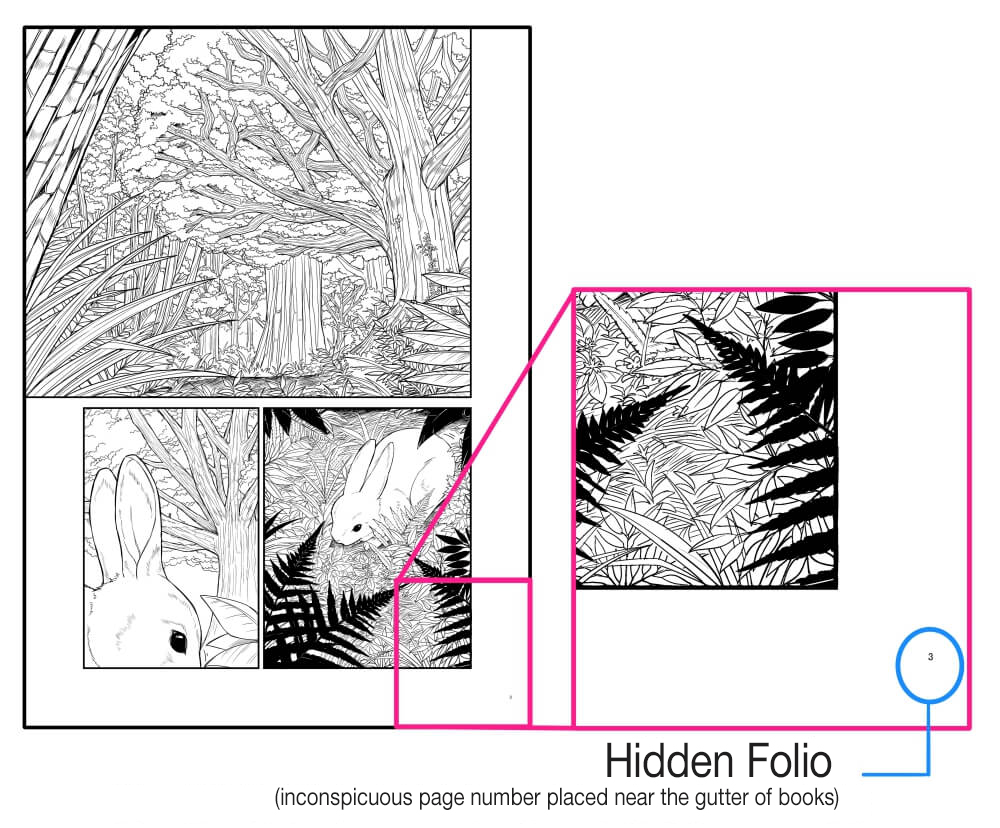
Press Next once you have completed the folio settings.
Select the destination
The window for specifying the destination of the exported data will now appear.
Press the Open dialogue button and select the location where the data will be saved.

In addition, by ticking the two boxes below, a folder will be created and the export will run automatically and the folder will open by itself when the export is complete. This is useful because it is easy to see when the export is complete.
After specifying the destination, press the Next button.

Confirm settings and export
The window for confirming the settings will now appear.
Press OK to start the export.

It takes rather a long time, so wait until the gauge reaches 100% and do nothing.
As the export is performed while communicating with the data on the cloud storage, make sure you secure the better connection environment.

If you select the Open folder after export when specifying the destination, the folder will open automatically when the export is complete.

Now you have the original size png files in B4 size at 600 dpi.
Reducing data for web upload
We have created a B4 size manga with 600 dpi data and exported it, but if you try to submit this data to image posting sites with the size as it is, you may not be able to submit it or it may take too long because the amount of data for each page is too large.
It is therefore recommended that you reduce the image size when uploading to other sites.
I usually do this using the Photoshop Action feature, but it is also possible, although it takes a little longer, to reduce the image size nicely in MediBang Paint. Let me explain how to do this.
Create a new project for reduction (file import)
First create a png file of the original size using the procedure described above.

Then select Import file from the File menu above.
If you can’t select it, another project must be open, so close it using the Close Project button.

The Import File window opens.
This project is only intended to reduce the size of the image, so give it a simple title such as “For the Resize”.
Drag and drop the file into the area at the bottom of the window, or click the Select File button to select the original size png file you created.

Then you will see the information list of the original size png data, so make sure all the pages are selected and press the OK button to start uploading.

This will take a little while, so wait until the gauge reaches 100% and do nothing.

When it reaches 100% you will see a message saying “Process Completed” so press the OK button.
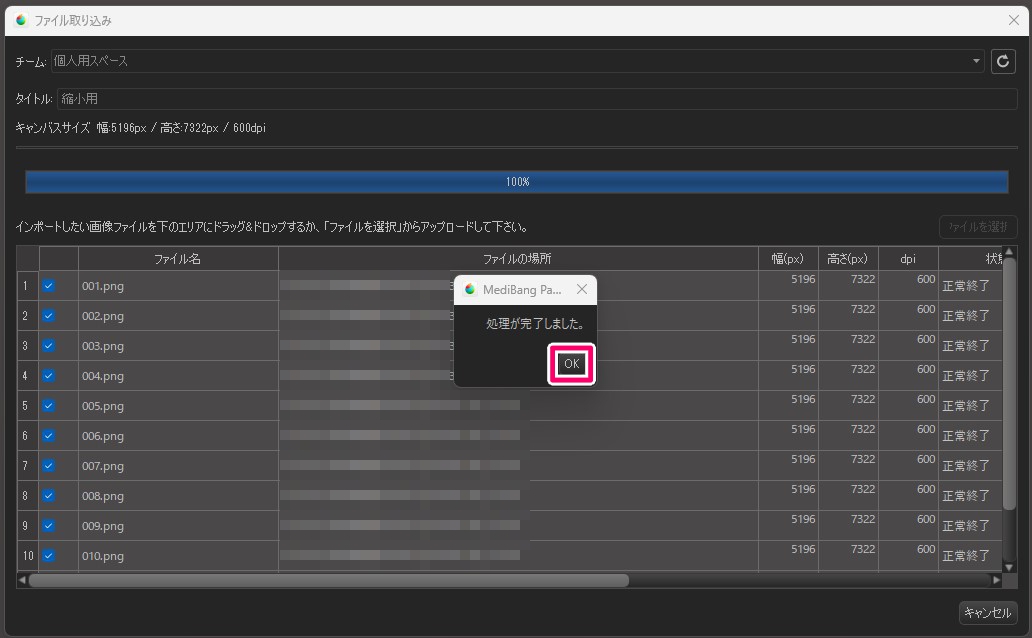
Then you will see the project panel.

Reduce data and export all
Press the Export All button at the bottom of the panel.
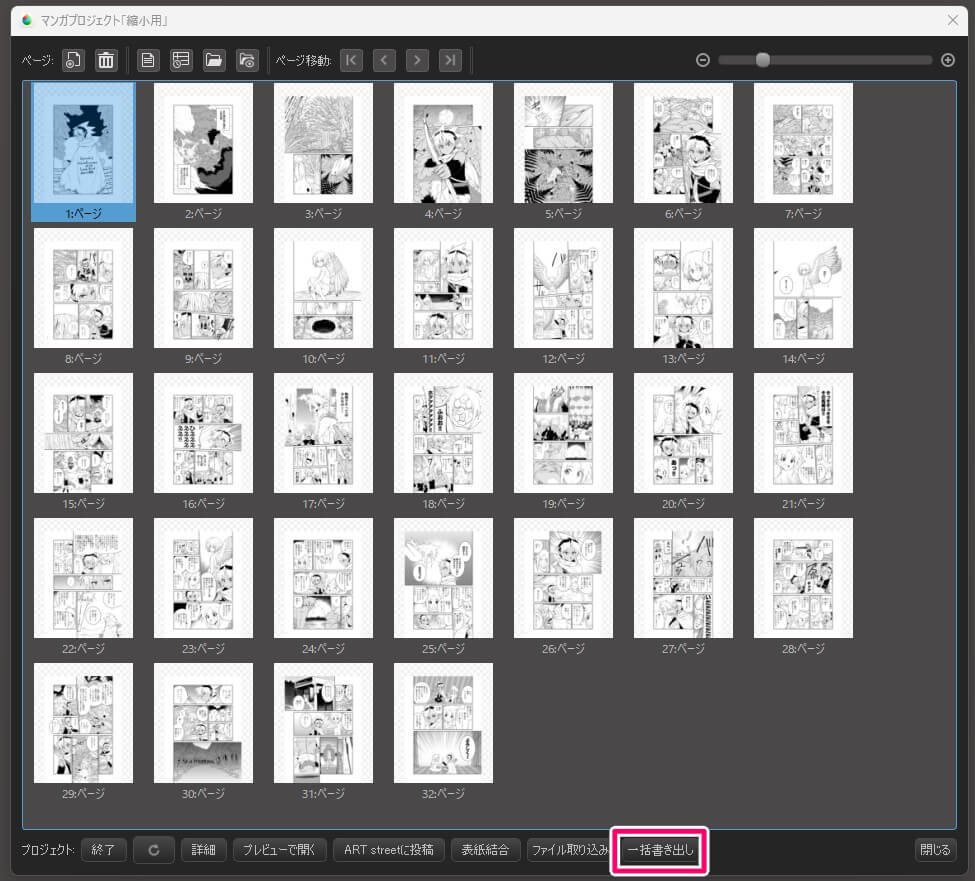
Set the file format to png and go to the resize window, leaving the export settings unchanged.
You can set the reduction ratio by selecting from the pull-down menu or entering the value.
The reduced size will be indicated in “project set value (reference value)”.
If there is a recommended size provided by the websites you want to publish to, you should enter the value.
Today we will select 25% from the pull-down menu.
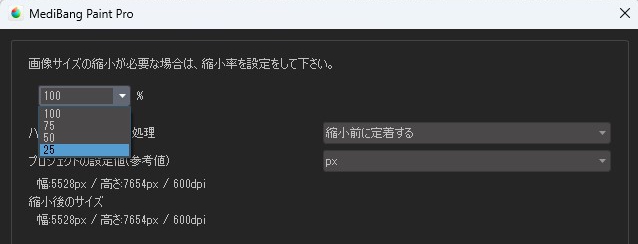
After setting the reduction ratio, click Next.
Specify the destination and export all pages, with the folio setting disabled.
The image below is the part of the manuscript exported with the reduction method.
The tone points will inevitably be rough, but it appears to have good image quality on screen. In addition, less data is required for each page.

Publish to ART street!
From now on, we’ll be learning how to publish the manga we’ve created on “ART street”, a website hosted by MediBang for the publication of artwork.
▼Visit Art street
Upload the exported data
Login to ART street from the button at the top of the site.

Then click on the “Submit” button at the top of the screen.

The initial window is for publishing illustrations, so change it to “Comics”.

The screen will say “Select your file type”, so choose the middle one.

Drag and drop the exported manga file to upload it (if you can’t do it properly, do it with “Select your file”).
(It says “Max File Size: 5 MB, File Limit: Total 500 Files”, so it seems that it’s fine to upload files in their original size, but it is not recommended as it takes a considerable amount of time and you may not be able to upload them)

Confirm that all pages have been uploaded correctly and click the Save button. At this stage your work is not yet published.

Uploading can take a long time if there are a lot of pages, so be patient.

Once the upload is complete, the untitled work will be registered as a one-shot.

If uploading from the cloud
If you store your work in the cloud, you don’t have to select the files you want to upload. However, uploading full-size files takes a long time, so you should only use this option if you have plenty of time to wait or if you have a reduced version of the file in the cloud.
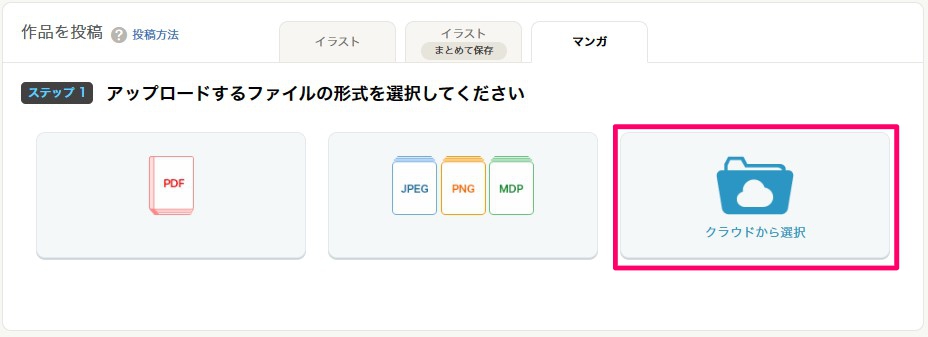
Edit the work description and publish
Click “Detail” on the left side of untitled titles.

Click “Edit” under “Work information” to edit titles, etc.

Click “Finish editing” after setting the title, description and tags.

It is possible to upload other files for the front cover. You can also click on “Preview” to see how the double page spread will look.

Once you have finished editing the work information, click “Publish to ART street” to publish the work.

Setting for serial form (series)
To publish your work as a series, you can edit the series information.
Click on ‘Your Submissions’ to open the submissions list.

Select “Comics” and “Series”, then click “Create New Series”.

You will then see the edit page, so enter the series title, key visual, description, etc. and click “Save”.
You can choose the series type from N/A, Cha. and Vol.
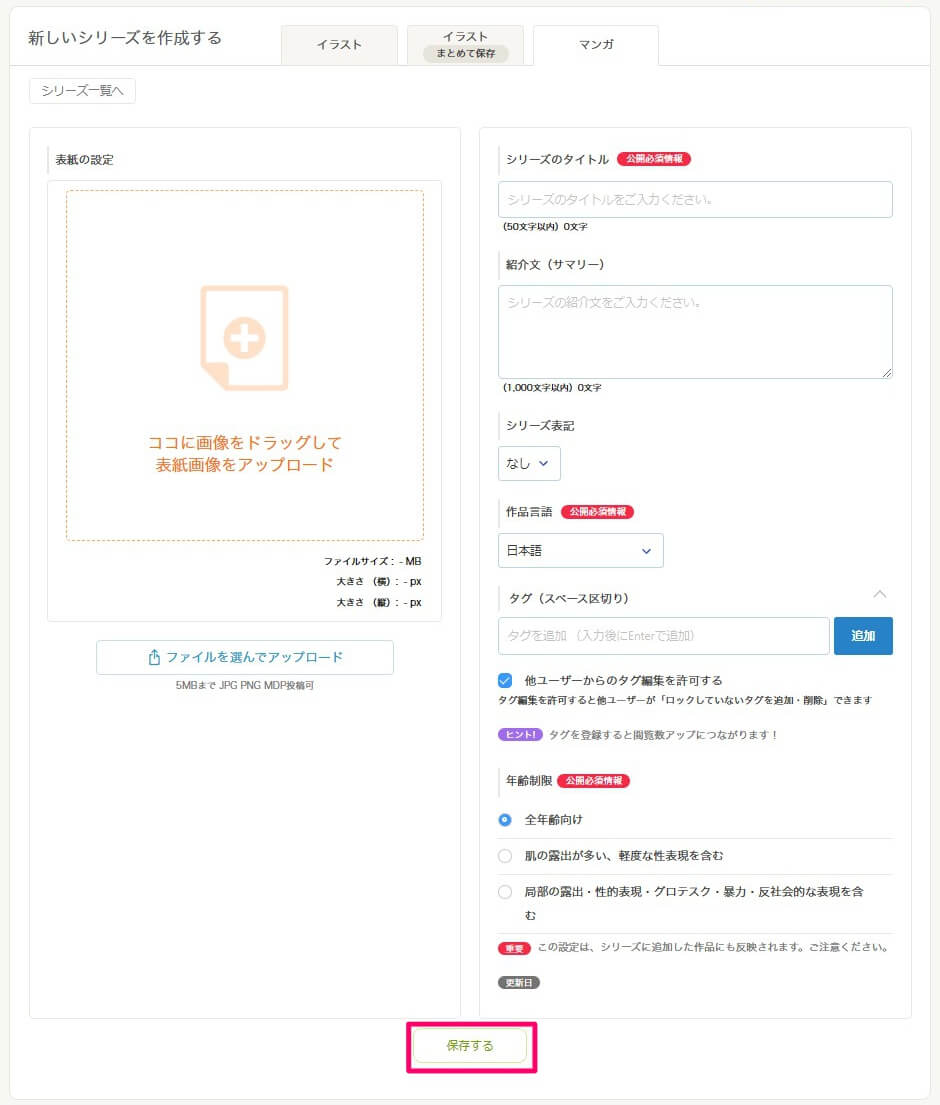
Next, click “View the work list for this series”.

Click on “Edit Series Structure”.

Move the cursor over the untitled work to see the tile box turn gray and the message “Add this work” appear. Click on it.


The work will be added to the list of works on the right of the window, so click “Save”.

Enter the information, including the title, in the same way as for a one-shot.

If you set the series type to “Chapter” or “Volume”, the number format will automatically be applied to the title on the public page.
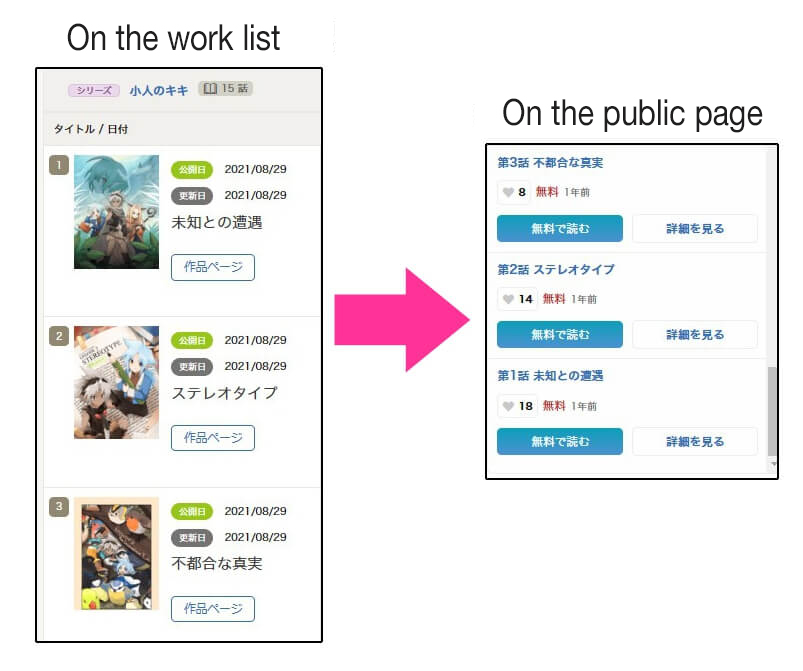
This is the end of today’s tutorial.
Now we’ve gone through the whole process from creating manga on MediBang Paint to publishing it.
In the next tutorial, I will explain how to make creating manga on MediBang Paint easier using the cloud function!
▼You can read my comic, which is used as an example in this tutorial. Please read it if you are interested.
https://medibang.com/book/0c2101280307258390018866367/
Click Here for Previous Tutorials.
Manga Tutorial for Beginners Vol. 01: Process of Manga Making
Manga Tutorial for Beginners Vol. 02: Let’s Make Outline (Part 1)
Manga Tutorial for Beginners Vol. 03: Let’s Make Outline (Part 2)
Manga Tutorial for Beginners Vol. 04: Get Ready to Draw Manga with MediBang Paint!
Manga Tutorial for Beginners Vol. 05: Let’s Make Name(outline)
Manga Tutorial for Beginners Vol. 06: Let’s think about frame layout and screen.
Manga Tutorial for Beginners Vol. 07: Considerations when setting up the canvas.
Manga Tutorial for Beginners Vol. 08: Let’s draw frames and speech bubbles.
Manga Tutorial for Beginners Vol. 09: Let’s draw people and natural objects
Manga Tutorial for Beginners Vol. 10: Let’s get the most out of brushes and materials
Manga Tutorial for Beginners Vol. 11: Let’s draw easy artifacts. (Not in perspective)
Manga Tutorial for Beginners Vol. 12: Let’s Draw a Room Interior in Perspective!
Manga Tutorial for Beginners Vol. 13: Let’s Draw Focus/Effect Lines and Letterings
Manga Tutorial for Beginners Vol. 14: Fill in with black
Manga Tutorial for Beginners Vol. 15: Add tones
「ГФ」
ART street
Click here for the collection: https://medibang.com/u/seledkapodshboi/
You can read my manga here→ https://medibang.com/book/0c2101280307258390018866367/
This is also a manga that I draw under a different name→https://medibang.com/comics/official/dobs340000005872400000000000a/
twitter: https://twitter.com/seledkapodshboi
\ We are accepting requests for articles on how to use /

