2021.11.01
【For Beginners】Become a Weaponsmith – Casting & Minting ~【Weapon Design】
What are the “essential elements” in fantasy stories?
You need magic, demons, …… wait a minute!? Weapons!
They not only allow physically strong strikes, but also include magical attacks.
If that’s the case, are magical books or grimoires included too? There are some characters in fantasy world who use books for physical attacks…
We’ll solve these questions later. But for now, I’ll show you how to draw weapons!
In this article about casting, I’ll be explaining how to design weapons, mainly swords, and how to draw them using the MediBang Paint!
Here we start on the path to becoming weaponsmiths. Let’s make a weapon that all heroes will want!
1, Prepare to start
First, let’s open MediBang Paint.
Functions and tool names that appeared for the first time are indicated as [Function, Tool Name (Windows Shortcut Key)].
I’ve also included a related article for you to read if you want to know more!
▼ About【Shortcut Keys】
Shortcut Keys List【Windows】
Shortcut Keys List【Mac】
Select [File] and then [New (Ctrl + N)].
▼How to [Create New].
Let’s make an artwork
The canvas settings for this project are 1350px wide and 2400px high.
Since we will be drawing the weapon vertically, we recommend a vertical length.
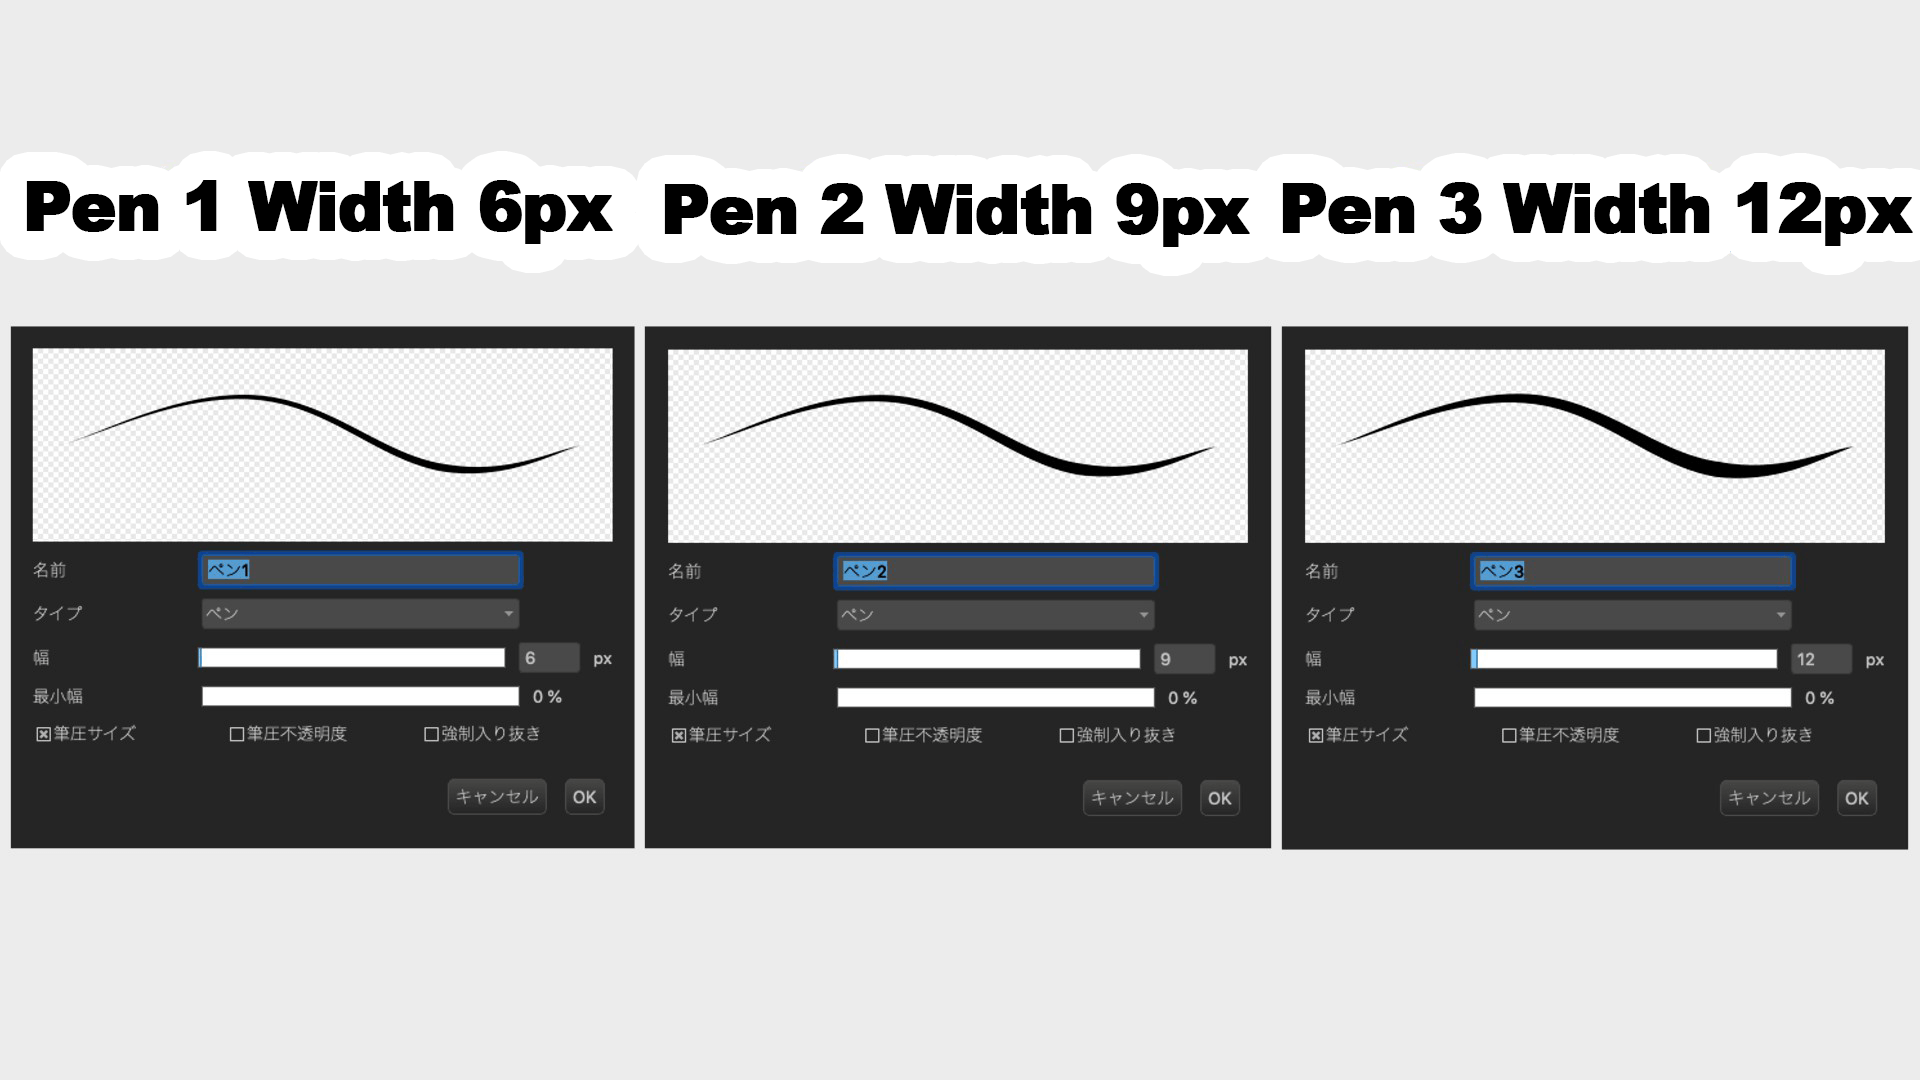
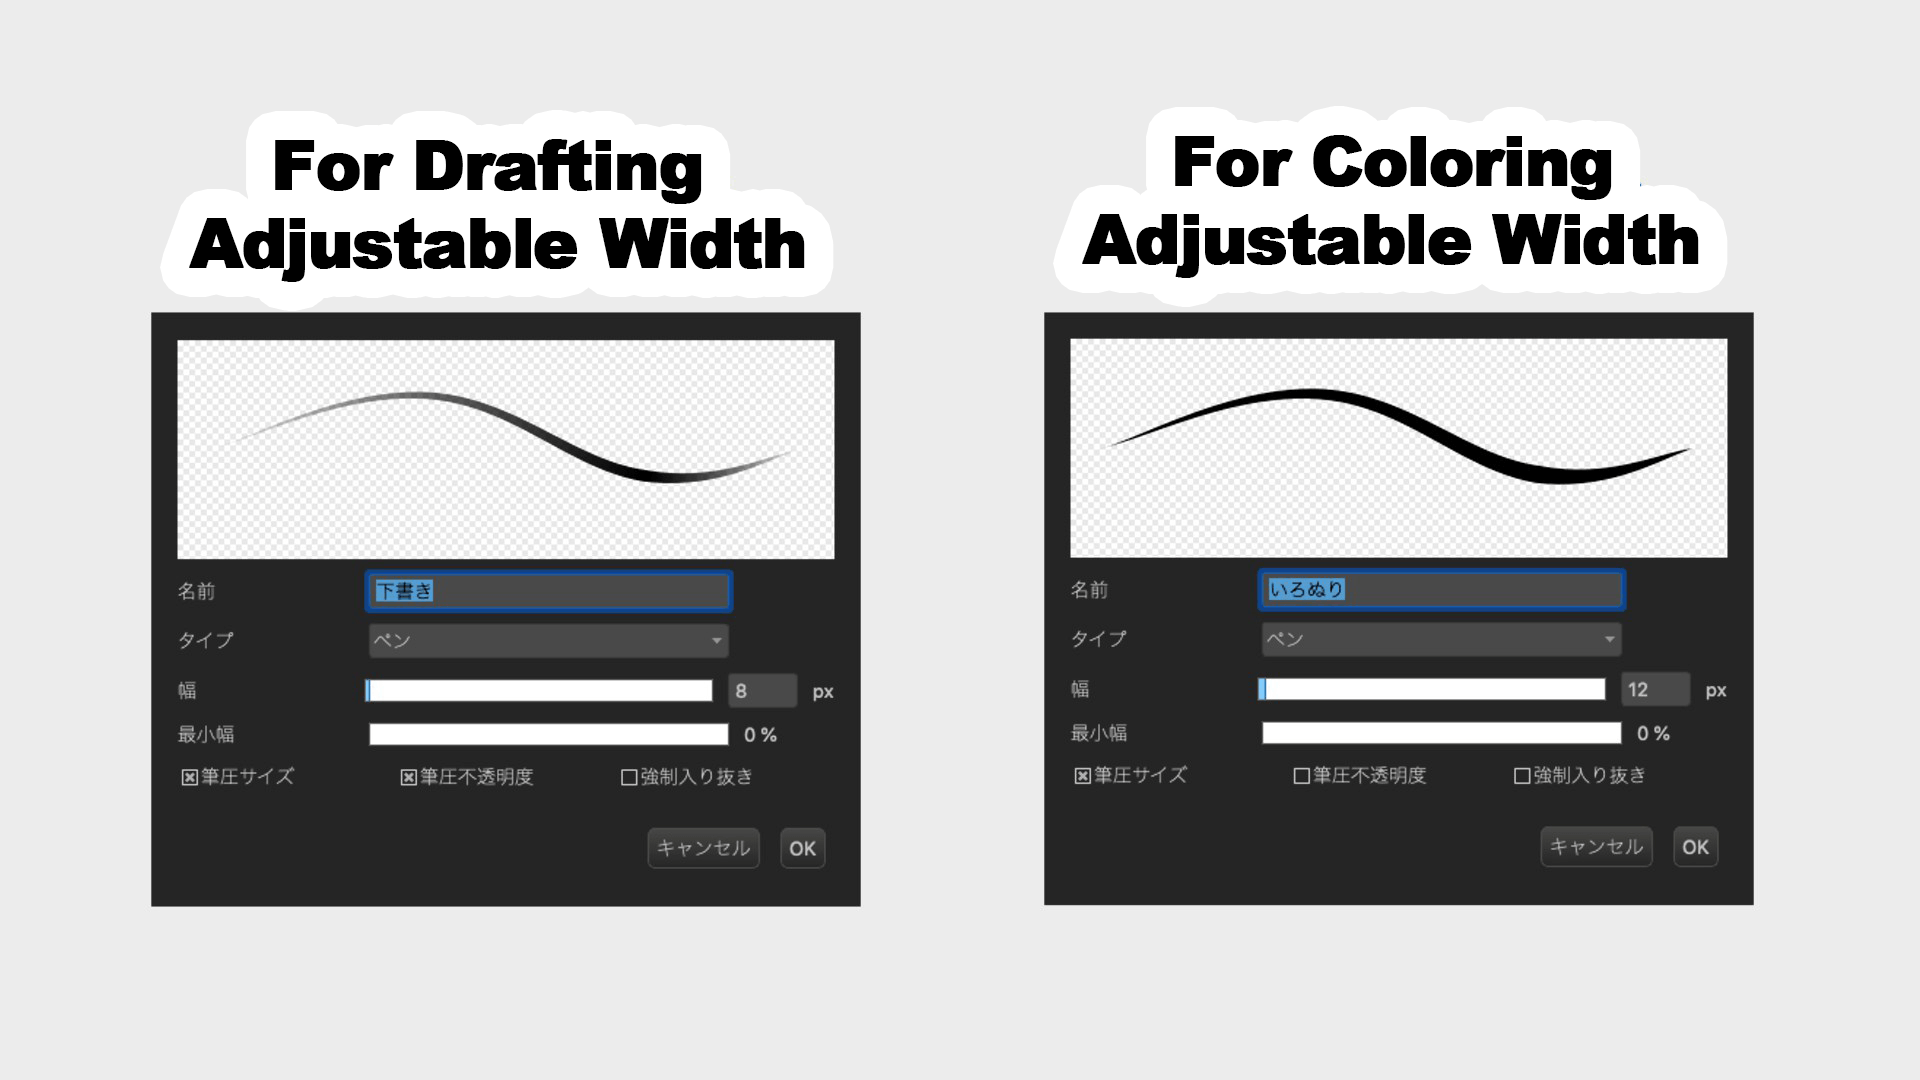
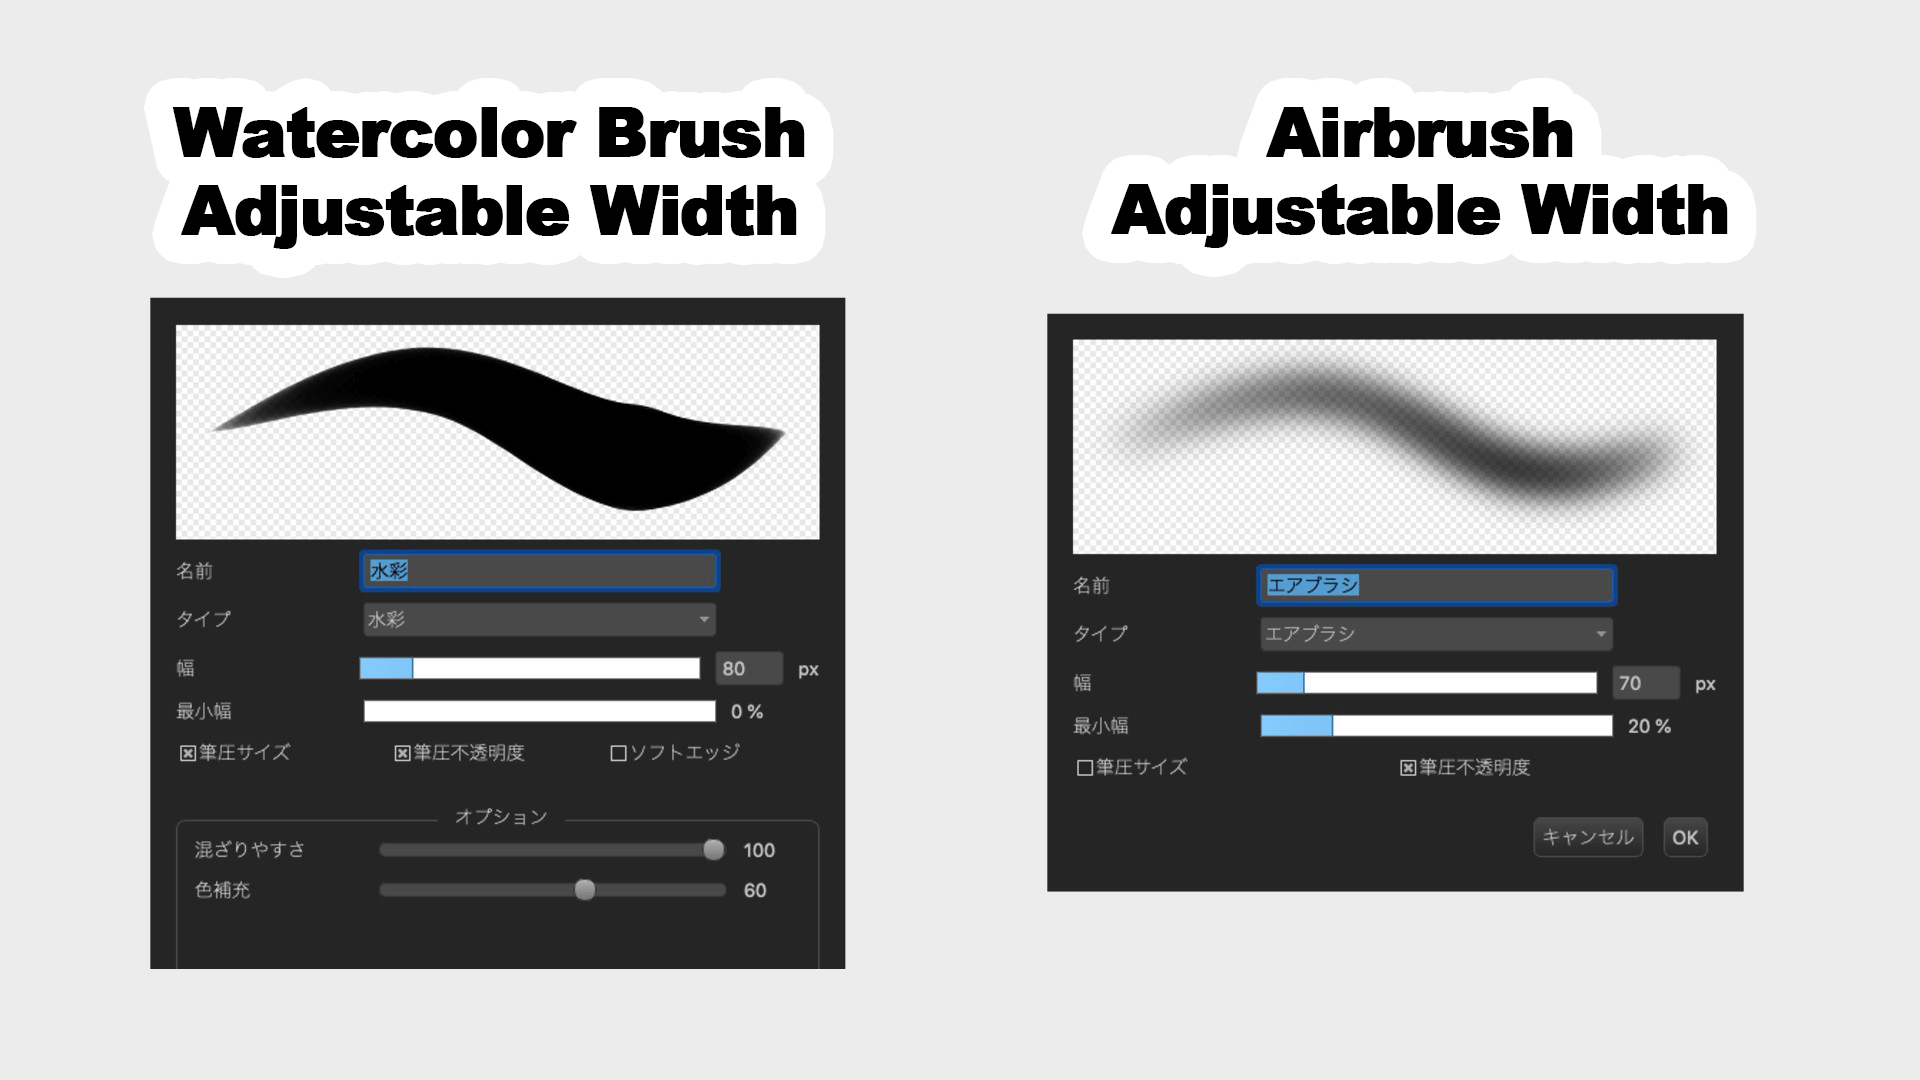
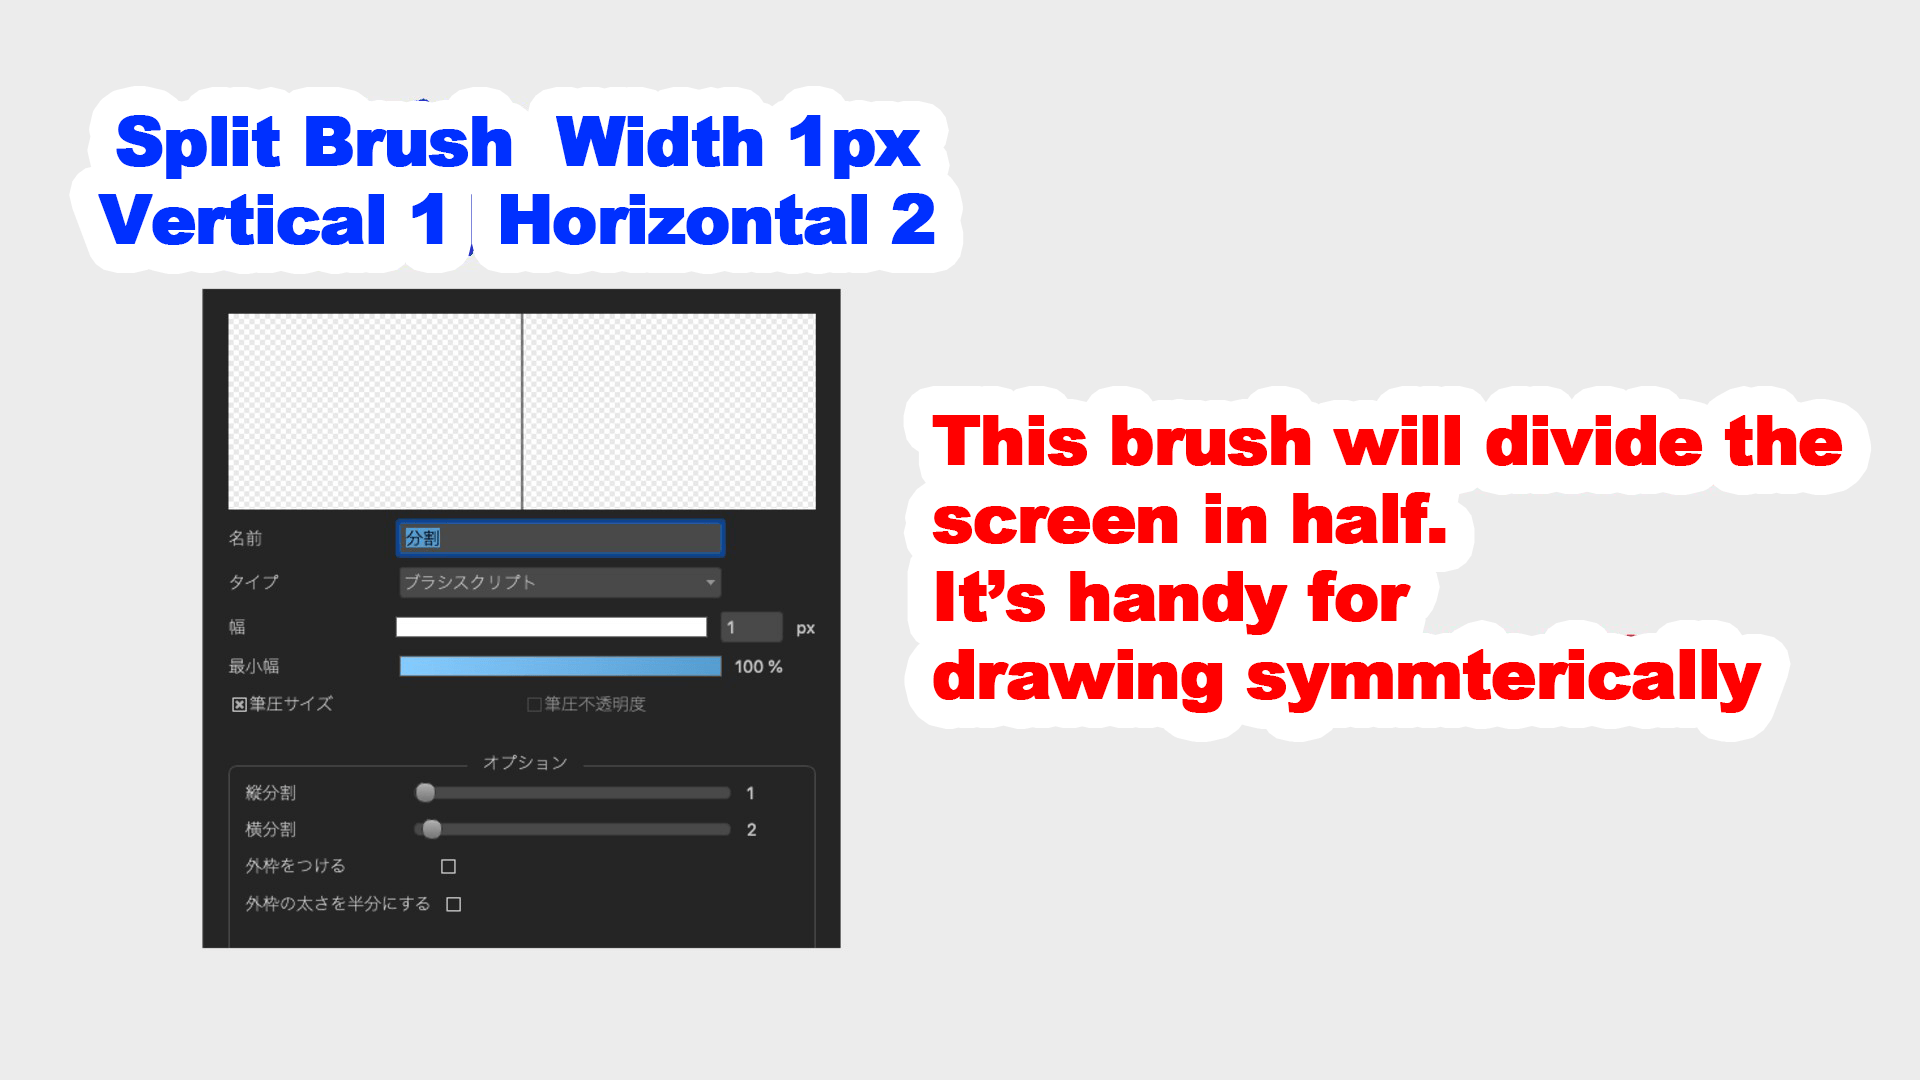
Here are the eight types of brushes I’ll be using.
The pen sizes are large, medium, small.
[Brush Opacity] Drafting on the left and coloring on the right.
One [watercolor type] pen on the left.
One airbrush type pen on the right.
And the split brush from [Cloud Brush].
If you are not certain about your preferences for the size of the image or the pen, you can use the same settings above to create a similar image.
Copy and use the same settings for the cloud split brush to draw with line in the center.
2, Draw the Draft
Let’s start with the most difficult part.
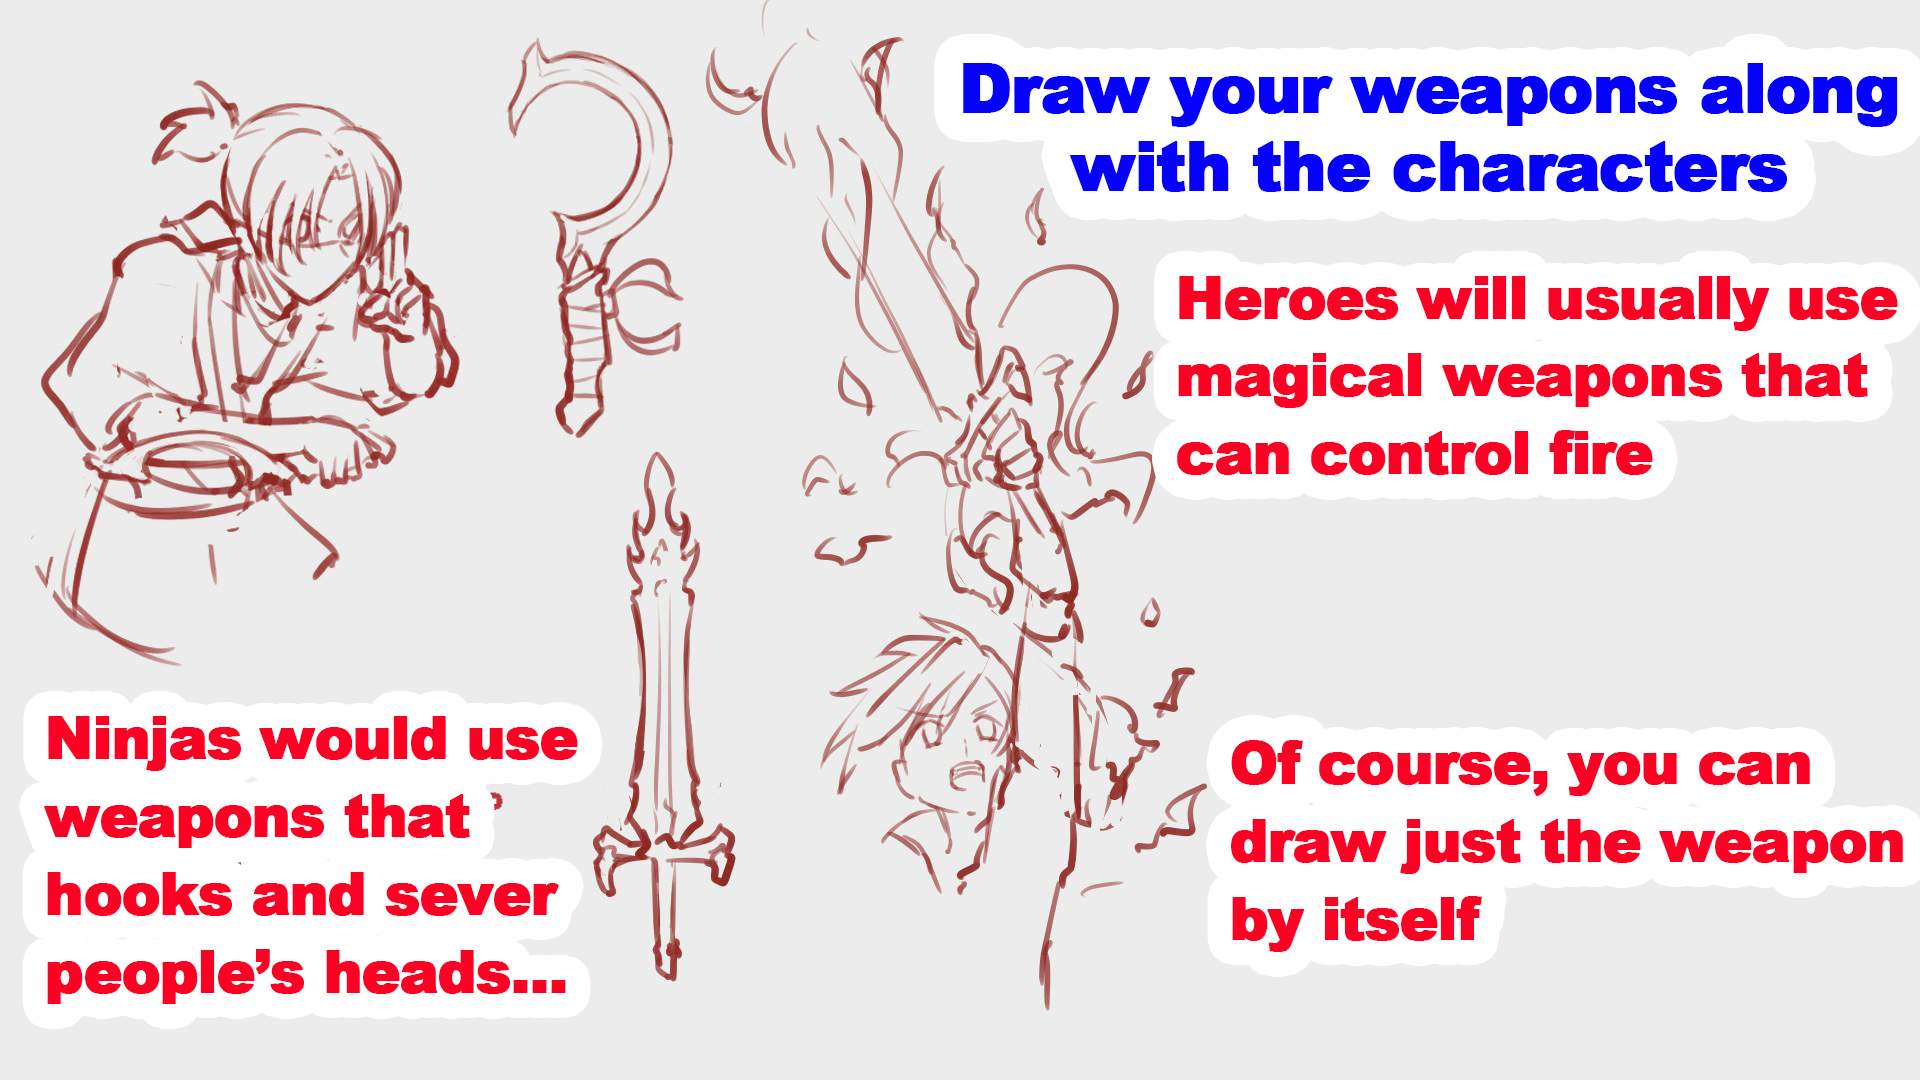
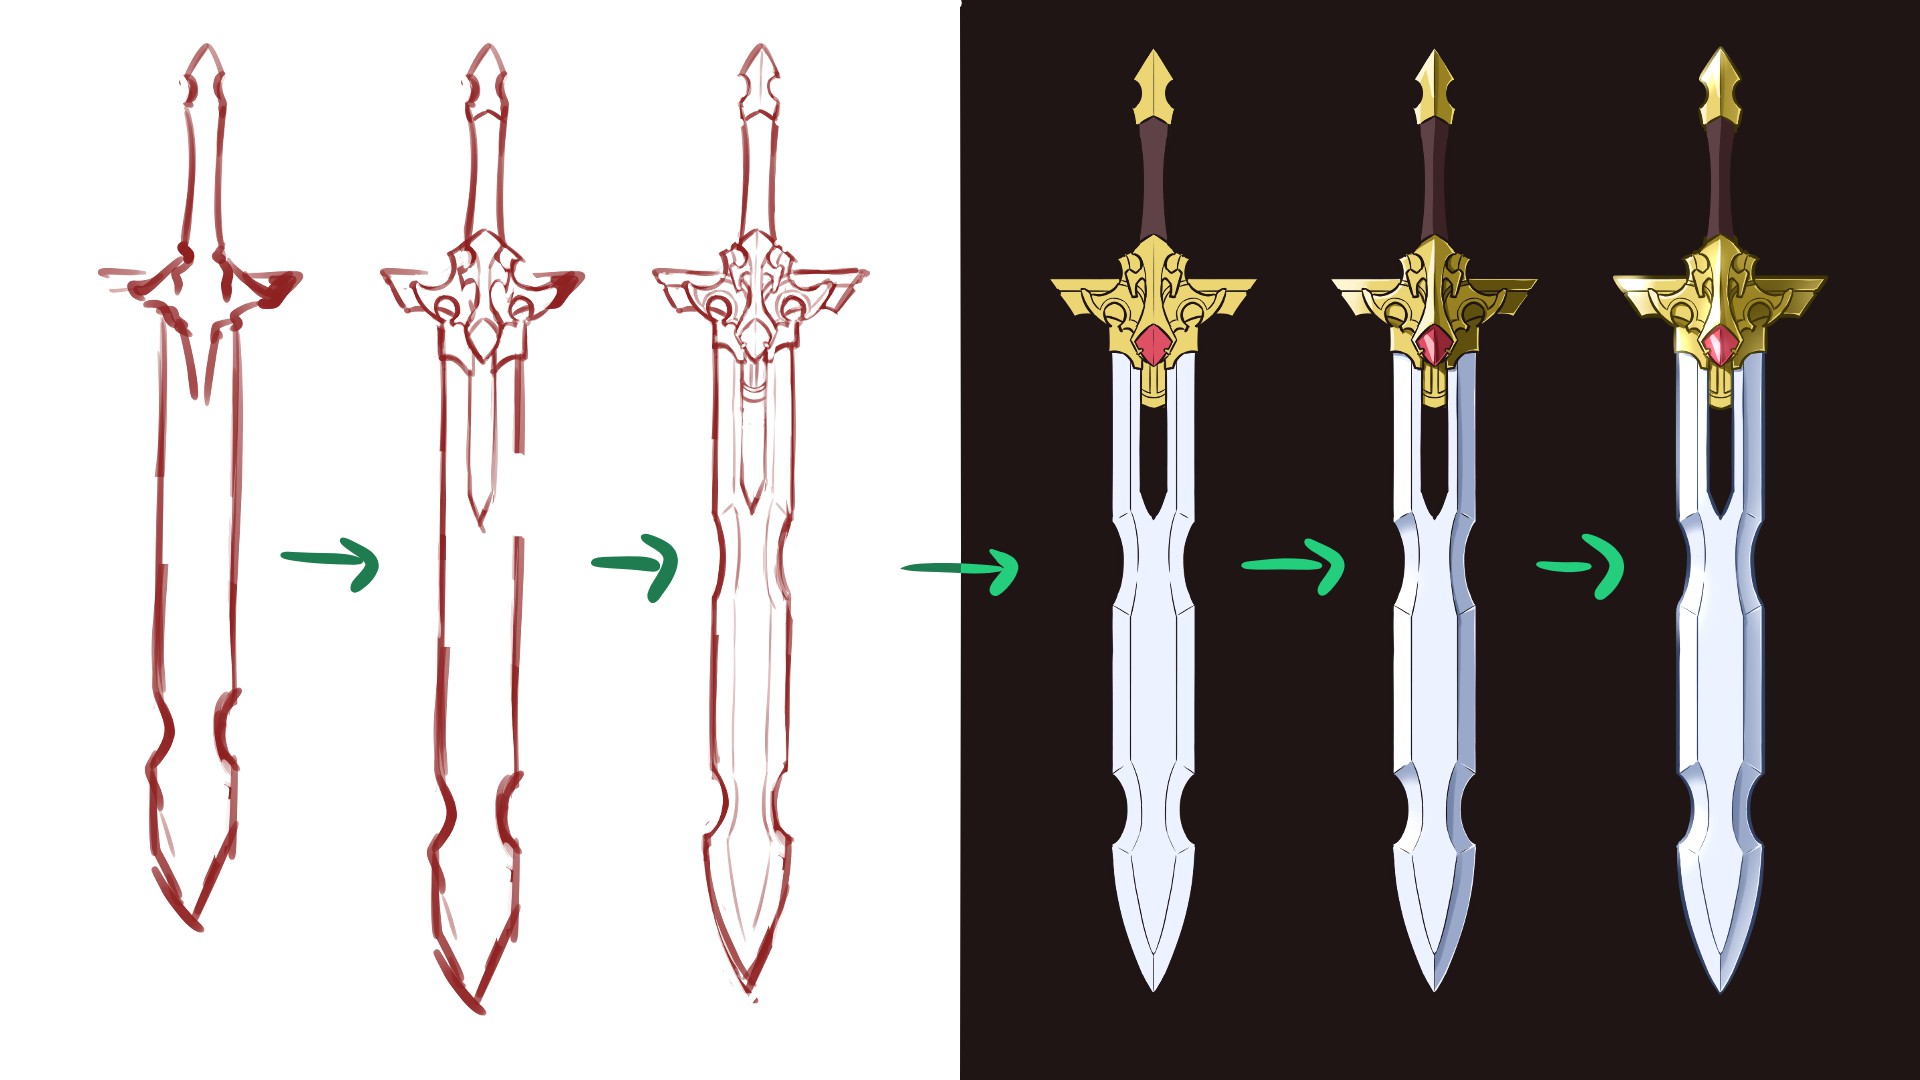
Think about what kind of weapon you want to make, and draw a rough draft.
After that, draw more pictures to match the image of the weapon.
The image of the weapon is also includes the image of the wielder, or the person who will handle the weapon.
“What kind of person will be use this weapon?, how will they wield it?”. More details mean more valuable future hints.
The weapon and its wielder are inseparable.
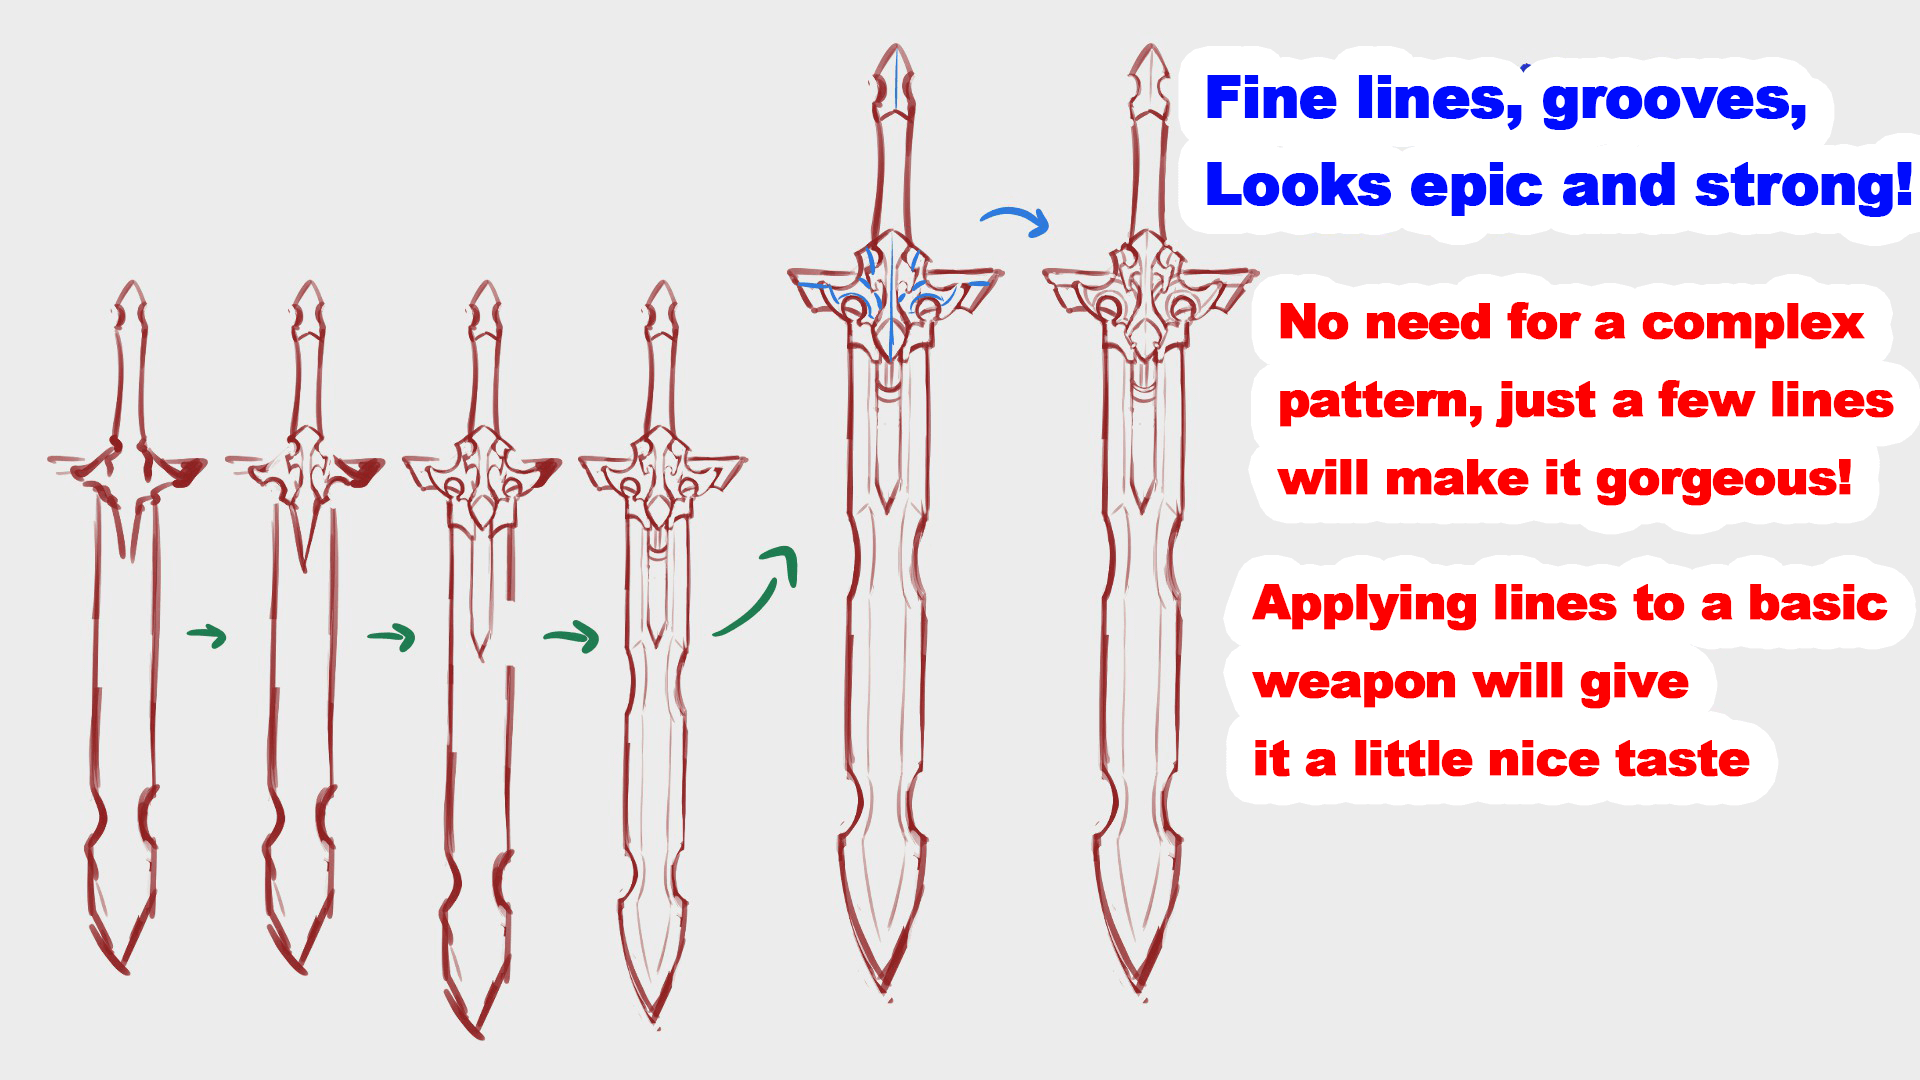
So let’s draw a sword with royal and gorgeous design this time!
If you want to decorate it with patterns and ornaments but lack the confidence, you can draw fine dents and lines to make it look cooler.
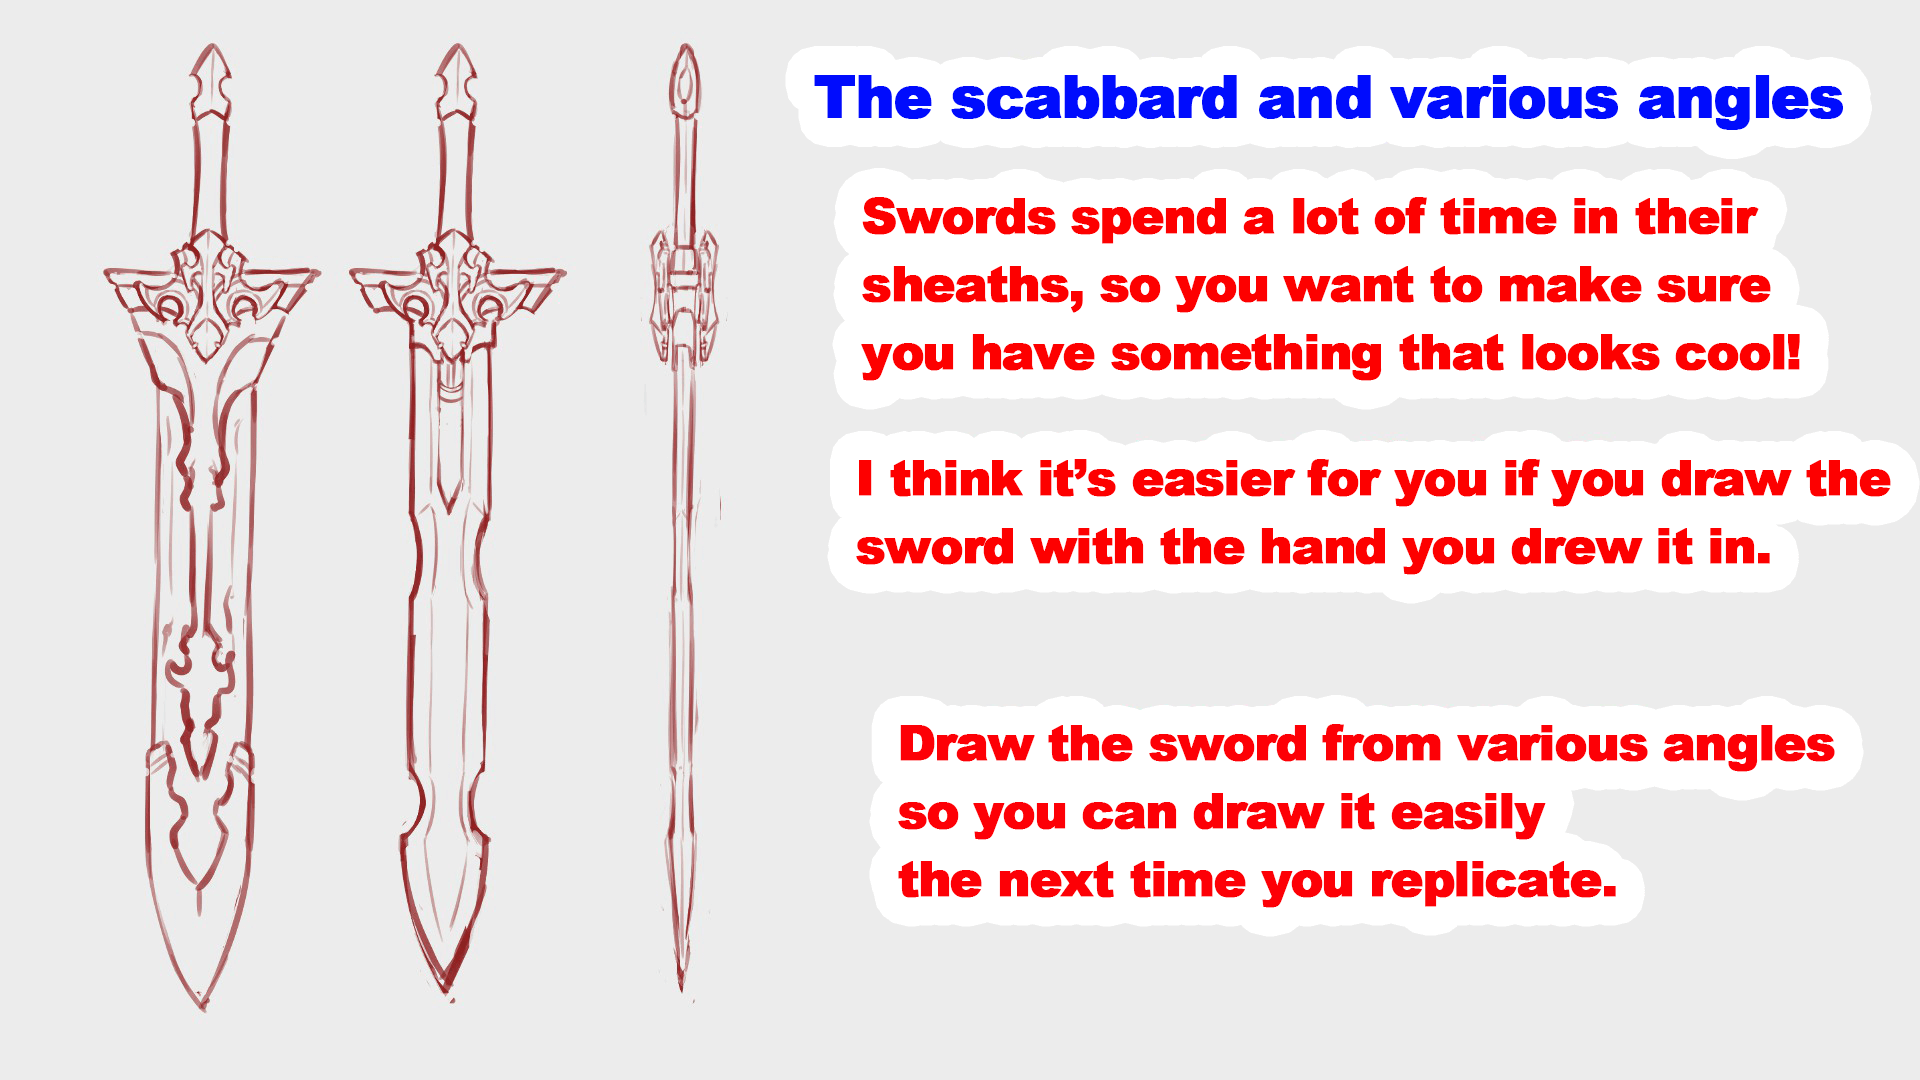
When you feel satisfied with the blade’s completion, draw the scabbard.
This will give you a rough completion of the sword as a whole.
If you draw the sword from various angles, it will be easier to visualize how the character will hold it.
There are many cases where the you find the sword shape strange, even if the initial drawing goes well… especially for me.
Don’t just stop by drawing the blade! If you think you’ve got what it takes, try drawing all of it!
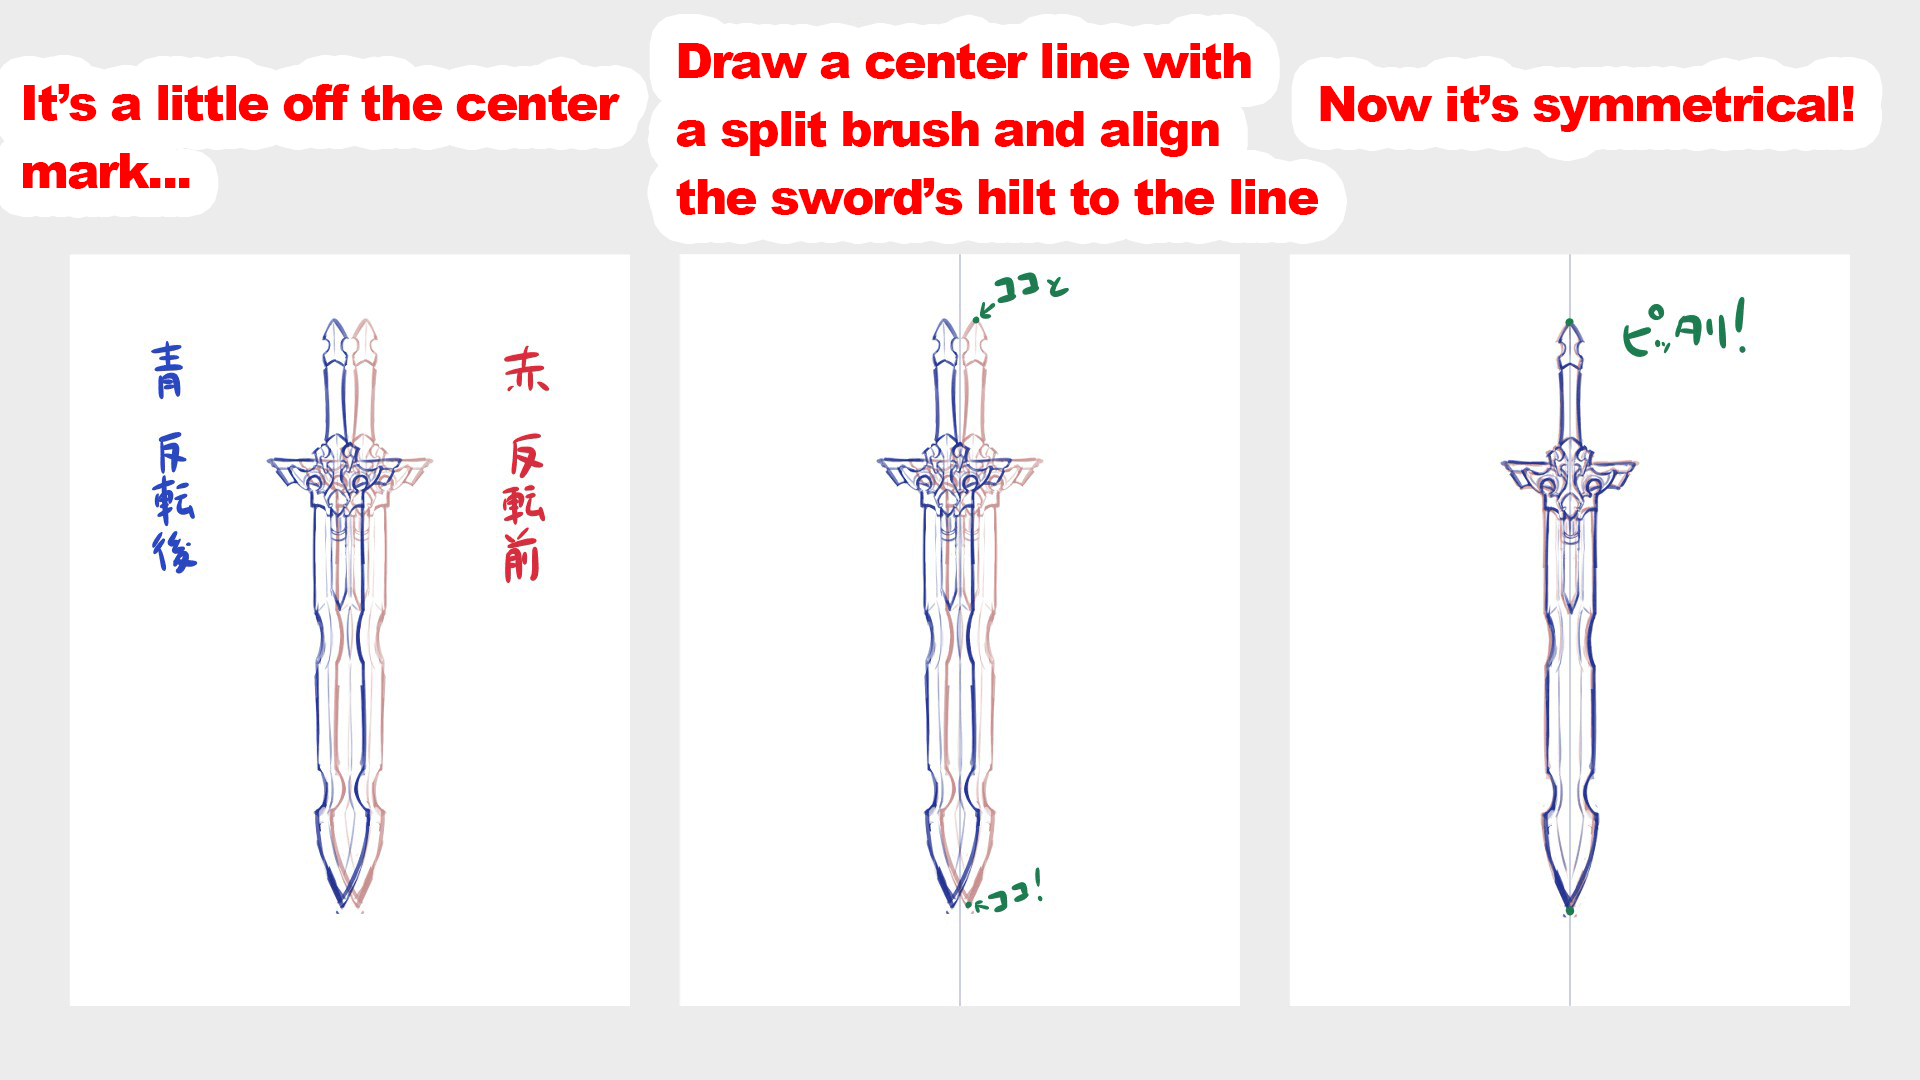
When the draft is complete, draw a line on a new [layer] with a split brush.
Just tap the screen, and a line will appear in the center! While looking at this line, move the weapon to the center.
If you feel the angle is off, use [Transform (Ctrl + T)] to rotate it.
You can also use [Flip (↓)] to see the difference between left and right.
Transformation and flipping are also useful for character drawings!
▼About【Layers】
Let’s use a Layer Function
3, Draw the Lines
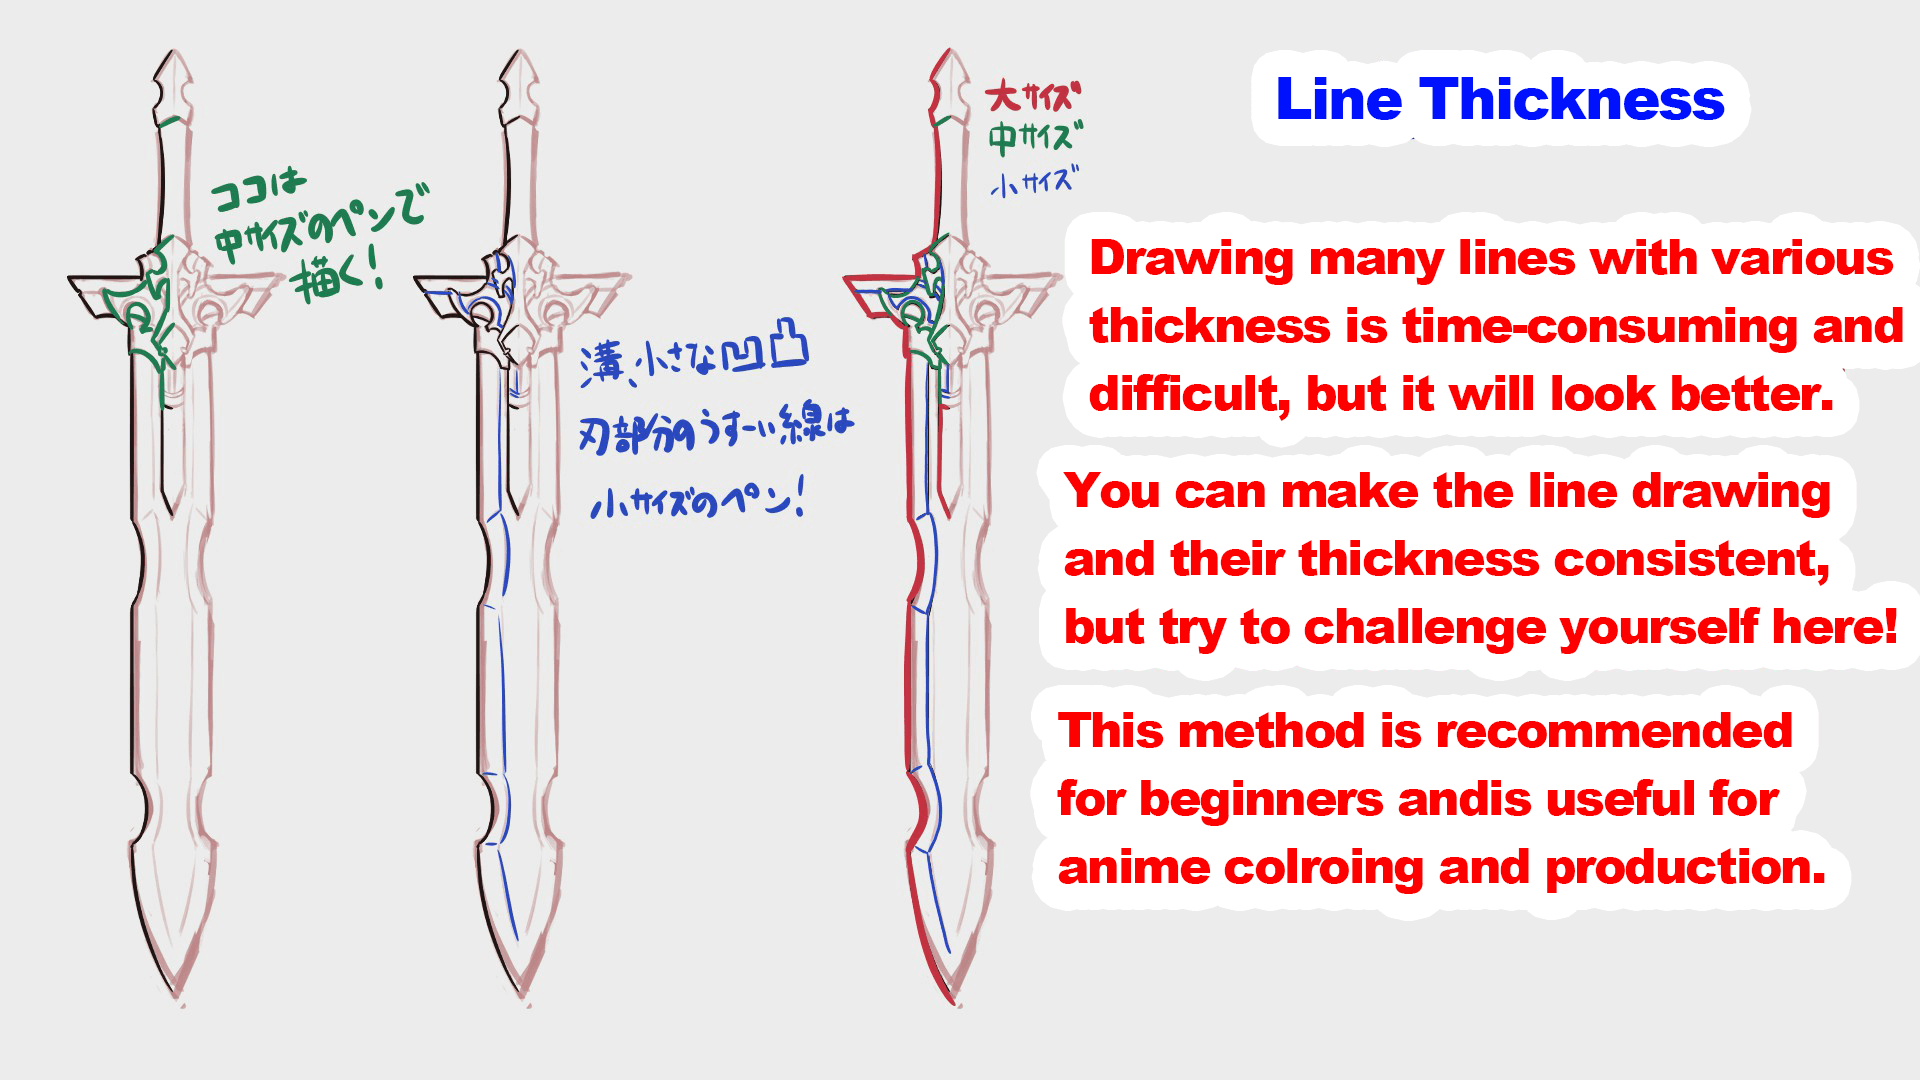
Use large, medium, and small pens to create your line drawings!
Use the large pen to draw the outermost outline, the medium pen to draw the inner outline, and the small pen to draw the fine lines.
Since we drew a symmetrical sword, let’s start with just one half!
Create a new layer and trace the rough draft.
Even if the sword is asymmetrical, there will be some common parts such as the width of the blade and hilt, so let’s draw those first!
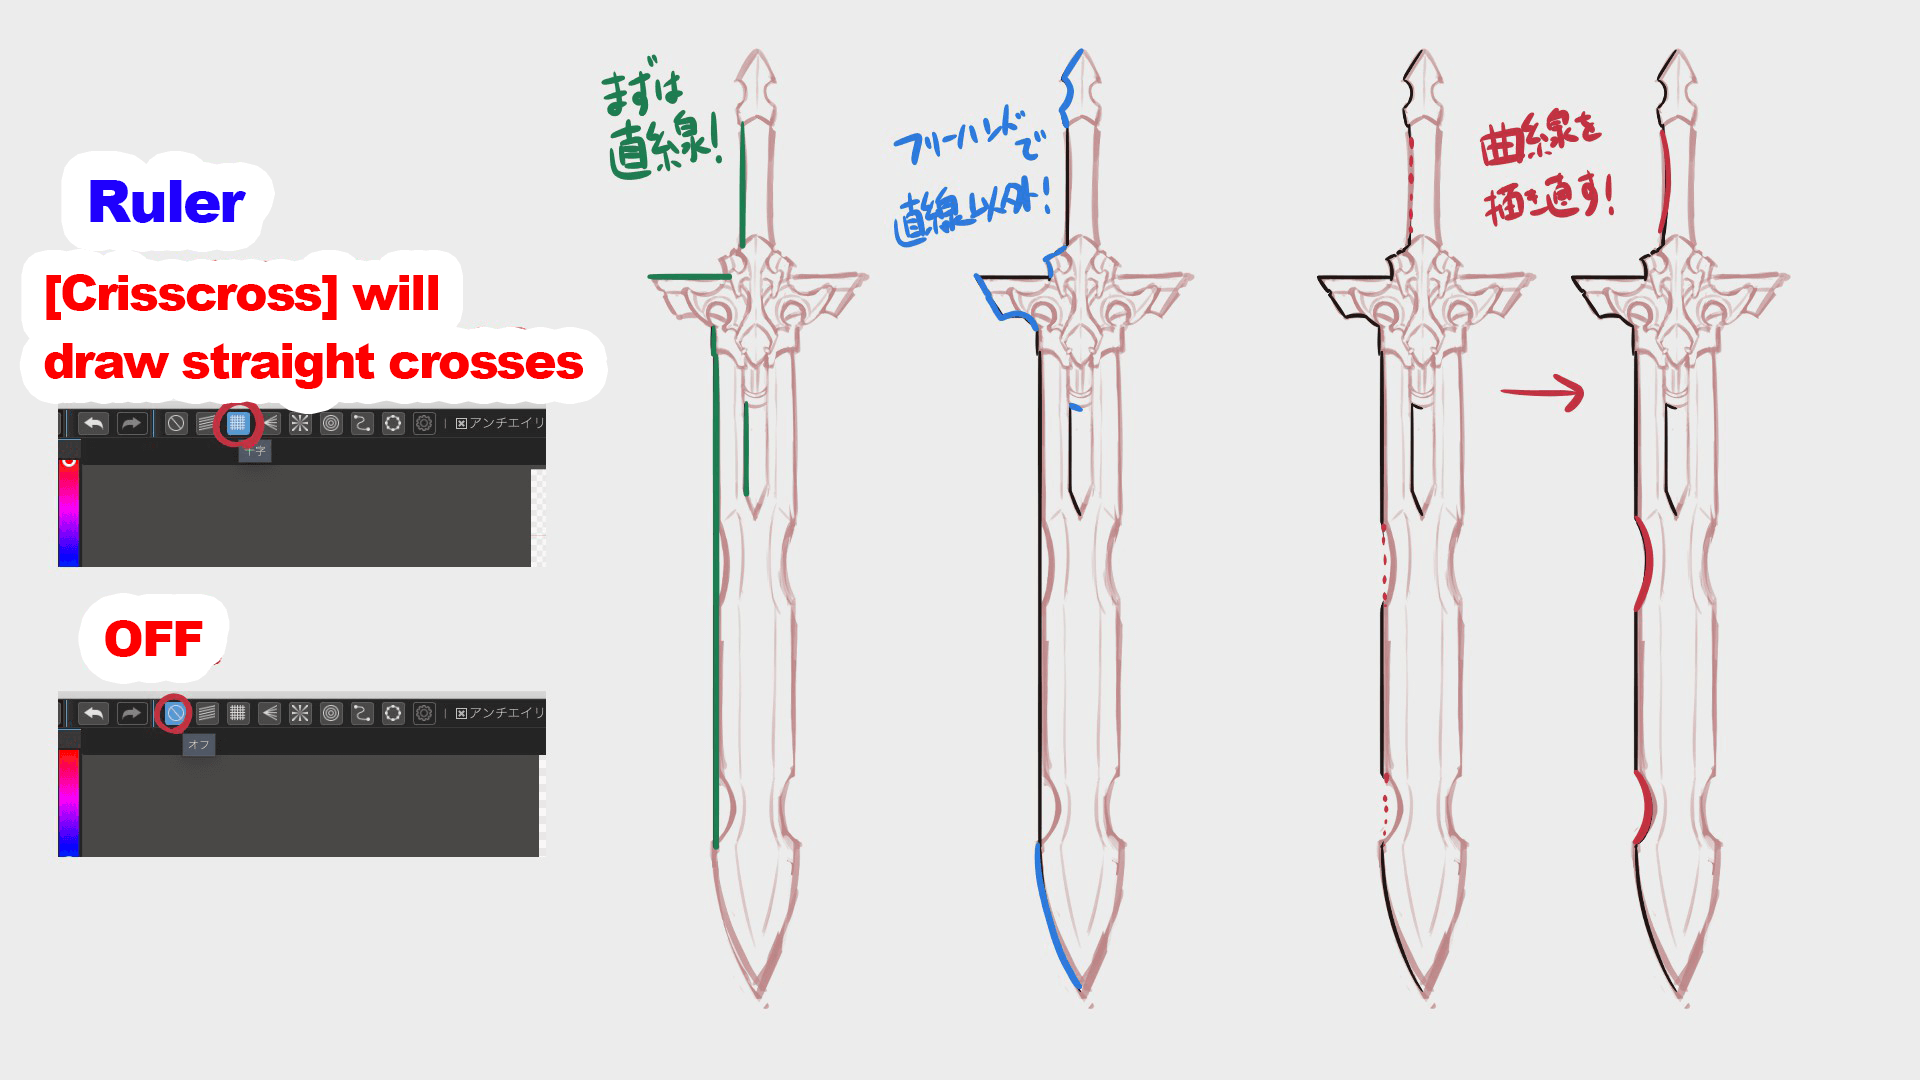
Here, we will use the [Ruler] function to draw straight lines.
There may be a bend in the middle of the line, but it is nicer to draw the same straight line all together.
Once the straight line is drawn, set the ruler to [Off (1)] and start drawing the other parts of the line.
There are rulers that can draw diagonals and curves, but if they are too short, you can draw them by hand.
After that, once you’ve drawn the straight line, erase it and make it a curve!
I did say the “inner outline,” but I guess you could find it if I say the “not too detailed part…”?
Use a medium pen to draw it.
The small pen is used for grooves and fine lines.
If it’s too difficult to use the small pen, use the same line for everything except the outline.
Once you have drawn half of the image, copy it (Command + C) and paste it (Command + V).
To flip the pasted layer, go to [Layer] > [Rotate] and select [Flip Left/Right].
Then, make some minor adjustments and your line drawing is ready!
There is also a way to draw directly using the Cloud Brush [Line Symmetry] without flipping.
You can draw it in any way you like.
▼Using the【Symmetry】Brush!
Symmetry Pen Tips! Let’s Draw Antique Key!
4, Paint the Colors
Not just line drawings, but detailed coloring instructions can be found in the article I wrote before. The main focus of this article is on characters, so if you want to draw with me, I’d be happy if you could read it once if you want to draw with me!
【For Beginners】Let’s make our own child! Part 2 【Original Character】
First, paint with the color you have in mind.
If the line drawing is closed, you can also use [Bucket (G)].
Create a new layer under the line drawing.
It is easier to draw if you separate the layers by color.
After painting the colors, it’s time to create the shadows.
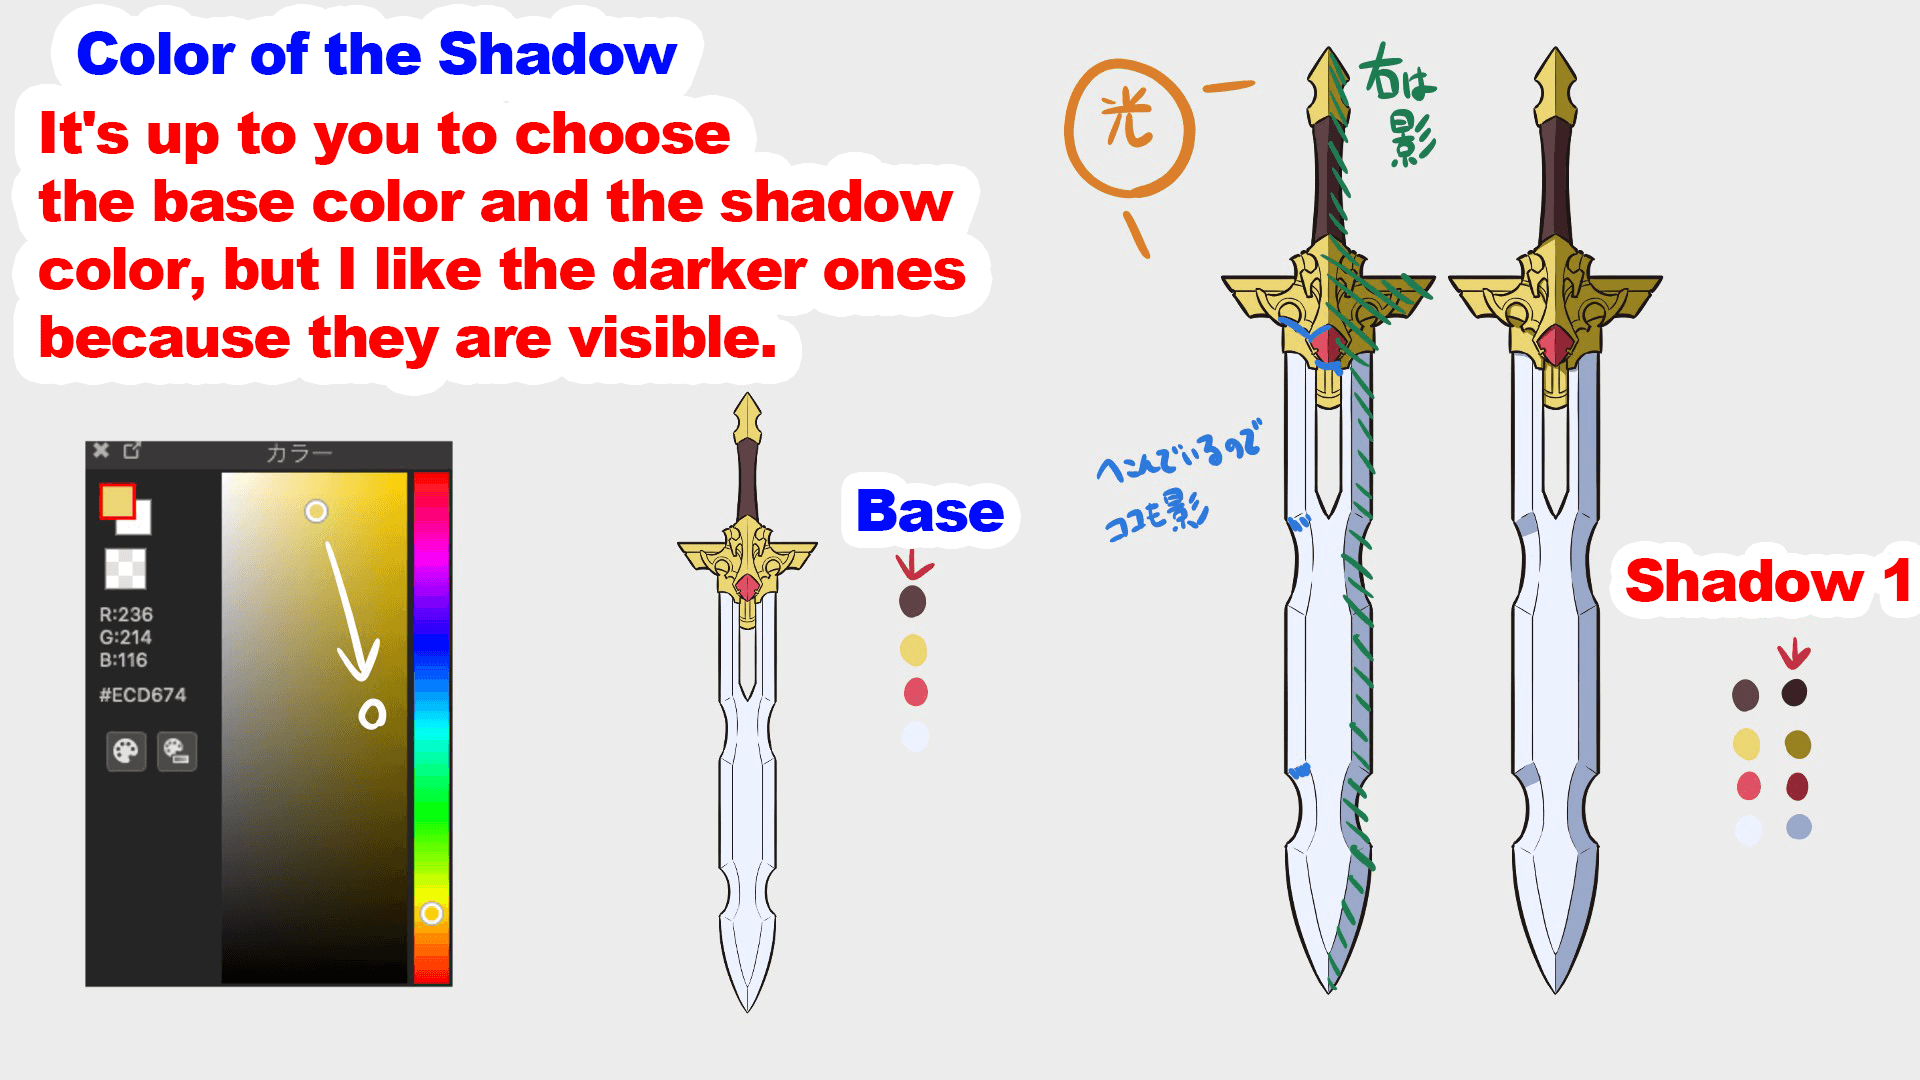
There’s nothing cooler than a bold shadow, so let’s make the right half a shadow!
If the right side is in shadow, it means that the light is coming from the left side.
In this case, it’s safe to use the upper left as the light source, so let’s draw it that way.
I recommend that the color of the shadow be diagonally right below the base color (shadow 1).
Instead of painting directly on the color layer, create a new layer and [clipping] it so that you can paint without sticking out!
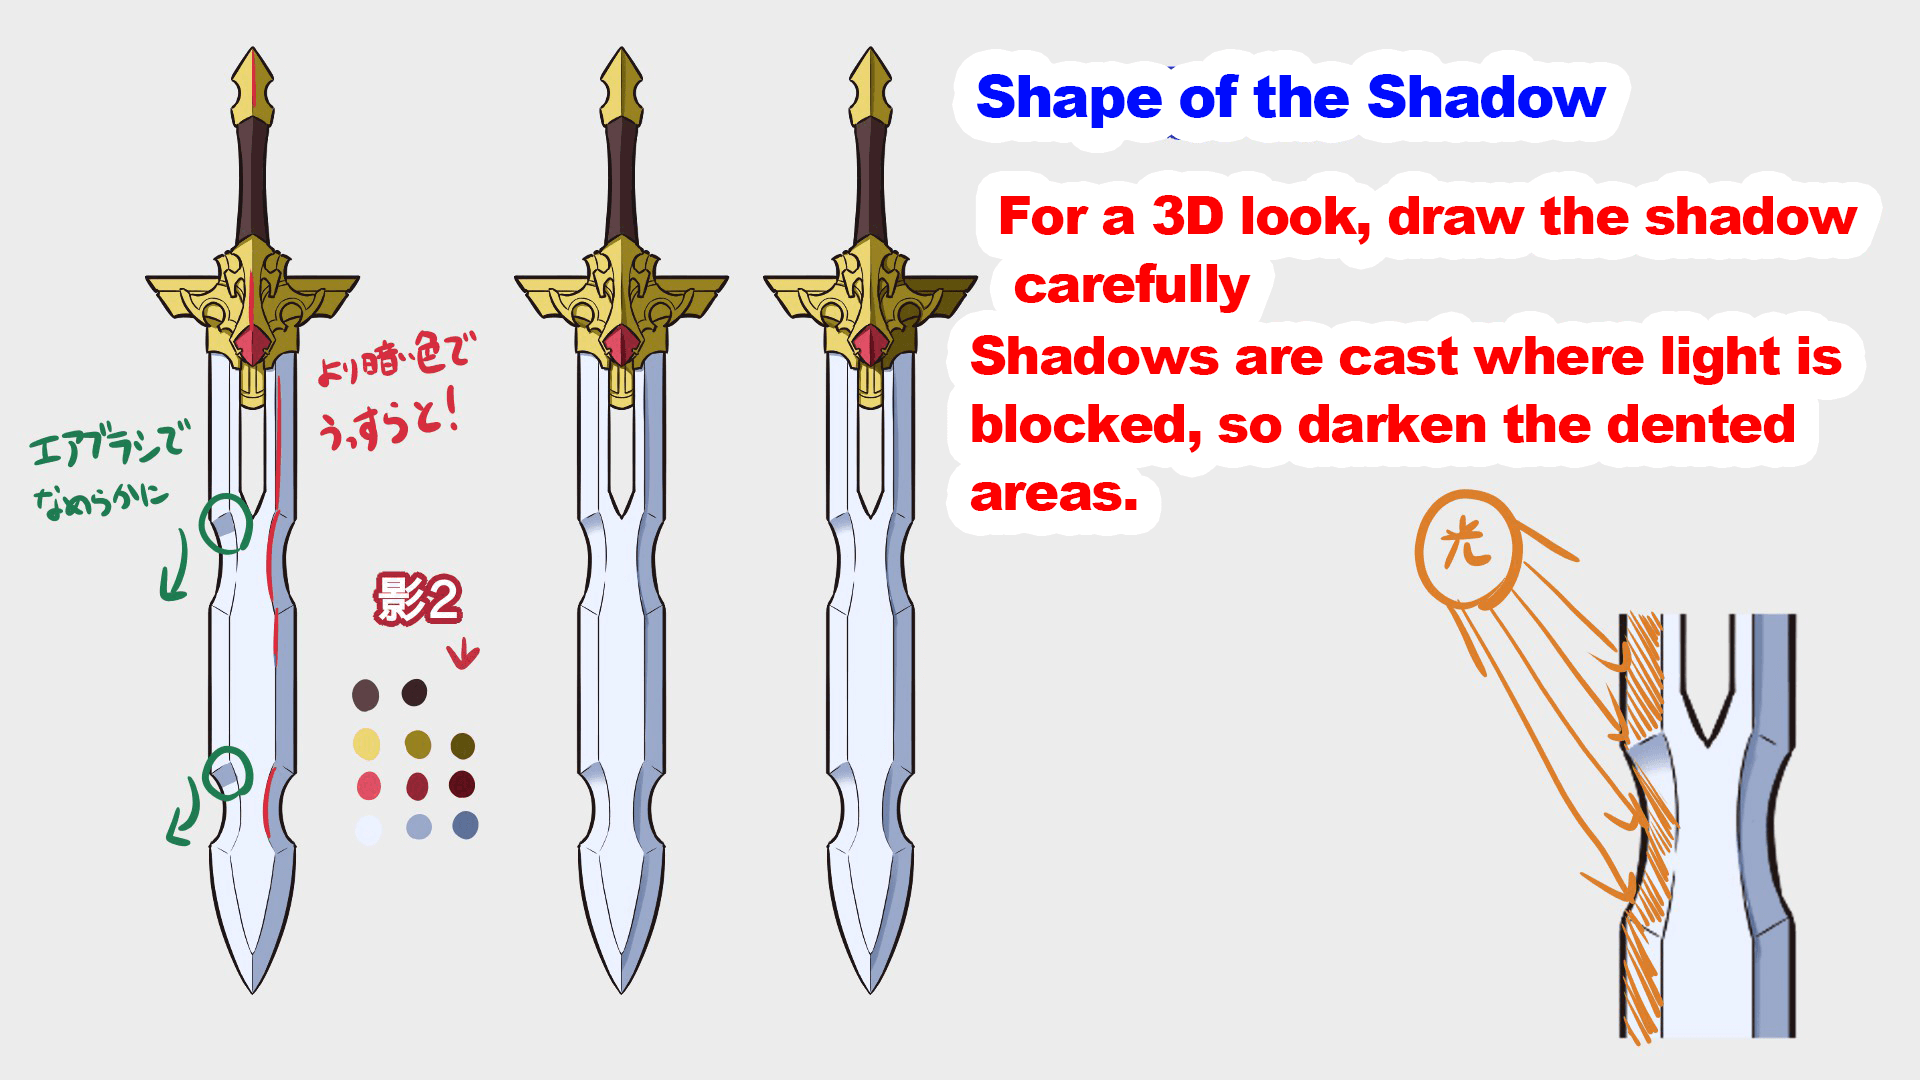
Paint the border of the color with the color diagonally further down to the right (shadow 2).
The brush is a watercolor. If you paint just a little, it will look a little more 3D.
But I want a little more, so I’ll fill in the right side of the image.
This is a color brush.
The shadows on the curved blade will gradually light up depending on the angle.
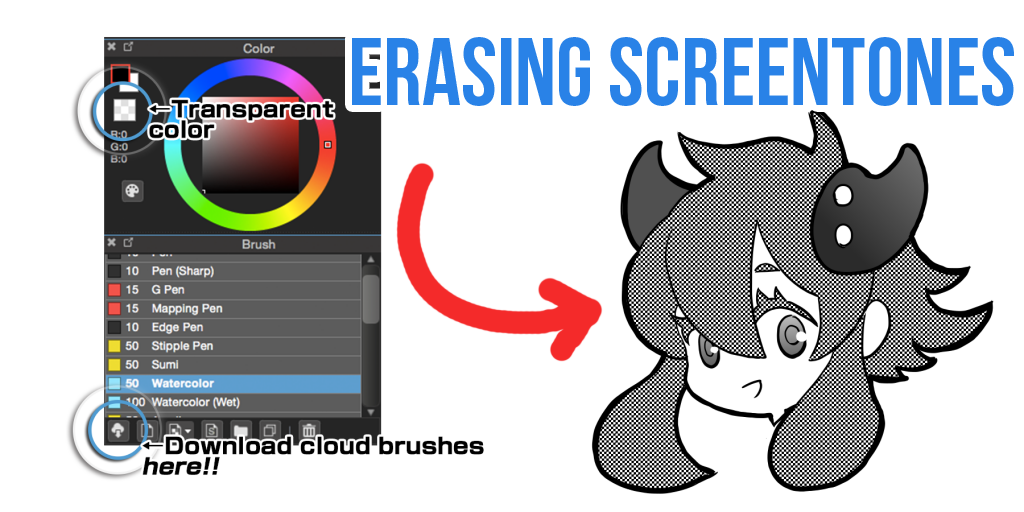
Let’s set the brush color to [transparent color (shift + Z)] and use the airbrush to smooth it out!
Now use the paint brush to scrape a little of the edge of the shadow on the right side.
When you remove the shadow, the bright base color comes out, so you can easily create a reflective effect!
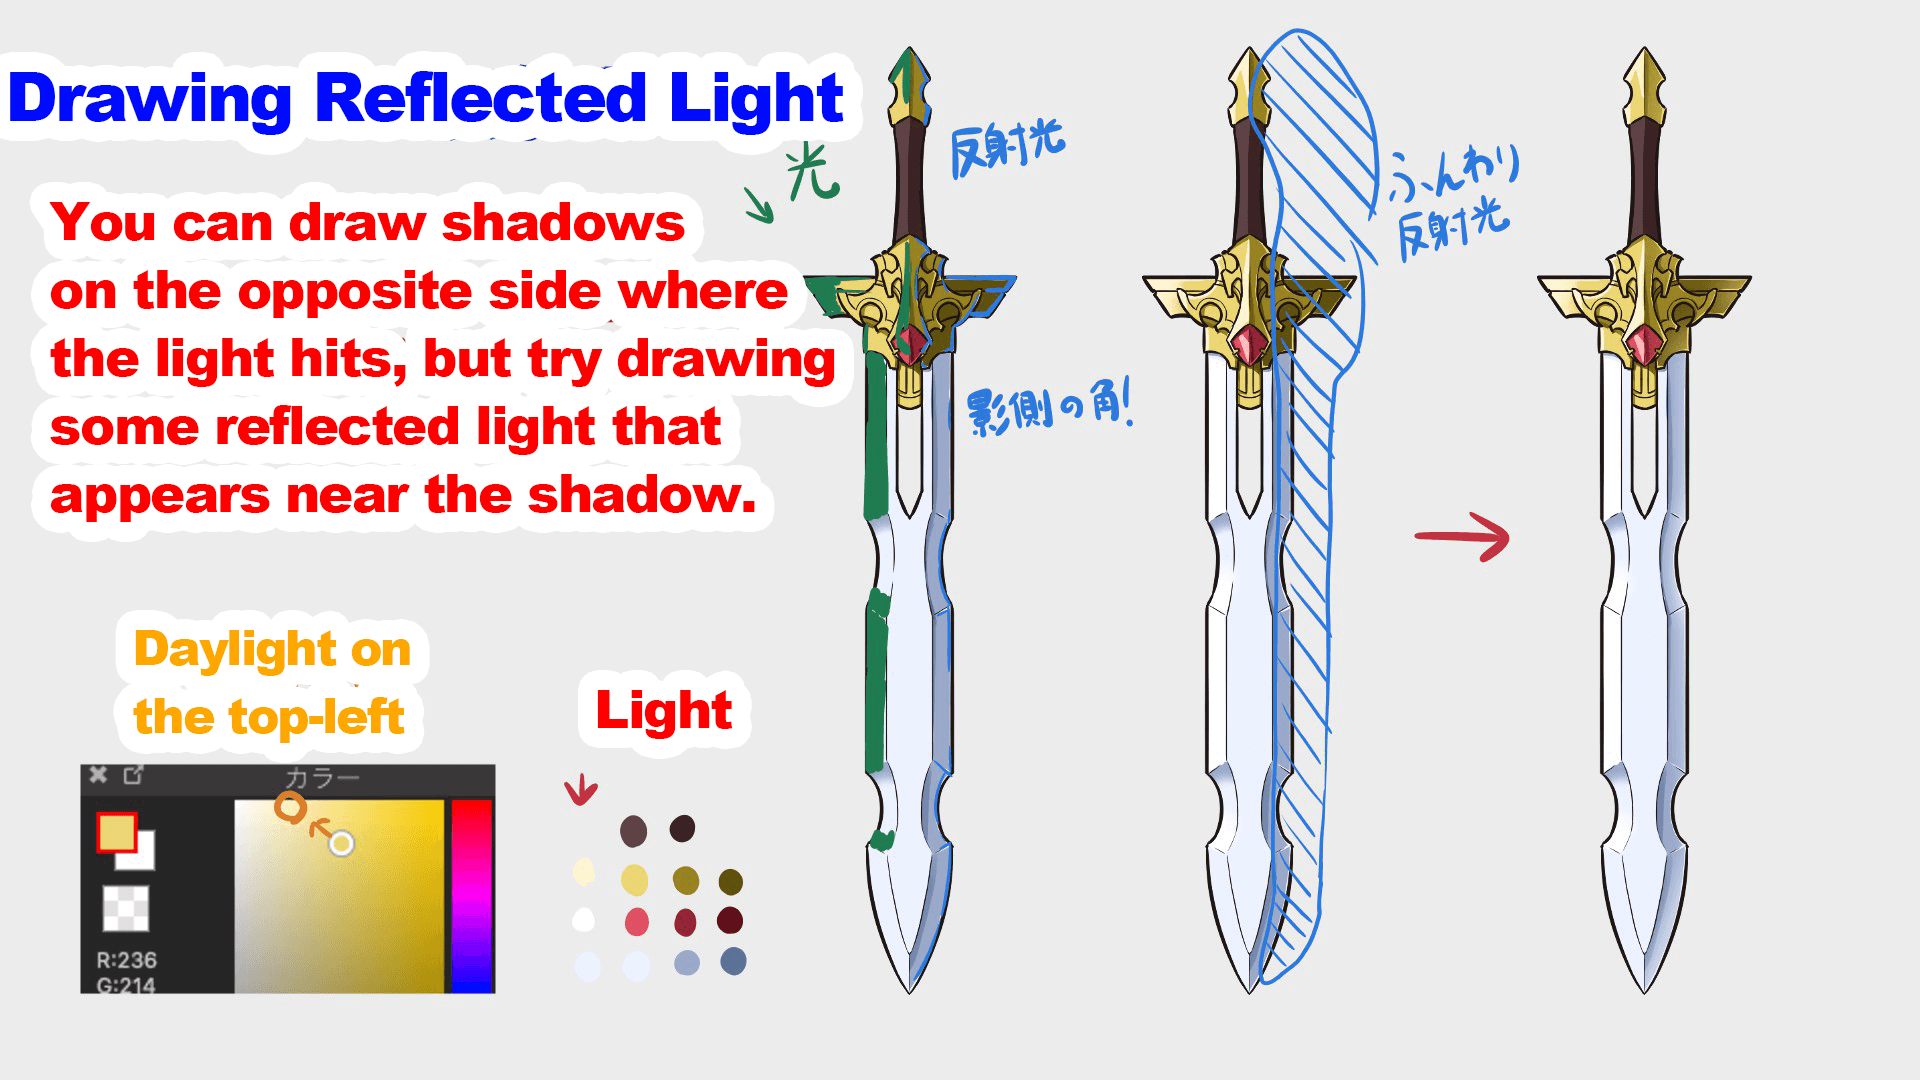
Let’s draw the light as well. Contrary to when we painted the shadow, let’s make the left side glow.
For a more reflective effect, let’s shave the right side softly in the same way we smoothed the curved shadow earlier.
At first glance, you may think that it is enough to shine the light only in the direction of the light source. However, there is something called reflected light that is vital in this world.
As the name implies, this is “light reflected from elsewhere,” so it would be strange if there were no reflected objects nearby.
Don’t worry about the details too much, just remember that corners are supposed to glow, and you’re a master of metal!
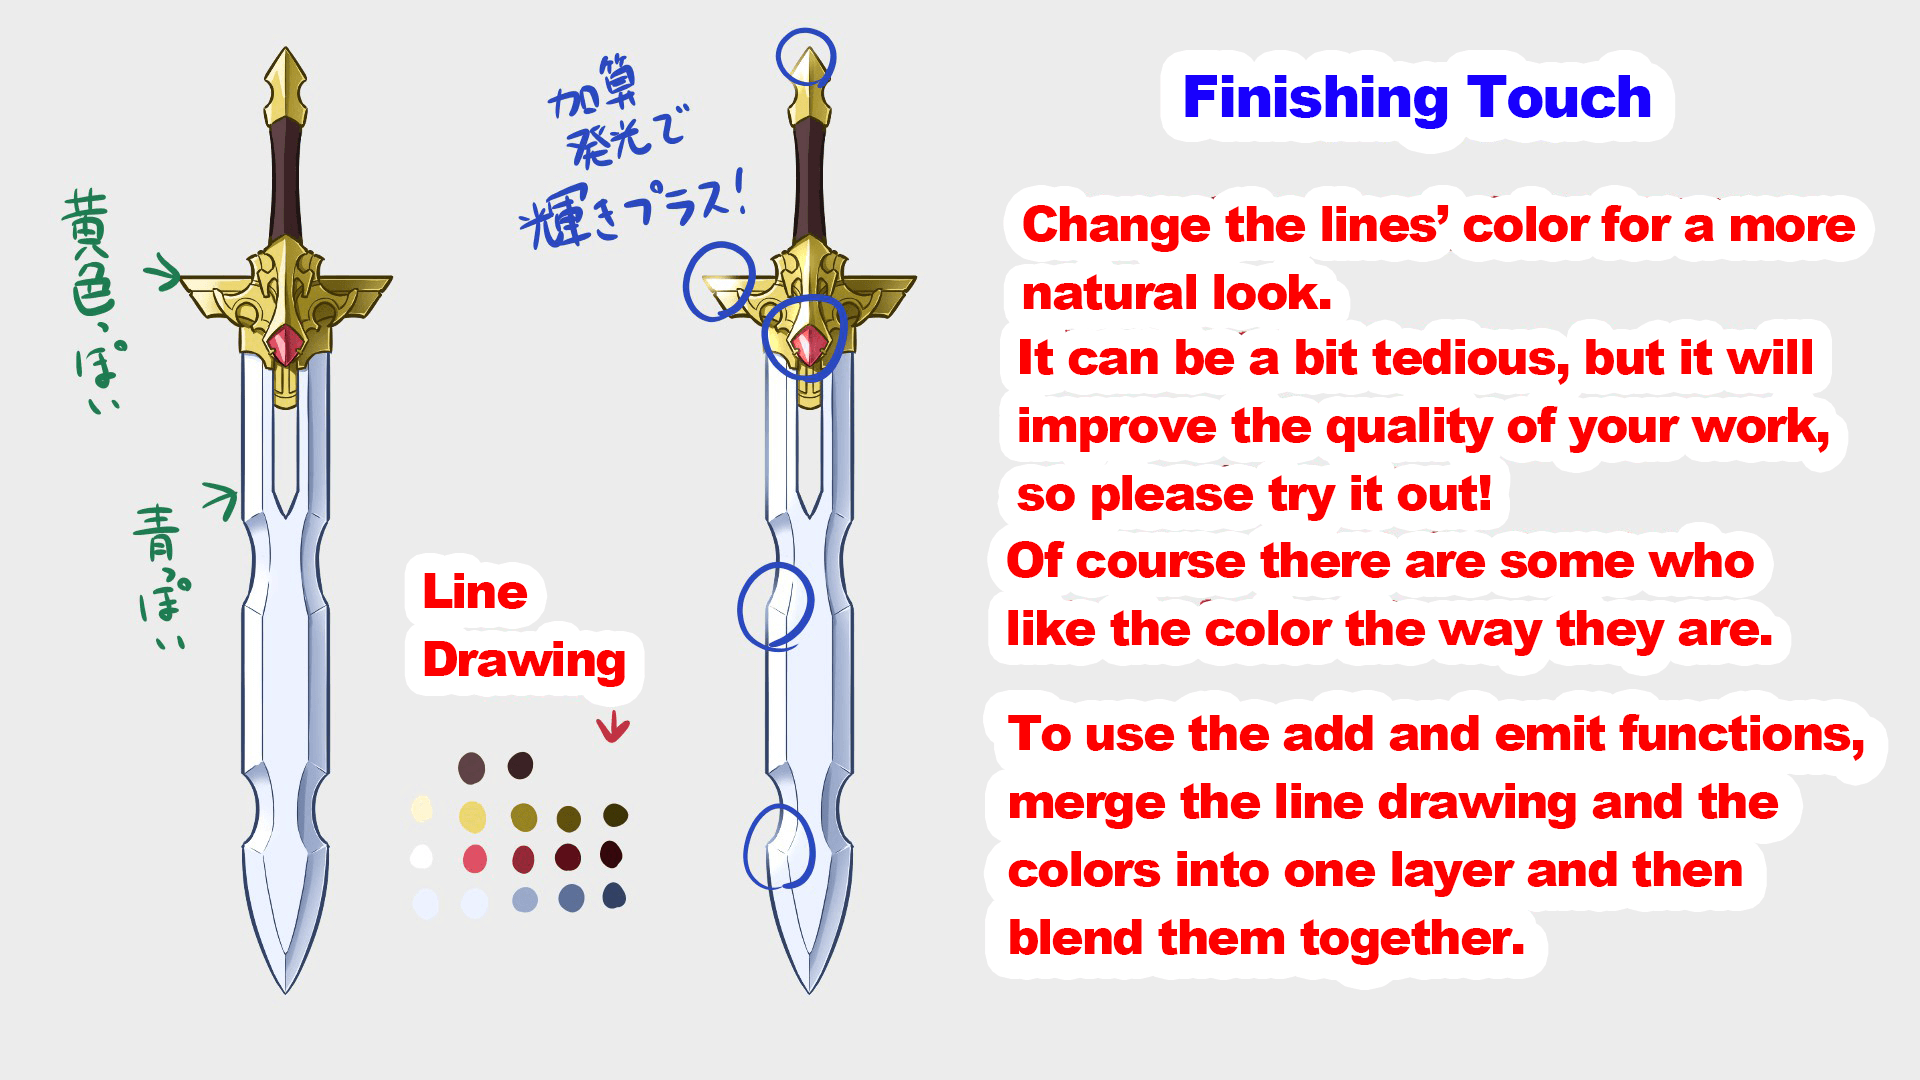
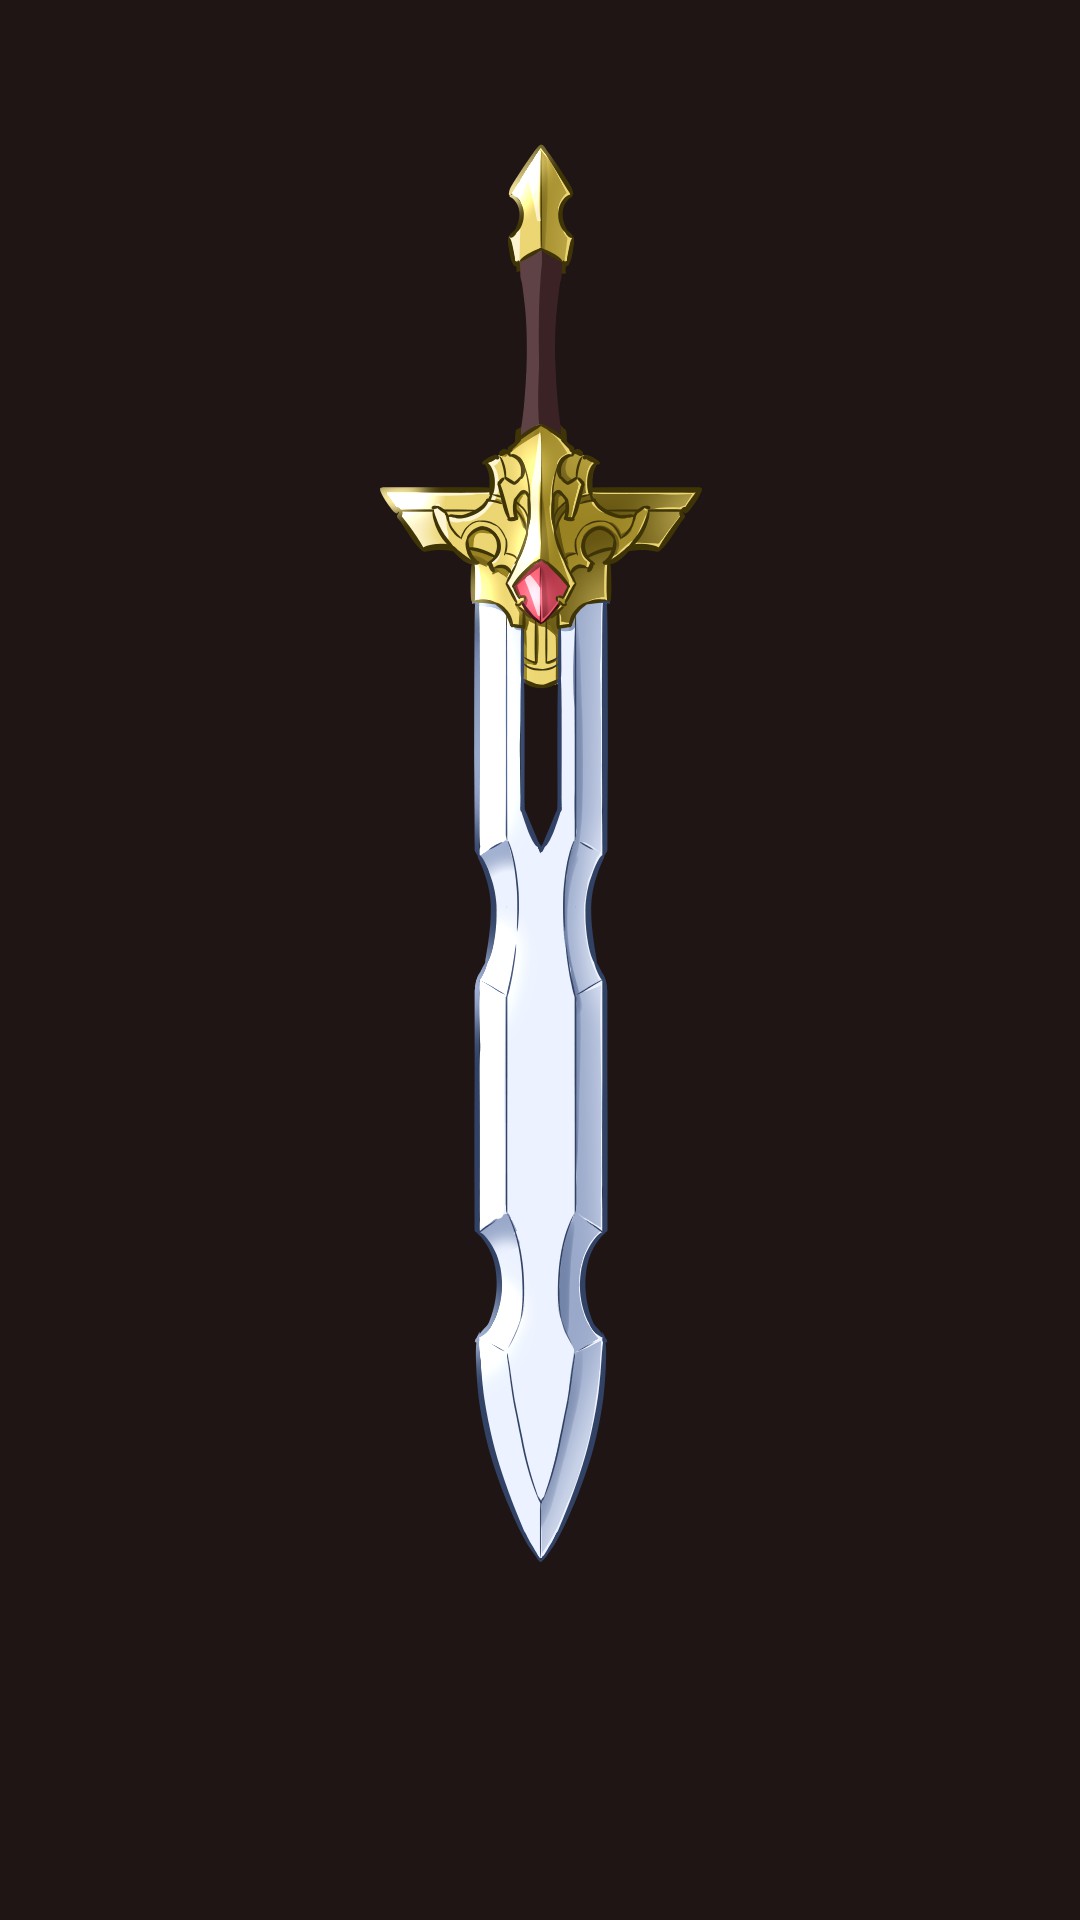
Finally, you can change the color of the line drawing by changing the layer’s [Protect Transparency], or make it glow as much as possible by changing the layer’s [Blend] to [Add/Flash], or make any other adjustments you like, and your weapon is ready!
How did it go?
Have you completed your ideal weapon?
Weapons are the romance of those who are fascinated by cool heroes, and at the same time, they are tools that cannot be separated from the exchange of life, whether it is hunting or fighting.
If good and evil are determined by the mind of the person wielding the weapon, then the true value of romance will be tested by those of us who depict all of these things.
What does that mean, I wonder? I’m not sure what I’m saying anymore.
Anyway, enjoy your drawing!
And thanks for reading!
(Texts・Pictures/Clock)
Twitter https://twitter.com/Clock1231
\ We are accepting requests for articles on how to use /

